

Growing Kale Benefits: Unlocking the secrets to a thriving, nutrient-packed garden is easier than you think! Have you ever dreamt of stepping outside your back door and harvesting fresh, vibrant kale for your salads, smoothies, or even a delicious kale chip snack? I know I have! For centuries, kale has been a staple in diets around the world, from the hearty stews of medieval Europe to the health-conscious kitchens of today. Its resilience and nutritional power have made it a beloved crop, and now, I’m here to show you how to easily cultivate this superfood in your very own backyard.
But why should you bother with growing kale benefits at home? Well, store-bought kale can be expensive, and sometimes, it just doesn’t have that same fresh, vibrant flavor. Plus, knowing exactly where your food comes from and how it’s grown is incredibly rewarding. In this article, I’m going to share some simple, yet effective DIY tricks and hacks that will transform even the most novice gardener into a kale-growing pro. Get ready to discover the joy of harvesting your own delicious and nutritious kale – it’s easier than you think!
Growing Kale: A Beginner’s Guide to a Bountiful Harvest
Hey there, fellow gardeners! I’m so excited you’re thinking about growing kale. It’s one of my absolute favorite things to cultivate – not only is it incredibly nutritious, but it’s also surprisingly easy to grow, even if you’re a complete beginner. Plus, fresh kale from your own garden tastes *amazing*. This guide will walk you through everything you need to know, from choosing the right variety to harvesting your leafy greens. Let’s get started!
Choosing Your Kale Variety
Before you even think about planting, you need to decide what kind of kale you want to grow. There are tons of different varieties, each with its own unique flavor, texture, and appearance. Here are a few of my personal favorites:
* **Curly Kale (e.g., ‘Dwarf Blue Curled Vates’):** This is probably the kale you’re most familiar with. It has tightly curled, blue-green leaves and a slightly bitter flavor that mellows out when cooked. It’s super hardy and productive.
* **Lacinato Kale (aka Dinosaur Kale or Tuscan Kale):** This variety has long, narrow, dark green leaves with a bumpy texture. It’s a bit milder and sweeter than curly kale, and it holds up really well in soups and stews.
* **Red Russian Kale:** This kale has flat, fringed leaves with purple stems and veins. It’s tender and sweet, especially when young, and it adds a beautiful pop of color to your garden.
* **Redbor Kale:** If you want something truly ornamental, Redbor kale is the way to go. Its deeply ruffled leaves are a vibrant purple color, and it gets even more intense in cold weather. It’s also edible, though it can be a bit tougher than other varieties.
* **Chinese Kale (Gai Lan):** This is a different species than the other kales, but it’s still delicious and easy to grow. It has thick, flat, blue-green leaves and small flower heads, similar to broccoli. It’s often used in stir-fries.
Consider your taste preferences and the space you have available when choosing your kale variety. Some varieties get quite large, so make sure you have enough room for them to spread out.
Preparing Your Garden Bed
Kale thrives in well-drained soil that’s rich in organic matter. Here’s how I prepare my garden bed for kale:
* **Sunlight:** Kale needs at least 6 hours of sunlight per day. Choose a spot in your garden that gets plenty of sun.
* **Soil Testing:** It’s always a good idea to test your soil before planting anything. This will tell you what nutrients are lacking and what amendments you need to add. You can buy a soil testing kit at most garden centers or send a sample to your local agricultural extension office.
* **Soil Amendment:** Kale prefers a slightly acidic to neutral soil pH (around 6.0 to 7.0). If your soil is too acidic, you can add lime to raise the pH. If it’s too alkaline, you can add sulfur to lower it. I usually add a generous amount of compost to my soil to improve drainage and fertility. Aged manure is also a great option.
* **Tilling/Digging:** Loosen the soil to a depth of at least 12 inches. This will make it easier for the kale roots to grow. Remove any rocks, weeds, or other debris.
* **Fertilizing:** Before planting, I like to add a slow-release fertilizer to the soil. This will provide the kale plants with a steady supply of nutrients throughout the growing season. Look for a fertilizer that’s high in nitrogen, which is essential for leafy green growth.
Starting Kale from Seed vs. Transplants
You can start kale from seed either indoors or directly in the garden, or you can buy transplants from a nursery. Here’s a breakdown of each method:
* **Starting from Seed Indoors:** This is a good option if you want to get a head start on the growing season, especially if you live in a colder climate.
1. **Sow Seeds:** Sow the seeds in seed trays or small pots filled with seed-starting mix about 6-8 weeks before the last expected frost. Plant the seeds about 1/4 inch deep.
2. **Watering:** Keep the soil consistently moist, but not soggy.
3. **Light:** Place the seed trays under grow lights or in a sunny window.
4. **Hardening Off:** Once the seedlings have developed a few sets of true leaves, you’ll need to harden them off before transplanting them into the garden. This means gradually exposing them to outdoor conditions over a period of about a week. Start by placing them outside for a few hours each day in a sheltered spot, and gradually increase the amount of time they spend outdoors.
* **Direct Sowing:** This is the easiest method, but it’s only suitable if you live in a climate with a long growing season.
1. **Sow Seeds:** Sow the seeds directly into the garden soil about 2-4 weeks before the last expected frost. Plant the seeds about 1/2 inch deep and space them about 18-24 inches apart.
2. **Watering:** Keep the soil consistently moist until the seeds germinate.
3. **Thinning:** Once the seedlings have emerged, thin them to about 18-24 inches apart.
* **Buying Transplants:** This is the quickest and easiest option, but it can be more expensive than starting from seed.
1. **Choose Healthy Plants:** Look for transplants that are healthy and vigorous, with no signs of pests or diseases.
2. **Planting:** Plant the transplants in the garden at the same depth they were growing in the nursery pots. Space them about 18-24 inches apart.
Planting Your Kale
Whether you’re transplanting seedlings or direct sowing seeds, here’s how to plant your kale:
1. **Dig Holes:** Dig holes that are slightly larger than the root balls of the transplants or the depth you need for direct sowing.
2. **Planting:** Gently remove the transplants from their pots and place them in the holes. If you’re direct sowing, sow the seeds according to the instructions above.
3. **Backfill:** Backfill the holes with soil, gently firming it around the plants.
4. **Watering:** Water the plants thoroughly after planting.
5. **Mulching:** Apply a layer of mulch around the plants to help retain moisture, suppress weeds, and regulate soil temperature. I like to use straw, shredded leaves, or wood chips.
Caring for Your Kale
Once your kale is planted, it’s important to provide it with the care it needs to thrive. Here’s what you need to do:
* **Watering:** Kale needs consistent moisture, especially during hot, dry weather. Water deeply whenever the soil feels dry to the touch. Avoid overhead watering, as this can promote fungal diseases.
* **Fertilizing:** Kale is a heavy feeder, so you’ll need to fertilize it regularly. I like to side-dress my kale plants with compost or a balanced fertilizer every few weeks.
* **Weeding:** Keep the garden bed free of weeds, as they can compete with the kale plants for nutrients and water.
* **Pest Control:** Kale is susceptible to a few common pests, such as aphids, cabbage worms, and flea beetles. I prefer to use organic pest control methods, such as hand-picking pests off the plants, spraying them with insecticidal soap, or using row covers to protect them from pests.
* **Disease Control:** Kale can also be affected by a few diseases, such as downy mildew and black rot. To prevent these diseases, make sure to provide good air circulation around the plants, avoid overhead watering, and remove any infected leaves promptly.
Harvesting Your Kale
You can start harvesting kale leaves as soon as they’re big enough to eat, usually about 6-8 weeks after planting. Here’s how I harvest my kale:
1. **Harvest Outer Leaves:** Harvest the outer leaves first, leaving the inner leaves to continue growing. This will allow you to harvest kale continuously throughout the growing season.
2. **Cut or Snap Leaves:** You can either cut the leaves off with a knife or scissors, or you can simply snap them off with your fingers.
3. **Wash and Store:** Wash the kale leaves thoroughly and store them in the refrigerator in a plastic bag or container. They’ll keep for about a week.
Extending Your Kale Season
Kale is a cool-season crop, so it grows best in the spring and fall. However, you can extend your kale season by using a few simple techniques:
* **Succession Planting:** Plant new kale seedlings every few weeks to ensure a continuous supply of fresh kale.
* **Cold Frames/Row Covers:** Use cold frames or row covers to protect your kale plants from frost and freezing temperatures.
* **Overwintering:** In mild climates, you can overwinter kale plants by mulching them heavily and
Conclusion
So, there you have it! Mastering the art of growing kale offers a multitude of benefits, extending far beyond just having fresh greens at your fingertips. From the unparalleled nutritional value packed into each leaf to the sheer satisfaction of nurturing your own food source, cultivating kale is an incredibly rewarding experience. We’ve explored the ease with which you can start your own kale patch, even in limited spaces, and the simple steps to ensure a bountiful harvest.
But the real magic lies in the versatility of this leafy green. Don’t limit yourself to just one variety! Experiment with different types of kale – the curly kale with its robust flavor, the lacinato (dinosaur) kale with its tender leaves, or the Russian kale with its milder taste. Each offers a unique culinary experience, opening up a world of possibilities in your kitchen.
Consider these variations to elevate your kale-growing game:
* Succession Planting: Plant new kale seeds every few weeks to ensure a continuous supply throughout the growing season. This prevents you from being overwhelmed with a massive harvest all at once and keeps fresh kale readily available.
* Companion Planting: Kale thrives when planted alongside certain companion plants. Marigolds deter pests, while herbs like rosemary and thyme can improve the flavor of your kale. Experiment with different combinations to find what works best in your garden.
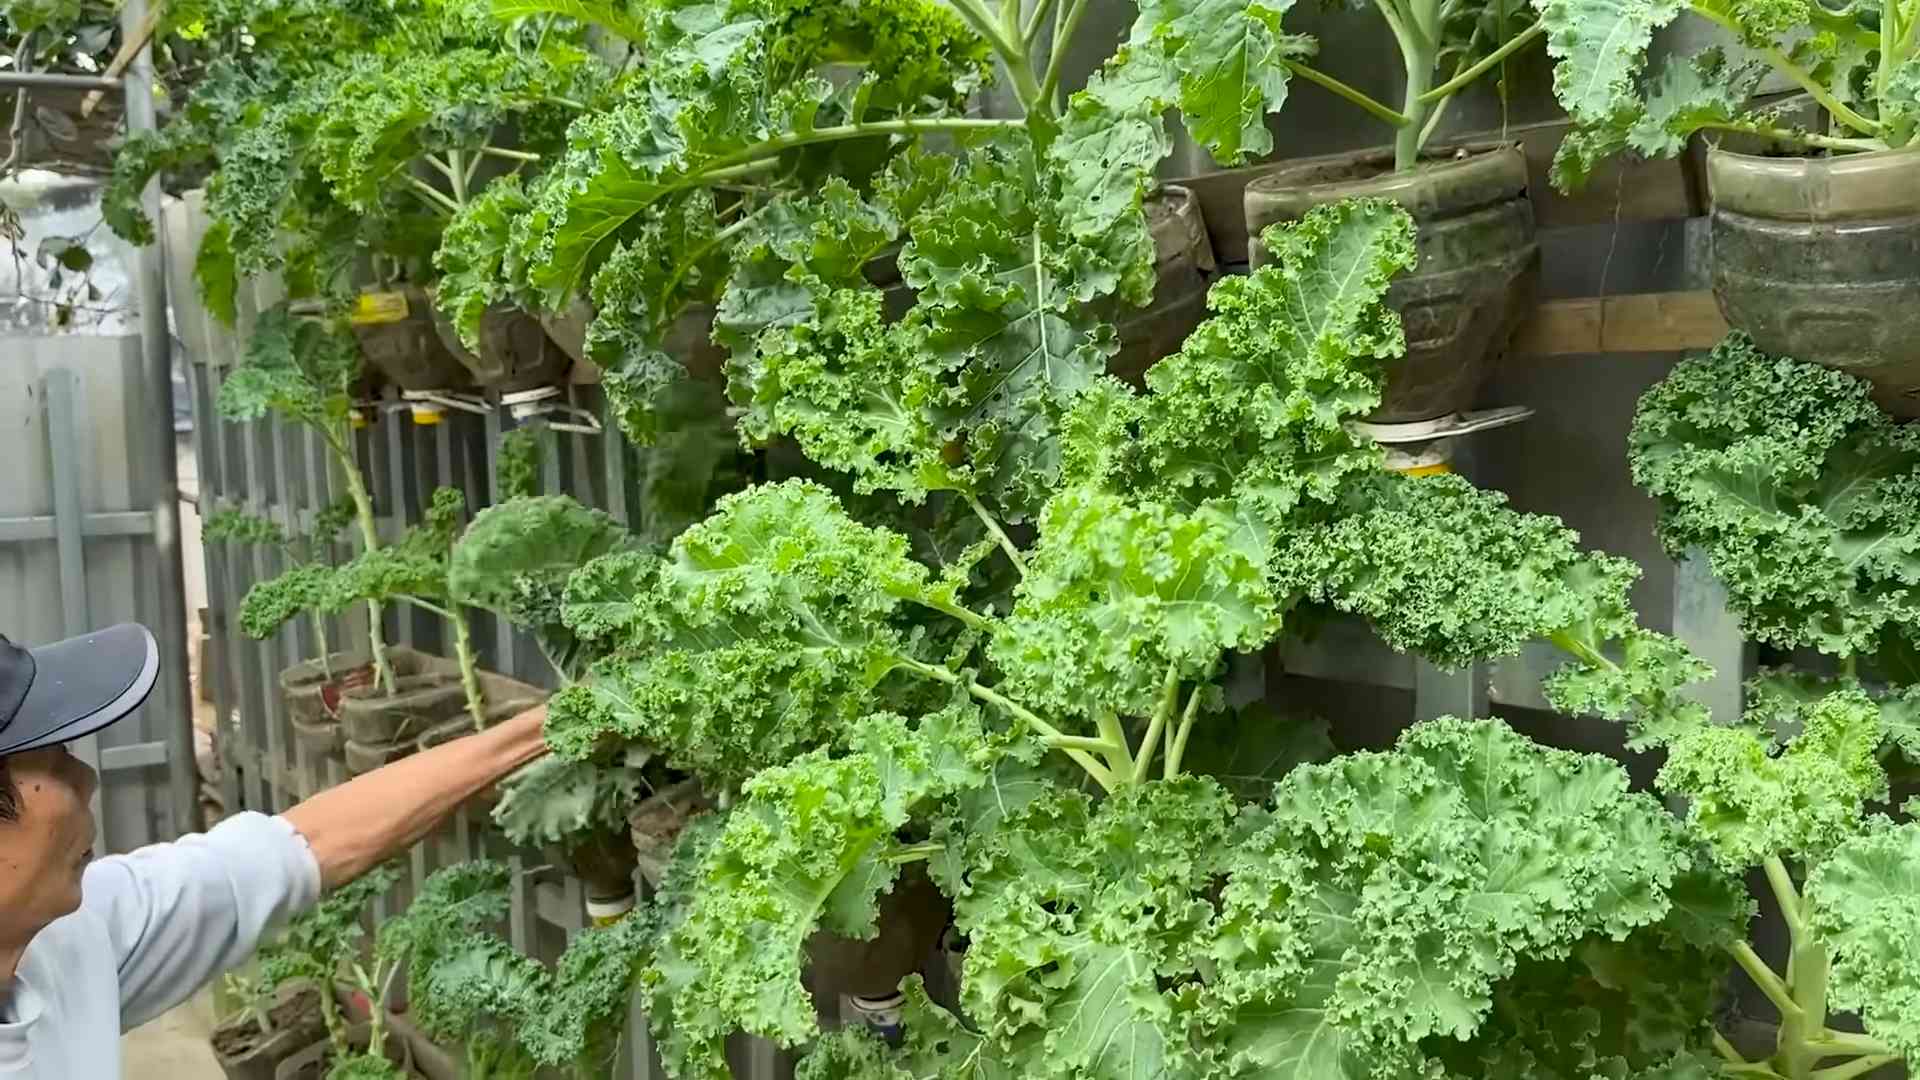
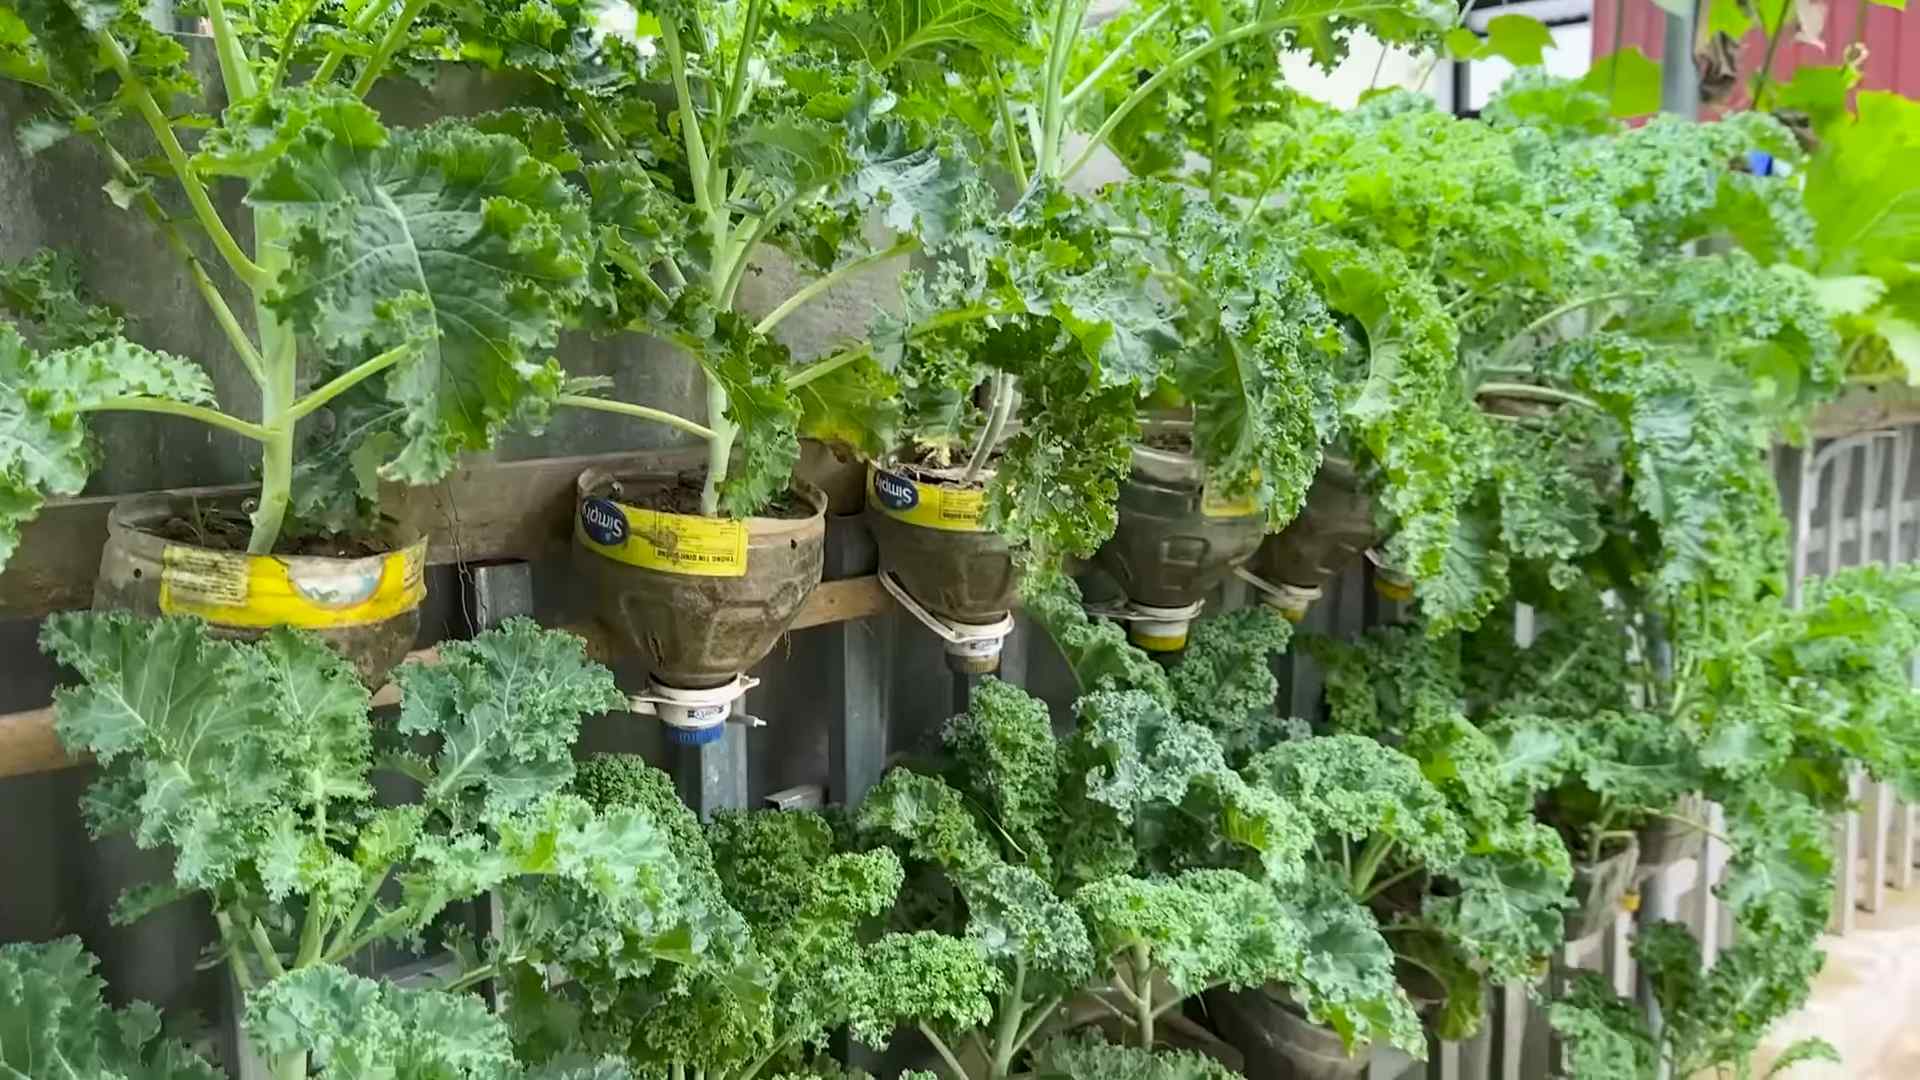
* Vertical Gardening: If space is limited, explore vertical gardening options. Kale grows well in containers and can be easily trained to grow upwards, maximizing your yield in a small area.
* Kale Chips Galore: Beyond salads and smoothies, kale makes fantastic chips! Toss kale leaves with olive oil, salt, and your favorite spices, then bake until crispy. It’s a healthy and delicious snack that even picky eaters will enjoy.
* Freezing for Later: Don’t let your abundant harvest go to waste! Blanch kale leaves for a few minutes, then freeze them for later use in soups, stews, and smoothies. This ensures you can enjoy the benefits of growing kale year-round.
Growing kale is more than just a gardening project; it’s an investment in your health and well-being. It’s a chance to connect with nature, learn new skills, and enjoy the fruits (or rather, vegetables) of your labor. The benefits of growing kale are truly immeasurable.
We wholeheartedly encourage you to give this DIY trick a try. Start small, be patient, and don’t be afraid to experiment. The rewards are well worth the effort. And most importantly, we want to hear about your experiences! Share your tips, tricks, and triumphs in the comments below. Let’s build a community of kale-loving gardeners and inspire others to discover the joy of growing their own food. What are you waiting for? Grab some seeds and get growing!
Frequently Asked Questions (FAQ)
What are the main benefits of growing my own kale?
Growing your own kale offers a plethora of advantages. Firstly, you have access to fresh, nutrient-rich greens right in your backyard. Kale is packed with vitamins A, C, and K, as well as antioxidants and fiber. Secondly, you control the growing process, ensuring that your kale is free from harmful pesticides and chemicals. Thirdly, it’s a cost-effective way to enjoy this superfood, as a single kale plant can produce a significant amount of leaves over time. Finally, gardening is a therapeutic activity that can reduce stress and improve your overall well-being.
How much space do I need to grow kale?
One of the great things about kale is that it doesn’t require a lot of space. You can grow it in containers on a balcony or patio, or in a small garden bed. A single kale plant typically needs about 12-18 inches of space to grow comfortably. If you’re planting multiple kale plants, space them about 18-24 inches apart to allow for proper air circulation and sunlight exposure. Vertical gardening is also an excellent option for maximizing space.
What kind of soil is best for growing kale?
Kale thrives in well-drained soil that is rich in organic matter. Before planting, amend your soil with compost or aged manure to improve its fertility and drainage. Kale prefers a slightly acidic to neutral soil pH, ideally between 6.0 and 7.5. You can test your soil pH with a simple soil testing kit available at most garden centers. If your soil is too acidic, you can add lime to raise the pH.
How often should I water my kale plants?
Kale needs consistent moisture to thrive, especially during hot and dry weather. Water your kale plants deeply whenever the top inch of soil feels dry to the touch. Avoid overwatering, as this can lead to root rot. Mulching around your kale plants with straw or wood chips can help retain moisture in the soil and suppress weeds.
What are some common pests and diseases that affect kale?
Kale can be susceptible to various pests and diseases, including aphids, cabbage worms, flea beetles, and fungal diseases like powdery mildew. Regularly inspect your kale plants for signs of infestation or disease. You can control aphids and cabbage worms with insecticidal soap or Bacillus thuringiensis (Bt). Flea beetles can be deterred with row covers. To prevent fungal diseases, ensure good air circulation around your plants and avoid overhead watering.
How do I harvest kale?
You can start harvesting kale leaves once they reach a usable size, typically about 6-8 inches long. Harvest the outer leaves first, leaving the inner leaves to continue growing. This allows the plant to produce new leaves throughout the growing season. You can harvest kale leaves continuously for several months, or even longer in mild climates. Simply snap or cut the leaves off near the base of the plant.
Can I grow kale in the winter?
Yes, kale is a cold-hardy vegetable that can tolerate frost and even snow. In mild climates, you can grow kale throughout the winter. In colder climates, you may need to protect your kale plants with row covers or a cold frame to prevent them from freezing. Kale actually tastes sweeter after a frost, as the cold temperatures convert some of the starches in the leaves to sugars.
How do I store harvested kale?
To store harvested kale, wash the leaves thoroughly and dry them with a salad spinner or paper towels. Store the kale in a plastic bag or container in the refrigerator. Kale will typically last for about 5-7 days in the refrigerator. You can also freeze kale for longer storage. Blanch the kale leaves for a few minutes, then freeze them in freezer bags or containers.
What are some creative ways to use kale in my cooking?
Kale is an incredibly versatile vegetable that can be used in a wide variety of dishes. You can add it to salads, smoothies, soups, stews, and stir-fries. Kale can also be baked into chips, sautéed with garlic and olive oil, or used as a filling for omelets and frittatas. Don’t be afraid to experiment with different recipes and flavor combinations to find your favorite ways to enjoy kale.
Is growing kale organically difficult?
Growing kale organically is relatively straightforward. The key is to start with healthy soil, use organic fertilizers, and practice good pest and disease management techniques. Avoid using synthetic pesticides and herbicides. Instead, rely on natural methods like companion planting, crop rotation, and hand-picking pests. With a little effort, you can easily grow delicious and nutritious kale without the use of harmful chemicals.

Leave a Comment