

Growing Native Shallots at Home can feel like unlocking a secret garden, right in your backyard! Forget those bland, store-bought shallots – imagine the burst of fresh, oniony-garlicky flavor you can add to your dishes with your own homegrown bounty. For centuries, shallots have been a staple in cuisines around the world, from the delicate sauces of French cooking to the vibrant curries of Southeast Asia. They’re not just delicious; they’re also packed with nutrients and relatively easy to cultivate.
But let’s be honest, sometimes gardening feels more like a chore than a joy, especially when you’re battling pests, unpredictable weather, or just plain lack of space. That’s where these DIY tricks and hacks come in! I’m going to share some simple, effective methods to help you successfully growing native shallots at home, even if you’re a complete beginner or have limited gardening space.
Think of this article as your personal guide to shallot success. We’ll cover everything from choosing the right shallot variety and preparing your soil to protecting your precious plants from common problems. So, grab your gardening gloves, and let’s get started on this flavorful adventure together! You’ll be amazed at how rewarding it is to harvest your own shallots and elevate your cooking to a whole new level.
Growing Native Shallots at Home: A DIY Guide
Okay, so you want to grow your own shallots? Awesome! Let me tell you, there’s nothing quite like the satisfaction of harvesting something you’ve nurtured from a tiny bulb. And native shallots? Even better! They’re often hardier and have a flavor that’s just… well, more shallot-y. This guide will walk you through everything you need to know to successfully grow native shallots right in your backyard (or even in containers!).
Choosing Your Shallots and Preparing for Planting
Before we get our hands dirty, let’s talk about selecting the right shallots and getting everything ready.
* Sourcing Your Shallots: Look for shallots specifically labeled as “native” or “heirloom.” Local farmers markets or nurseries are your best bet. Avoid supermarket shallots, as they might be treated to prevent sprouting. You want firm, healthy bulbs with no signs of mold or rot.
* Timing is Key: The best time to plant shallots is in the fall (September-November) in milder climates, or early spring (February-April) in colder regions. This allows them to establish roots before the harsh weather hits.
* Soil Preparation: Shallots love well-drained, fertile soil. Amend your garden soil with plenty of compost or well-rotted manure. This will improve drainage and provide essential nutrients. Aim for a slightly acidic to neutral pH (around 6.0-7.0).
* Sunlight Needs: Shallots need at least 6 hours of sunlight per day. Choose a sunny spot in your garden.
* Spacing: Give your shallots enough room to grow. Space them about 6-8 inches apart in rows that are 12-18 inches apart. This allows for good air circulation and prevents overcrowding.
Planting Your Shallots: Getting Started
Alright, let’s get those shallots in the ground!
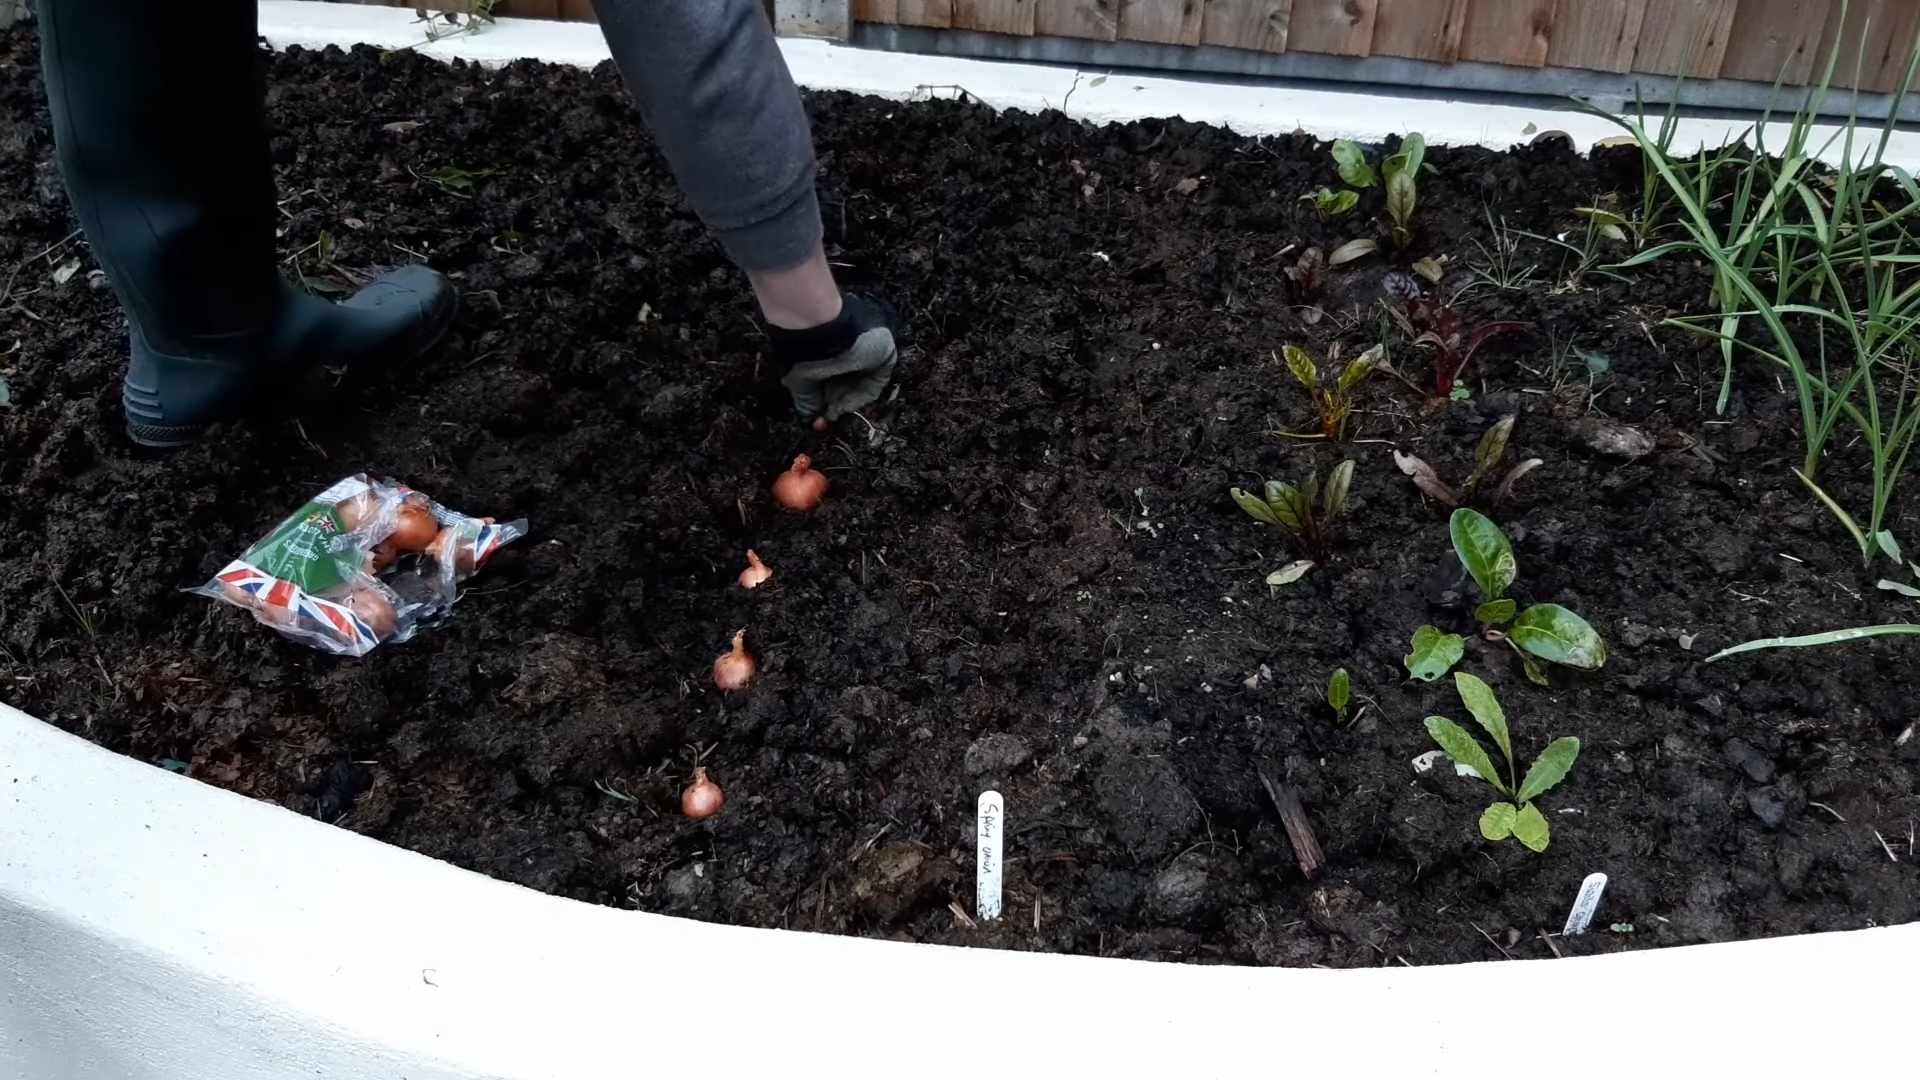
1. Prepare the Planting Bed: Loosen the soil in your chosen area to a depth of about 12 inches. Remove any rocks, weeds, or debris. Incorporate your compost or manure thoroughly.
2. Create Planting Holes: Dig small holes, about 2-3 inches deep, spaced 6-8 inches apart.
3. Plant the Shallots: Place each shallot bulb in a hole, pointed end up. Cover with soil, leaving the very tip of the bulb exposed. This helps prevent rot.
4. Water Thoroughly: After planting, water the area well to settle the soil around the bulbs.
5. Mulch (Optional): Apply a layer of mulch, such as straw or shredded leaves, around the shallots. This will help retain moisture, suppress weeds, and regulate soil temperature.
Caring for Your Shallots: Nurturing Your Crop
Now that your shallots are planted, it’s time to give them the TLC they need to thrive.
* Watering: Shallots need consistent moisture, especially during dry periods. Water deeply when the top inch of soil feels dry. Avoid overwatering, as this can lead to bulb rot.
* Weeding: Keep the area around your shallots free of weeds. Weeds compete for nutrients and can harbor pests and diseases. Hand-pull weeds carefully to avoid disturbing the shallot bulbs.
* Fertilizing: Shallots benefit from a light feeding of fertilizer during the growing season. Use a balanced fertilizer (e.g., 10-10-10) or a fertilizer specifically formulated for onions and garlic. Apply according to the package directions. I like to use a liquid seaweed fertilizer every few weeks for an extra boost.
* Pest and Disease Control: Keep an eye out for common pests like onion thrips and onion maggots. Use organic pest control methods, such as insecticidal soap or neem oil, if necessary. Prevent fungal diseases by ensuring good air circulation and avoiding overhead watering.
* Scaping (Optional): Some people like to harvest the flower stalks (scapes) of shallots. This encourages bulb development. If you choose to scape, cut the stalks off when they begin to curl. They’re delicious in stir-fries and salads!
Harvesting Your Shallots: The Sweet Reward
The moment you’ve been waiting for! Harvesting your own shallots is incredibly rewarding.
* When to Harvest: Shallots are typically ready to harvest when the tops begin to yellow and fall over. This usually happens in late summer or early fall.
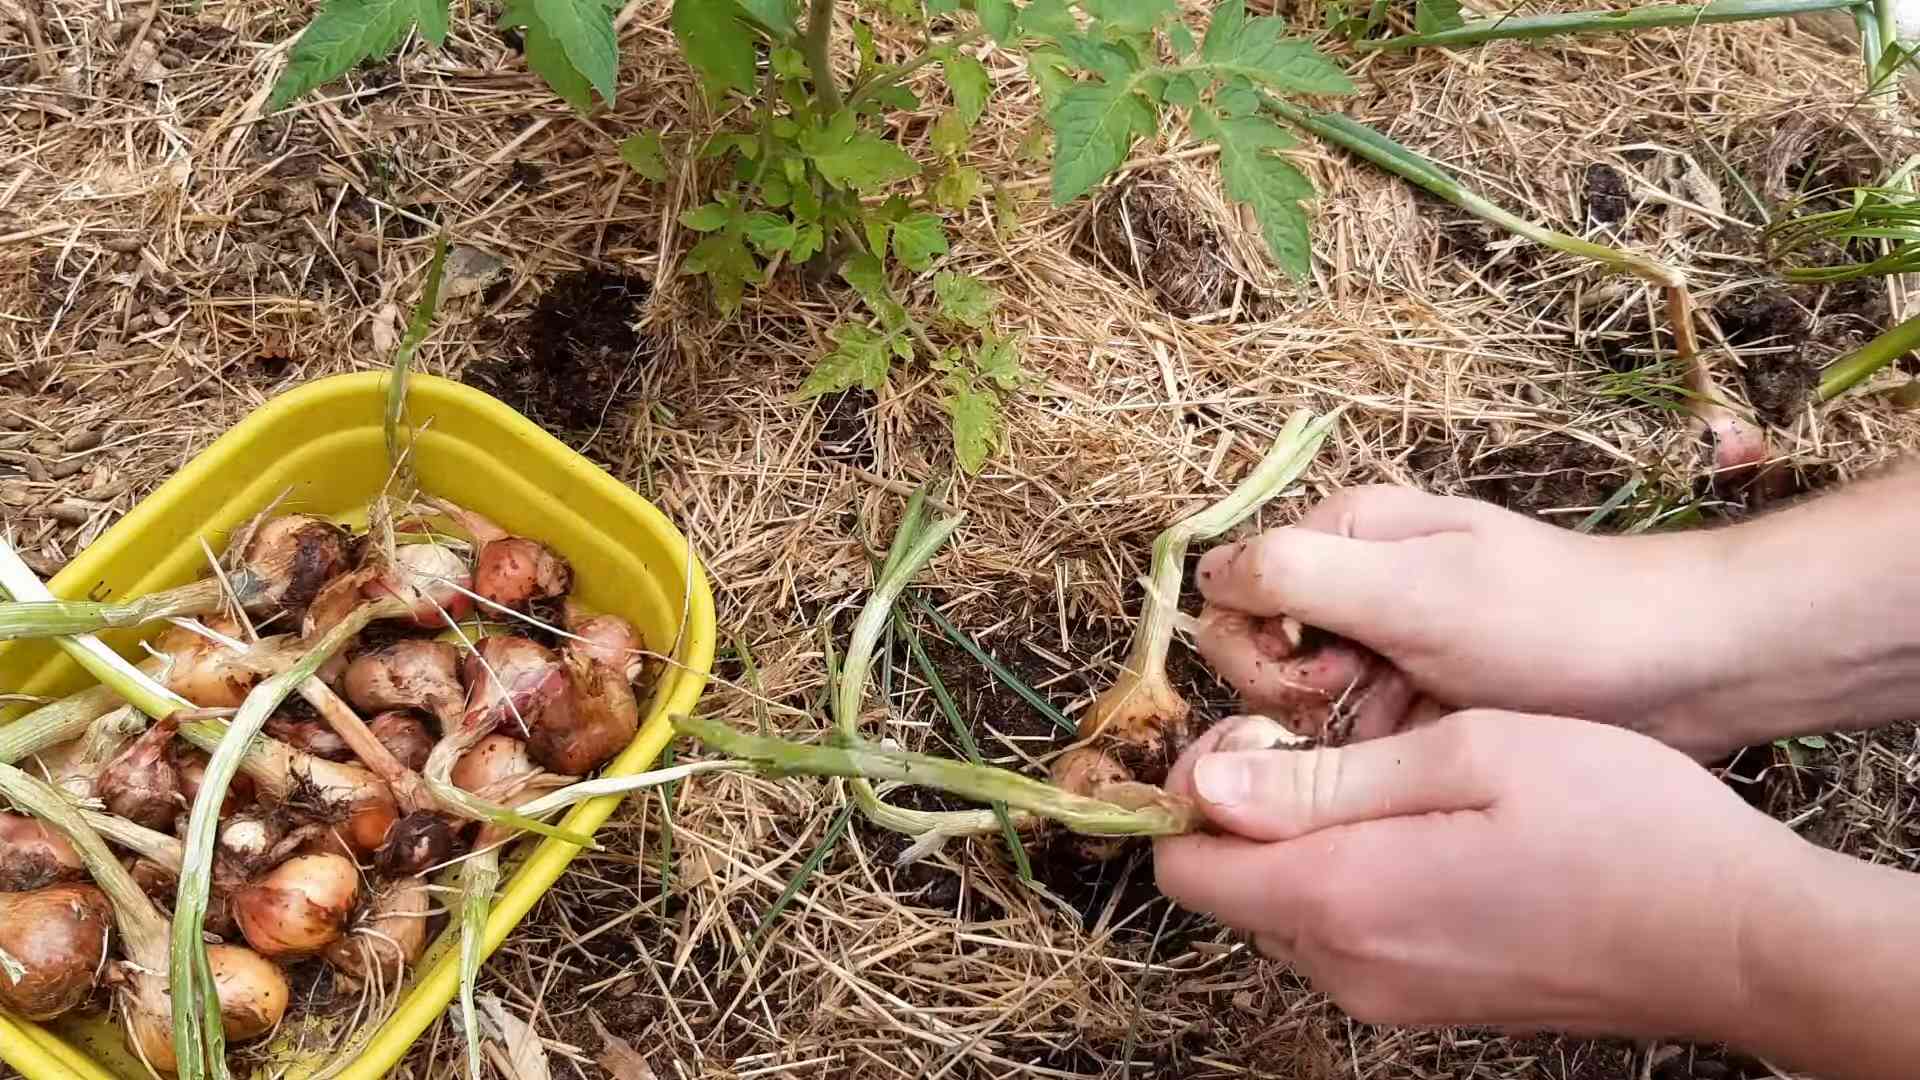
* How to Harvest: Gently loosen the soil around the shallots with a garden fork or trowel. Carefully lift the bulbs from the ground.
* Curing: After harvesting, cure the shallots by laying them out in a single layer in a warm, dry, well-ventilated place for 2-3 weeks. This allows the outer skins to dry and toughen, which helps prevent rot during storage.
* Storing: Store cured shallots in a cool, dry, dark place. A mesh bag or basket is ideal. Properly stored shallots can last for several months.
Troubleshooting: Common Problems and Solutions
Even with the best care, you might encounter a few challenges along the way. Here are some common problems and how to address them:
* Bulb Rot: This is usually caused by overwatering or poor drainage. Ensure your soil is well-draining and avoid overwatering. If you notice bulb rot, remove the affected plants immediately to prevent it from spreading.
* Onion Thrips: These tiny insects can damage the leaves of your shallots. Use insecticidal soap or neem oil to control them.
* Onion Maggots: These pests attack the roots of shallots. Use row covers to prevent adult flies from laying eggs near your plants.
* Yellowing Leaves: This can be caused by nutrient deficiencies, pests, or diseases. Check your soil pH and nutrient levels. Treat any pests or diseases promptly.
Growing Shallots in Containers: A Great Option for Small Spaces
Don’t have a garden? No problem! You can easily grow shallots in containers.
* Choosing a Container: Select a container that is at least 8 inches deep and 12 inches wide. Make sure it has drainage holes.
* Potting Mix: Use a high-quality potting mix that is well-draining. Avoid using garden soil, as it can become compacted in containers.
* Planting: Plant the shallots as described above, spacing them about 4-6 inches apart in the container.
* Watering: Container-grown shallots will need more frequent watering than those grown in the ground. Water when the top inch of soil feels dry.
* Fertilizing: Fertilize regularly with a balanced liquid fertilizer.
* Sunlight: Place the container in a sunny location that receives at least 6 hours of sunlight per day.
Propagating Shallots: Expanding Your Crop
Shallots are easy to propagate, which means you can expand your crop year after year.
* Division: Shallots naturally multiply by forming clusters of bulbs. At harvest time, you can divide these clusters and replant the individual bulbs.
* Saving Seed: While shallots are typically propagated by bulbs, they can also be grown from seed. However, it takes longer to produce mature bulbs from seed. If you want to try growing shallots from seed, start them indoors 8-10 weeks before the last frost.
Using Your Homegrown Shallots: Culinary Delights
Now for the best part: enjoying the fruits (or rather, bulbs) of your labor!
* Flavor Profile: Shallots have a delicate, sweet flavor that is milder than onions. They’re a versatile ingredient that can be used in a wide variety of dishes.
* Culinary Uses: Use shallots in soups, stews, sauces, salads, stir-fries, and more. They’re also delicious caramelized or pickled.
* Storage: Store unused shallots in a cool, dry, dark place.
Extra Tips for Shallot Success
Here are a few extra tips to help you grow the best shallots possible:
* Rotate Your Crops: Avoid planting shallots in the same location year after year. This helps prevent soilborne diseases.
* Companion Planting: Plant shallots with companion plants like carrots, chamomile, and rosemary. These plants can help deter pests and improve growth.
* Record Keeping: Keep a garden journal to track your planting dates, watering schedule, and any problems you encounter. This will help you learn from your mistakes and improve your success in future years.
Growing native shallots is a rewarding experience that will provide you with delicious, homegrown produce. With a little bit of care and attention, you can enjoy a bountiful harvest of these flavorful bulbs. Happy gardening!
Conclusion
So, there you have it! Growing native shallots at home is not only achievable, but it’s also incredibly rewarding. From the unparalleled flavor that surpasses store-bought varieties to the sheer satisfaction of nurturing your own food source, the benefits are undeniable. This isn’t just about saving a few dollars; it’s about connecting with nature, understanding the origins of your food, and adding a touch of culinary magic to your dishes.
Why is this DIY trick a must-try? Because it empowers you to cultivate a truly exceptional ingredient right in your own backyard, balcony, or even a sunny windowsill. Imagine the burst of flavor in your next French onion soup, the subtle sweetness enhancing your vinaigrette, or the aromatic depth it adds to your favorite stir-fry – all thanks to shallots you grew yourself. You’ll be amazed at the difference in taste and texture compared to commercially grown options. Plus, you’ll have the satisfaction of knowing exactly where your food came from and how it was grown, free from pesticides and other unwanted chemicals.
But the beauty of growing native shallots at home lies in its adaptability. Feel free to experiment with different varieties of native shallots to discover your personal favorite. Some varieties are known for their mildness, while others pack a more pungent punch. You can also adjust your growing methods to suit your specific climate and space constraints. Try growing them in raised beds for better drainage, or in containers if you’re short on space. Consider companion planting with herbs like rosemary or thyme to deter pests and enhance the flavor of your shallots.
Don’t be afraid to get your hands dirty and embrace the learning process. Gardening is a journey, and every season brings new opportunities to refine your skills and deepen your connection with the natural world. Even if you encounter a few challenges along the way, remember that the rewards of growing your own native shallots are well worth the effort.
We wholeheartedly encourage you to give this DIY trick a try. Start small, be patient, and enjoy the process. Once you’ve harvested your first batch of homegrown shallots, you’ll be hooked! And most importantly, we want to hear about your experience. Share your tips, tricks, and triumphs in the comments below. Let’s create a community of passionate gardeners who are dedicated to growing the most flavorful and sustainable ingredients possible. Let us know what native shallot varieties you tried, what growing methods worked best for you, and what delicious dishes you created with your homegrown harvest. Your insights will inspire and empower others to embark on their own gardening adventures. So, go ahead, get planting, and let the flavor revolution begin!
Frequently Asked Questions (FAQ)
What exactly are native shallots, and how are they different from regular shallots or onions?
Native shallots are shallot varieties that are indigenous to a specific region or country. They have adapted to the local climate and soil conditions over generations, often resulting in unique flavor profiles and characteristics. Compared to commercially available shallots, native shallots often boast a more intense and complex flavor, with subtle nuances that are lost in mass-produced varieties. They may also exhibit greater resistance to local pests and diseases. While both shallots and onions belong to the Allium family, shallots typically have a milder, sweeter flavor than onions, and they grow in clusters, similar to garlic. Native shallots, in particular, offer a taste of local terroir, reflecting the unique environmental factors that have shaped their development.
What is the best time of year to plant native shallots?
The ideal planting time for native shallots depends on your local climate. In general, they are best planted in the fall (September-November) in warmer climates, allowing them to establish roots before the winter dormancy. In colder climates, spring planting (March-April) is recommended, after the last frost. Planting in the fall allows the shallots to develop a strong root system, resulting in larger bulbs and a more abundant harvest the following summer. However, spring planting can still be successful, especially if you provide adequate moisture and protection from extreme temperatures. Consult your local agricultural extension office or experienced gardeners in your area for specific recommendations tailored to your region.
What kind of soil do native shallots need?
Native shallots thrive in well-drained, fertile soil that is rich in organic matter. The ideal soil pH is between 6.0 and 7.0. Before planting, amend your soil with compost, well-rotted manure, or other organic amendments to improve drainage, fertility, and water retention. Avoid heavy clay soils, as they can become waterlogged and lead to bulb rot. If you have clay soil, consider growing your shallots in raised beds or containers filled with a well-draining potting mix. Proper soil preparation is crucial for healthy shallot growth and a bountiful harvest.
How much sunlight do native shallots require?
Native shallots need at least 6-8 hours of direct sunlight per day to thrive. Choose a planting location that receives ample sunlight throughout the growing season. If you are growing shallots indoors, place them near a sunny window or supplement with artificial grow lights. Insufficient sunlight can result in weak, leggy growth and reduced bulb size.
How often should I water my native shallots?
Water your native shallots regularly, especially during dry periods. Keep the soil consistently moist, but avoid overwatering, which can lead to bulb rot. Water deeply and less frequently, rather than shallowly and more often. Allow the top inch of soil to dry out between waterings. During the dormant season, reduce watering frequency.
How do I know when my native shallots are ready to harvest?
Native shallots are typically ready to harvest when the tops begin to yellow and fall over. This usually occurs in late summer or early fall, depending on your climate and the variety of shallot you are growing. Gently dig up the bulbs and allow them to cure in a warm, dry place for a week or two before storing them. Curing helps to harden the outer layers of the bulbs, preventing rot and extending their shelf life.
Can I grow native shallots in containers?
Yes, native shallots can be successfully grown in containers, making them a great option for gardeners with limited space. Choose a container that is at least 8-10 inches deep and wide, with drainage holes. Fill the container with a well-draining potting mix and plant the shallot sets 2-3 inches deep and 4-6 inches apart. Water regularly and fertilize every few weeks with a balanced fertilizer. Place the container in a sunny location that receives at least 6-8 hours of direct sunlight per day.
What are some common pests and diseases that affect native shallots, and how can I prevent them?
Common pests that affect native shallots include onion thrips, onion maggots, and nematodes. Diseases include downy mildew, white rot, and pink root. To prevent pest and disease problems, practice good garden hygiene, such as removing plant debris and weeds regularly. Rotate your crops each year to avoid building up pest and disease populations in the soil. Use organic pest control methods, such as insecticidal soap or neem oil, to control pests. Ensure good air circulation around your plants to prevent fungal diseases. Choose disease-resistant varieties of native shallots whenever possible.
How do I store my harvested native shallots?
After curing, store your native shallots in a cool, dry, and well-ventilated place. A mesh bag or basket is ideal for storage. Avoid storing shallots in the refrigerator, as this can cause them to sprout or rot. Properly stored shallots can last for several months.
Can I save some of my native shallots to plant next year?
Yes, you can save some of your native shallots to plant next year. Select the largest and healthiest bulbs for replanting. Store them in a cool, dry place until planting time. This allows you to maintain your own supply of native shallots and continue to enjoy their unique flavor and characteristics year after year.

Leave a Comment