

Growing Pink Radishes Backyard – sounds like a dream, right? Imagine plucking vibrant, rosy radishes straight from your own garden, adding a pop of color and a peppery kick to your salads and snacks. It’s not just a dream; it’s an achievable reality, even if you’re a complete beginner! For centuries, radishes have been a staple in gardens around the world, prized for their quick growth and versatility. From ancient Egypt, where they were a common food for laborers, to modern-day kitchens, radishes have proven their staying power.
But let’s be honest, sometimes gardening feels intimidating. Maybe you’ve tried before and ended up with spindly greens and no actual radishes. Or perhaps you’re just short on space and think a backyard garden is out of the question. That’s where these DIY tricks and hacks come in! I’m here to show you that growing pink radishes backyard is easier than you think. We’ll cover everything from choosing the right variety to maximizing your harvest, even in small spaces. So, ditch the store-bought radishes and let’s get our hands dirty! I promise, the satisfaction of growing your own food is totally worth it.
Growing Gorgeous Pink Radishes in Your Backyard: A DIY Guide
Okay, radish lovers, let’s get our hands dirty! I’m going to walk you through everything you need to know to grow beautiful, vibrant pink radishes right in your own backyard. Radishes are super rewarding because they grow so quickly – you can literally go from seed to salad in just a few weeks! Plus, that peppery bite is just irresistible.
What You’ll Need
Before we dive in, let’s gather our supplies. This is a pretty straightforward project, so you probably have a lot of this stuff already.
* **Radish Seeds (Pink Varieties):** Obviously! Look for varieties like ‘Pink Beauty’, ‘French Breakfast’ (often has a pink blush), or ‘Cherry Belle’. I personally love ‘Pink Beauty’ for its vibrant color and crisp texture.
* **Gardening Gloves:** Protect those precious hands!
* **Hand Trowel or Garden Fork:** For preparing the soil.
* **Rake:** To smooth out the soil surface.
* **Watering Can or Hose with a Gentle Spray Nozzle:** Radishes need consistent moisture.
* **Well-Draining Soil:** Radishes aren’t picky, but they do need good drainage.
* **Compost or Aged Manure (Optional):** To enrich the soil.
* **Row Covers (Optional):** To protect against pests and extreme weather.
* **Measuring Tape or Ruler:** To ensure proper spacing.
* **Small Garden Labels and a Permanent Marker:** To keep track of your radish varieties (if you’re planting more than one).
Choosing the Right Spot
Sunlight is key! Radishes need at least 6 hours of direct sunlight per day. Choose a spot in your backyard that gets plenty of sunshine. Also, make sure the soil is well-draining. Radishes don’t like to sit in soggy soil, as this can lead to rot.
Preparing the Soil
This is a crucial step, so don’t skip it!
1. **Clear the Area:** Remove any rocks, weeds, or debris from the planting area. I like to use a garden fork to loosen the soil and make it easier to work with.
2. **Amend the Soil (Optional):** If your soil is heavy clay or sandy, amend it with compost or aged manure. This will improve drainage and add nutrients. I usually add a couple of inches of compost and mix it in well.
3. **Rake the Soil:** Use a rake to smooth out the soil surface and create a level planting bed. This will make it easier to sow the seeds evenly.
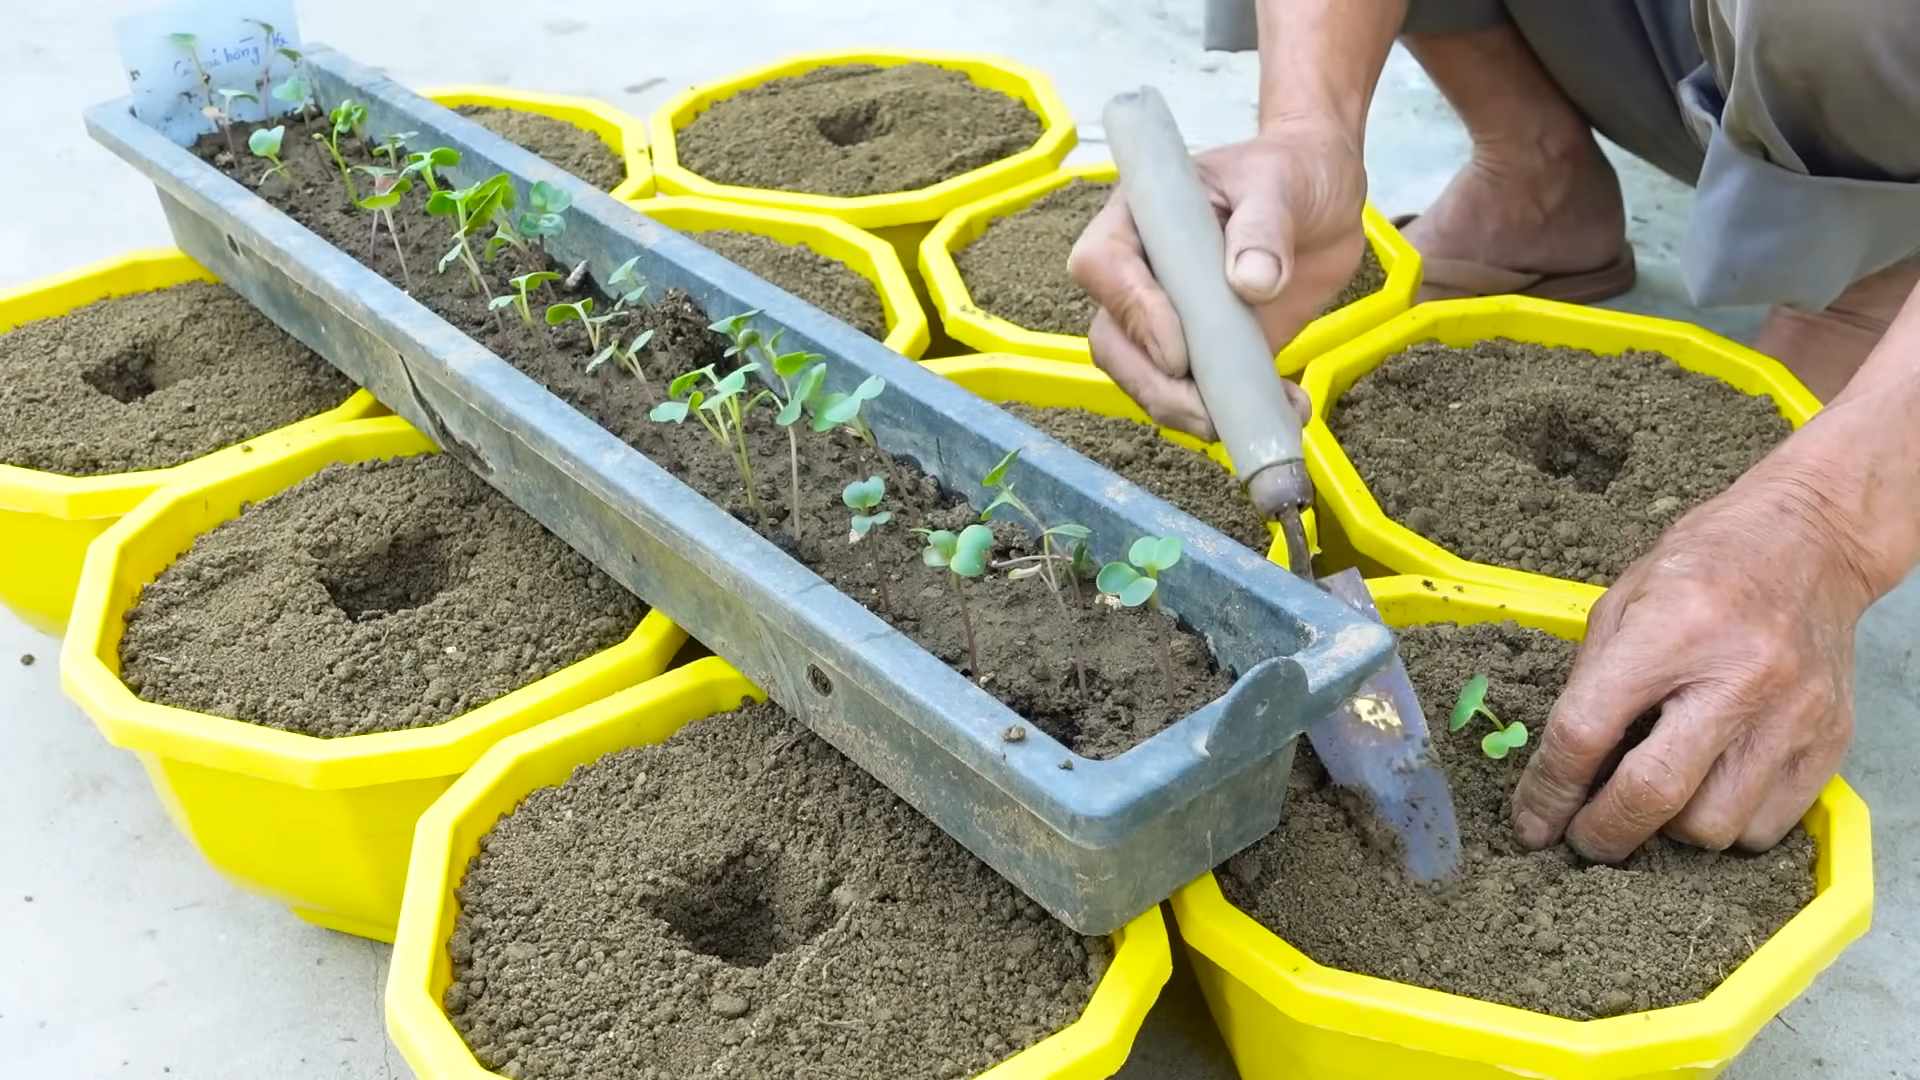
Planting the Radish Seeds
Now for the fun part!
1. **Create Furrows:** Use your finger or a hand trowel to create shallow furrows in the soil. The furrows should be about ½ inch deep and spaced about 1 inch apart. I find that using a ruler helps me keep the rows straight and evenly spaced.
2. **Sow the Seeds:** Sprinkle the radish seeds evenly into the furrows. Don’t overcrowd them! I aim for about ½ inch between each seed.
3. **Cover the Seeds:** Gently cover the seeds with soil.
4. **Water Thoroughly:** Water the planting area gently but thoroughly. You want to moisten the soil without washing away the seeds. I use a watering can with a gentle spray nozzle to avoid disturbing the seeds.
5. **Label Your Rows:** Use garden labels and a permanent marker to label each row with the radish variety and planting date. This will help you keep track of your progress.
Caring for Your Radishes
Radishes are relatively low-maintenance, but they do need a little TLC.
1. **Water Regularly:** Keep the soil consistently moist, but not soggy. Water whenever the top inch of soil feels dry to the touch. I usually water every day or two, depending on the weather.
2. **Thin Seedlings (If Necessary):** Once the seedlings emerge (usually within a few days), thin them out if they are too crowded. You want to leave about 1 inch between each plant. This will give them enough room to grow. I know it feels harsh to pull out the little guys, but it’s necessary for the health of the remaining plants.
3. **Weed Regularly:** Keep the planting area free of weeds. Weeds compete with radishes for nutrients and water. I like to hand-pull weeds as soon as I see them.
4. **Fertilize (Optional):** If your soil is poor, you can fertilize your radishes with a balanced fertilizer. Follow the instructions on the fertilizer package. I usually don’t fertilize unless I notice the plants are looking pale or stunted.
5. **Protect from Pests (Optional):** Radishes can be susceptible to pests like flea beetles and root maggots. If you’re having problems with pests, you can cover your plants with row covers. I’ve found that row covers are especially helpful in preventing flea beetle damage.
Harvesting Your Radishes
This is the best part! Radishes are ready to harvest in just 3-4 weeks.
1. **Check for Maturity:** Radishes are ready to harvest when the roots are about 1 inch in diameter. You can gently brush away the soil around the base of the plant to check the size of the root.
2. **Harvest Carefully:** Gently pull the radishes from the soil. If the soil is dry, you may need to loosen it with a hand trowel first.
3. **Wash and Enjoy:** Wash the radishes thoroughly and enjoy them fresh! I love to eat them raw in salads, or sliced and served with butter and salt.
Troubleshooting
Even with the best planning, things can sometimes go wrong. Here are a few common problems you might encounter and how to fix them:
* **Radishes are not forming bulbs:** This is usually caused by overcrowding, lack of sunlight, or poor soil. Make sure you thin your seedlings properly, provide plenty of sunlight, and amend the soil with compost.
* **Radishes are splitting:** This is usually caused by inconsistent watering. Make sure you water regularly and evenly.
* **Radishes are bitter:** This can be caused by hot weather or letting the radishes grow too large. Harvest your radishes before they get too big, and try to plant them in the spring or fall when the weather is cooler.
* **Pests are attacking my radishes:** Use row covers to protect your plants from pests. You can also try using organic pest control methods, such as insecticidal soap or neem oil.
Succession Planting for a Continuous Harvest
To enjoy a continuous supply of radishes throughout the growing season, practice succession planting. This means planting a new batch of seeds every 1-2 weeks. This way, you’ll always have radishes ready to harvest. I usually plant a small batch of seeds every week to keep my radish supply going strong.
Choosing the Right Pink Radish Variety
While I mentioned a few earlier, let’s delve a bit deeper into some popular pink radish varieties:
* **’Pink Beauty’:** As I said before, this is a classic for a reason. It’s known for its vibrant pink color, crisp texture, and mild flavor. It matures quickly, making it a great choice for impatient gardeners (like me!).
* **’French Breakfast’:** This variety has an elongated shape and a beautiful pink blush at the top, fading to white at the bottom. It has a slightly milder flavor than some other radish varieties.
* **’Cherry Belle’:** This is another popular variety with a round shape and a bright red color. While not strictly pink, it’s close enough and offers a reliable and quick harvest.
* **’Easter Egg’:** This is a mix of different colored radishes, including pink, red, white, and purple. It’s a fun choice for kids and adds a splash of color to your garden.
Extending Your Radish Season
Radishes are typically a cool-season crop, but you can extend your growing season by using a few simple techniques:
* **Plant in early spring or late summer:** This will allow you to avoid the hottest part of the summer, which can cause radishes to become bitter.
* **Use row covers:** Row covers can protect your plants from frost and extend the growing season by a few weeks.
* **Choose heat-tolerant varieties:** Some radish varieties are more heat-tolerant than others. Look for varieties that are specifically bred for warm weather.
Enjoying Your Homegrown Radishes
Now that you’ve successfully grown your own pink radishes, it’s time to enjoy the fruits (or rather, roots!) of your labor. Here are a few ideas:
* **Eat them raw:** Radishes are delicious eaten raw in salads, or sliced and served with butter and salt.
* **Roast them:** Roasting radishes mellows out their flavor and makes them surprisingly sweet.
* **Pickle them:** Pickled radishes are a tangy and delicious condiment.
* **Add them to soups and stews:** Radishes can add a peppery kick to soups and stews.
Conclusion
So, there you have it! Growing pink radishes in your backyard is not only achievable but also surprisingly rewarding. Forget those bland, store-bought radishes that lack that peppery punch and vibrant color. With a little effort and these simple DIY tricks, you can cultivate a crop of crisp, flavorful, and beautifully pink radishes right outside your door.
Why is this a must-try? Because it’s about more than just radishes. It’s about connecting with your food, understanding where it comes from, and experiencing the satisfaction of nurturing something from seed to table. It’s about adding a splash of color and a burst of flavor to your meals with ingredients you grew yourself. And let’s be honest, who wouldn’t want to impress their friends and family with a radish that’s as pretty as it is delicious?
But the best part? The possibilities are endless! Experiment with different varieties of pink radishes. Try ‘French Breakfast’ for a mild flavor and elongated shape, or ‘Cherry Belle’ for a classic round radish with a vibrant red-pink hue. You can even try interplanting your radishes with other fast-growing greens like lettuce or spinach to maximize your garden space. Consider succession planting, sowing new seeds every couple of weeks, to ensure a continuous harvest throughout the growing season.
Don’t be afraid to get creative with your soil amendments. Adding compost or well-rotted manure will provide your radishes with the nutrients they need to thrive. You can also experiment with different mulches to help retain moisture and suppress weeds.
And remember, growing pink radishes is a journey, not a destination. There will be successes and failures along the way. But with each attempt, you’ll learn something new and become a more confident gardener. The key is to be patient, observant, and willing to adapt your approach as needed.
We wholeheartedly encourage you to give this DIY trick a try. It’s a fun, easy, and rewarding way to add a touch of homegrown goodness to your life. And once you’ve harvested your first batch of beautiful pink radishes, we’d love to hear about your experience! Share your photos, tips, and tricks in the comments below. Let’s create a community of radish-loving gardeners and inspire others to get their hands dirty! Let us know what worked for you, what challenges you faced, and what delicious recipes you created with your homegrown bounty. Your insights could be invaluable to other aspiring radish growers.
So, grab your seeds, prepare your soil, and get ready to embark on a radish-growing adventure. We’re confident that you’ll be amazed at what you can achieve with a little bit of effort and a whole lot of love. Happy gardening! And remember, the secret to truly delicious pink radishes lies in the care and attention you give them.
Frequently Asked Questions (FAQ)
What are the best conditions for growing pink radishes?
Pink radishes thrive in cool weather, ideally between 50°F and 65°F (10°C and 18°C). They need at least six hours of sunlight per day and well-drained soil that is rich in organic matter. Avoid planting them in overly hot weather, as this can cause them to become tough and bitter. Proper soil preparation is key; loosen the soil to a depth of at least six inches and amend it with compost or well-rotted manure to improve drainage and fertility.
How often should I water my pink radishes?
Radishes need consistent moisture to grow quickly and develop a crisp texture. Water them deeply whenever the top inch of soil feels dry to the touch. Avoid overwatering, as this can lead to root rot. A good rule of thumb is to water every 2-3 days, depending on the weather conditions. Mulching around the plants can help retain moisture and reduce the need for frequent watering.
What are some common pests and diseases that affect pink radishes?
Common pests that can affect radishes include flea beetles, root maggots, and aphids. Flea beetles can be controlled with row covers or insecticidal soap. Root maggots can be prevented by rotating crops and avoiding planting radishes in the same location year after year. Aphids can be washed off with a strong stream of water or treated with insecticidal soap. Diseases that can affect radishes include damping-off and white rust. Damping-off can be prevented by using sterile potting mix and avoiding overwatering. White rust can be treated with a fungicide. Regular inspection of your plants will help you catch any problems early and take appropriate action.
How long does it take for pink radishes to mature?
Pink radishes are one of the fastest-growing vegetables, typically maturing in just 3-4 weeks. This makes them a great choice for beginner gardeners or those who want a quick harvest. The exact time will depend on the variety of radish, the weather conditions, and the soil quality. Check the seed packet for specific information on the maturity time for your chosen variety.
How do I know when my pink radishes are ready to harvest?
The best way to tell if your radishes are ready to harvest is to check their size. Most varieties are ready when they are about 1 inch in diameter. You can also gently brush away the soil around the top of the radish to check its size. Don’t let them get too big, as they can become tough and bitter. Harvest them promptly once they reach the desired size.
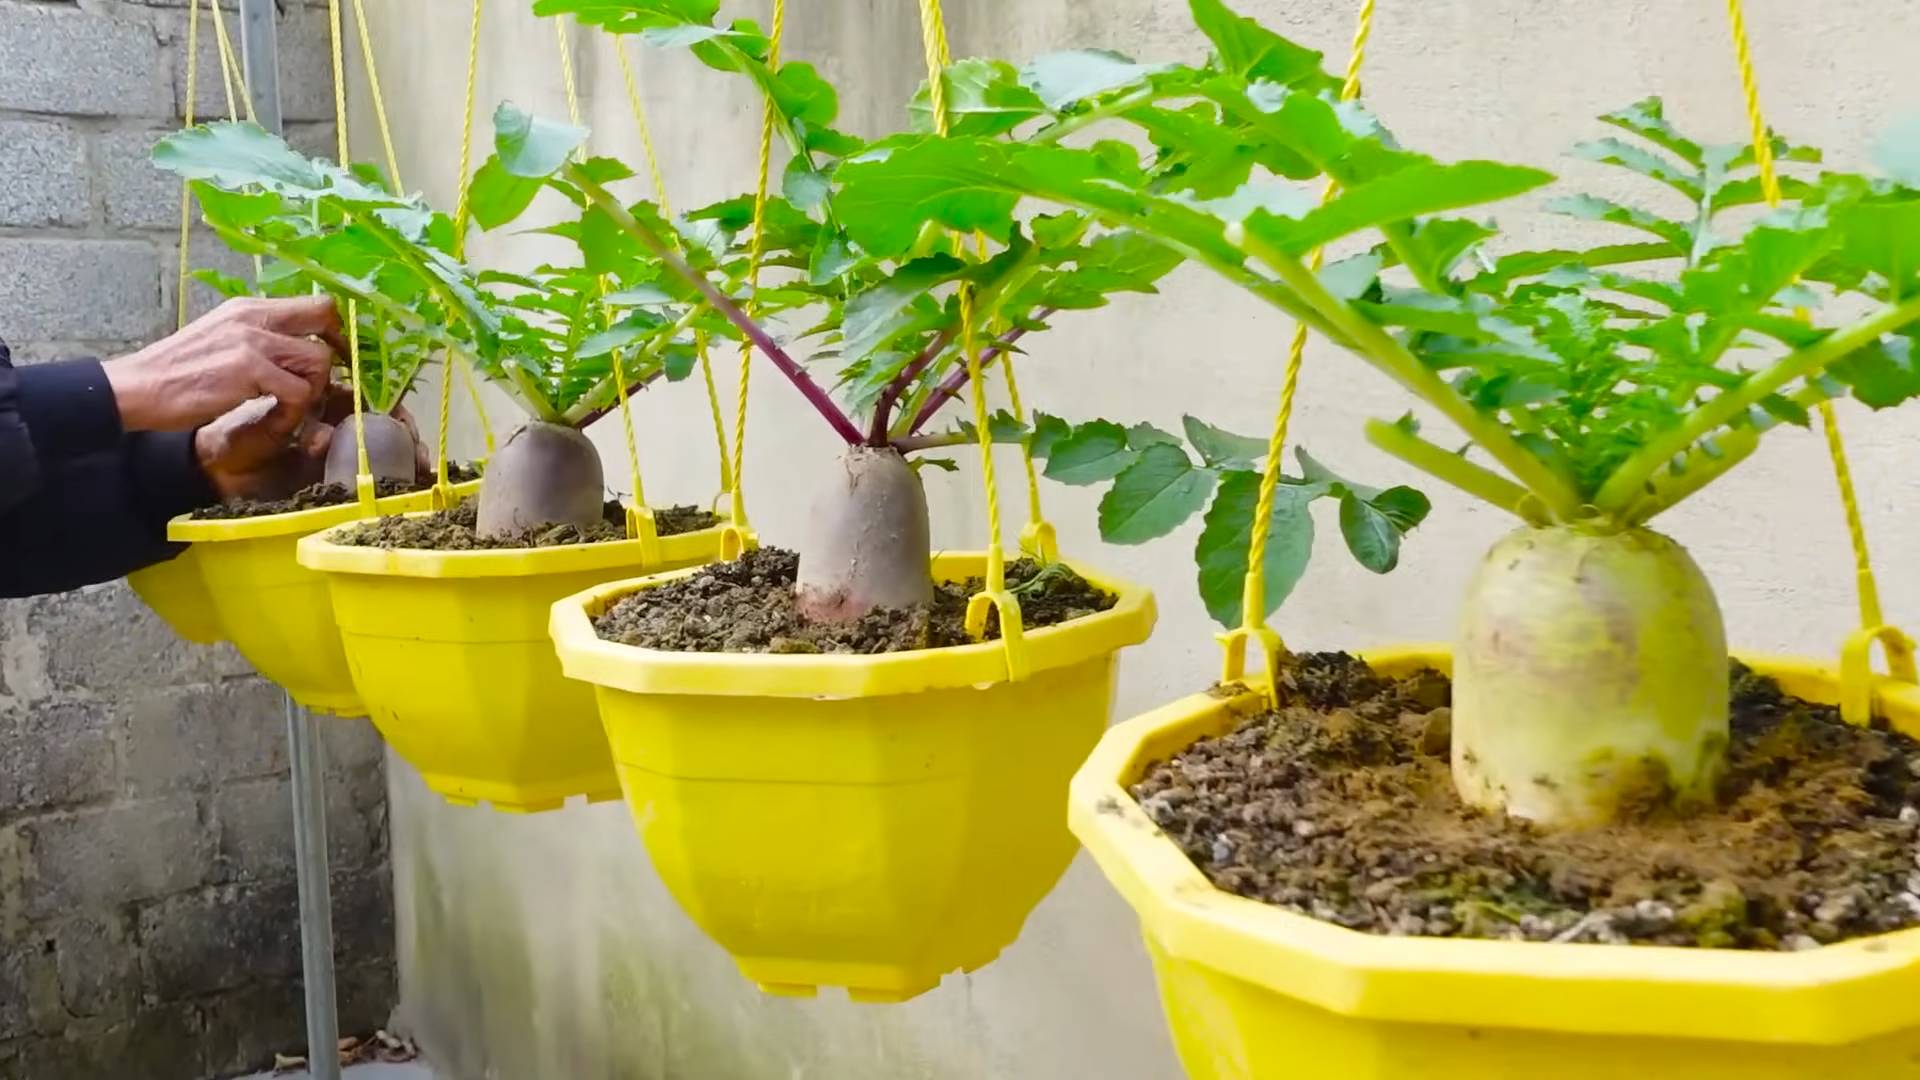
Can I grow pink radishes in containers?
Yes, pink radishes are well-suited for container gardening. Choose a container that is at least 6 inches deep and has drainage holes. Use a high-quality potting mix and water regularly. Container-grown radishes may need more frequent watering than those grown in the ground, as the soil in containers tends to dry out more quickly.
What are some creative ways to use pink radishes in cooking?
Pink radishes are incredibly versatile and can be used in a variety of dishes. They can be eaten raw in salads, sliced thinly on sandwiches, or used as a garnish. They can also be roasted, sautéed, or pickled. The greens are also edible and can be used in salads or stir-fries. Try adding them to tacos, soups, or even pizza for a peppery kick.
How do I store pink radishes after harvesting?
To store radishes, remove the greens and wash the radishes thoroughly. Place them in a plastic bag or container with a damp paper towel and store them in the refrigerator. They should last for up to two weeks. The greens can also be stored separately in a plastic bag in the refrigerator, but they will only last for a few days.
What if my pink radishes are all tops and no bottoms?
This is a common problem that can be caused by several factors, including overcrowding, lack of sunlight, or poor soil. Thin out your radishes to give them more space to grow. Make sure they are getting at least six hours of sunlight per day. Amend the soil with compost or well-rotted manure to improve its fertility.
Are there any specific varieties of pink radishes you recommend?
Several varieties of pink radishes are available, each with its own unique characteristics. ‘French Breakfast’ is a popular choice for its mild flavor and elongated shape. ‘Cherry Belle’ is a classic round radish with a vibrant red-pink hue. ‘Pink Beauty’ is another good option, known for its smooth skin and crisp texture. Experiment with different varieties to find your favorite.
Leave a Comment