

Growing Tomatoes from Seed can feel like unlocking a secret garden, right in your own home! Imagine biting into a juicy, sun-ripened tomato that you nurtured from a tiny seed. That’s the magic we’re about to explore together. For centuries, tomatoes have held a special place in cultures worldwide, from the vibrant sauces of Italy to the refreshing salsas of Mexico. They weren’t always loved, though! Initially, some Europeans considered them poisonous, but thankfully, that myth has long been debunked.
But let’s be honest, buying tomato seedlings from the store can be expensive, and you’re often limited in variety. That’s where this DIY guide comes in! I’m going to show you some simple, effective tricks and hacks to successfully start your own tomato plants from seed. Not only will you save money, but you’ll also have access to a wider range of heirloom and unique tomato varieties. Plus, there’s nothing quite as satisfying as watching those little sprouts emerge, knowing you played a part in bringing them to life. So, grab your seeds, and let’s get started on this exciting journey of growing tomatoes from seed!
Growing Tomatoes from Seed: A Beginner’s Guide
Hey there, fellow gardening enthusiasts! I’m so excited to share my tried-and-true method for starting tomato plants from seed. There’s nothing quite like the taste of a homegrown tomato, and starting them from seed gives you so much control over the varieties you grow. Plus, it’s incredibly rewarding! Let’s dive in!
Choosing Your Tomato Varieties
Before we get our hands dirty, let’s talk tomatoes! The sheer variety can be overwhelming, but don’t worry, I’ll help you narrow it down. Consider these factors:
* Your Climate: Some varieties thrive in hot, humid climates, while others prefer cooler temperatures. Check your local growing zone and choose varieties that are well-suited.
* Available Space: Determinate tomatoes are bush-type plants that grow to a certain size and then stop. They’re great for containers or smaller gardens. Indeterminate tomatoes, on the other hand, keep growing and producing fruit throughout the season, requiring staking or caging.
* Desired Use: Are you looking for slicing tomatoes for sandwiches, sauce tomatoes for canning, or cherry tomatoes for snacking?
* Disease Resistance: Look for varieties labeled with disease resistance codes (e.g., V, F, N, T, A). This can save you a lot of headaches later on.
Some of my personal favorites include:
* ‘Roma’ (Determinate): Excellent for making sauces and pastes.
* ‘Beefsteak’ (Indeterminate): Classic large slicing tomato.
* ‘Sungold’ (Indeterminate): Incredibly sweet and flavorful cherry tomato.
* ‘Early Girl’ (Indeterminate): A reliable early producer, perfect for shorter growing seasons.
Gathering Your Supplies
Okay, now for the fun part – gathering our supplies! Here’s what you’ll need:
* Tomato Seeds: Choose high-quality seeds from a reputable source.
* Seed Starting Mix: This is different from regular potting soil. It’s lighter and provides better drainage for delicate seedlings.
* Seed Starting Trays or Pots: I prefer using seed starting trays with individual cells, but small pots work just as well.
* Humidity Dome (Optional): This helps retain moisture and create a warm, humid environment for germination.
* Spray Bottle: For gently watering the seedlings.
* Grow Lights (Recommended): Tomato seedlings need a lot of light to grow strong and healthy. A grow light will prevent them from becoming leggy.
* Heat Mat (Optional): This can speed up germination, especially in cooler climates.
* Plant Labels: Don’t forget to label your seedlings! It’s easy to forget which variety is which.
* Small Spoon or Trowel: For filling the trays or pots with seed starting mix.
* Water: Use lukewarm water for watering.
Sowing Your Tomato Seeds
Alright, let’s get those seeds in the ground (or rather, in the seed starting mix!).
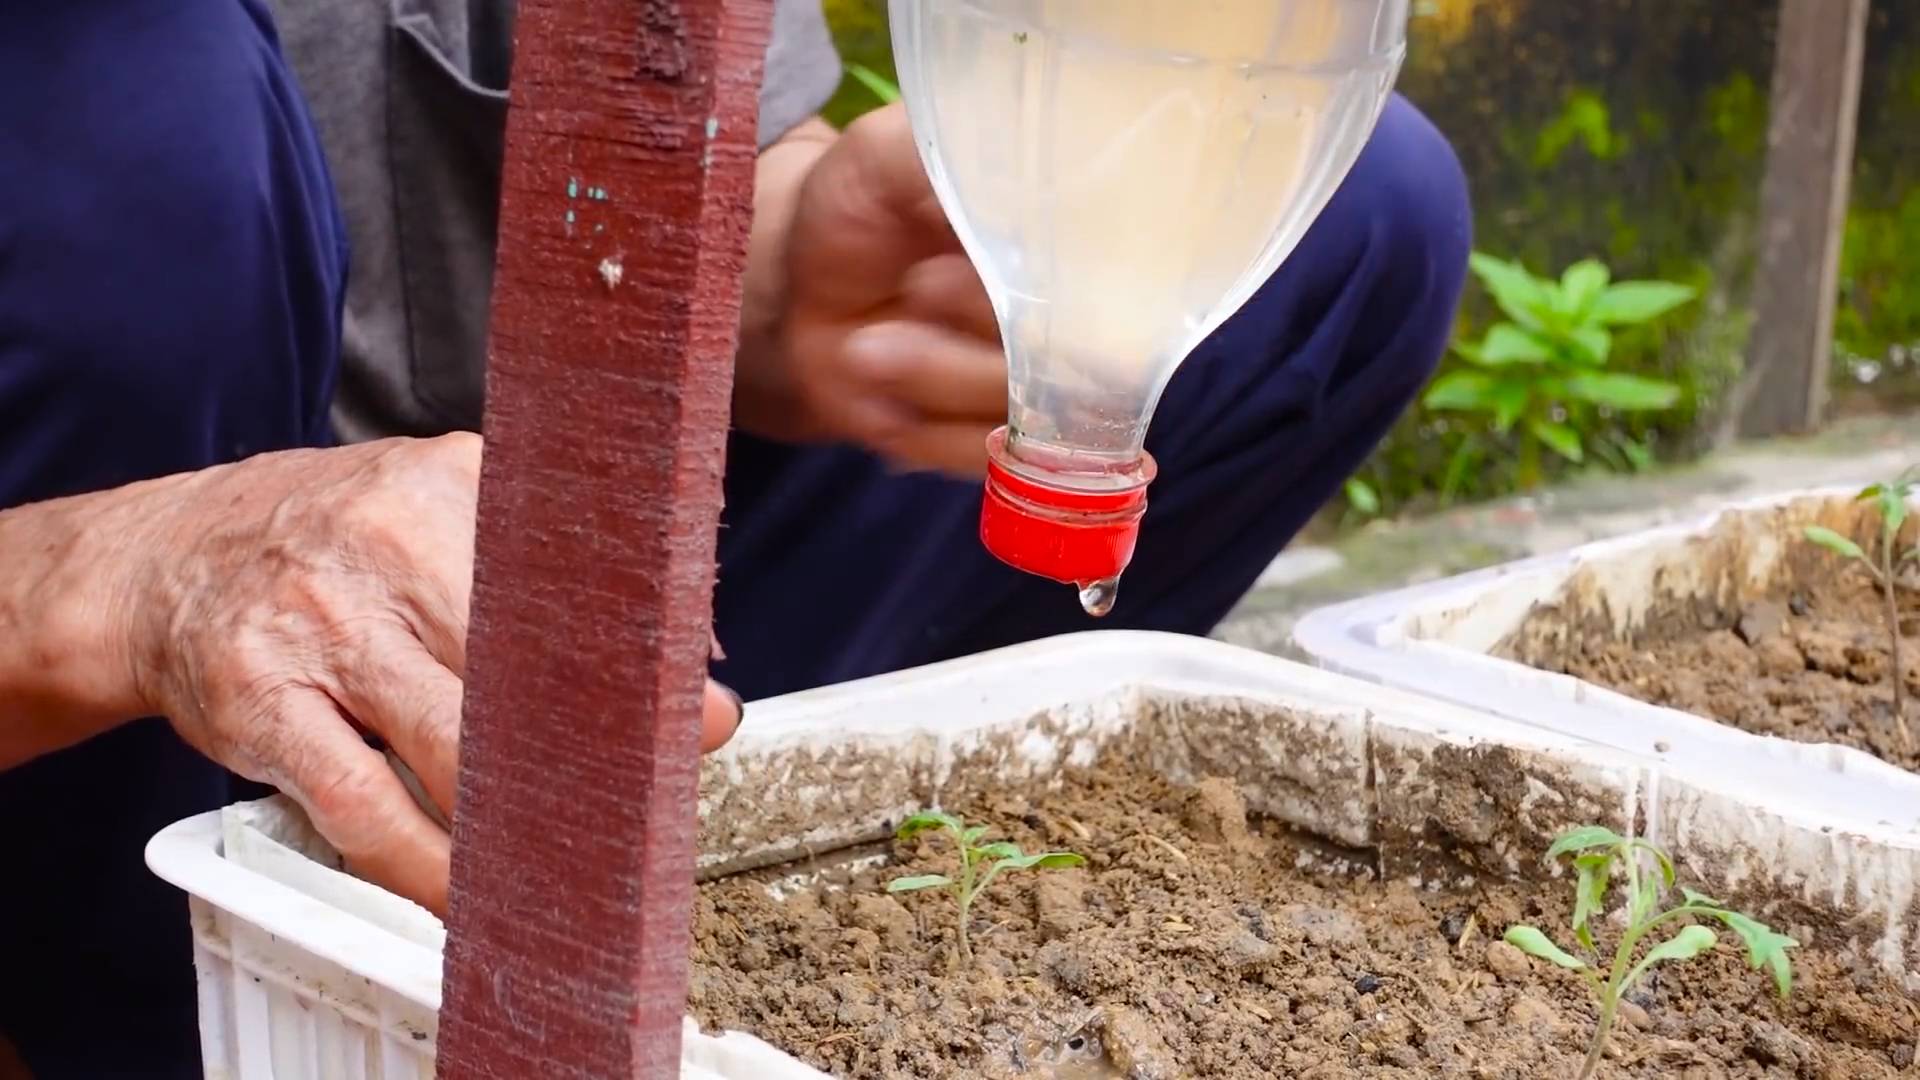
1. Moisten the Seed Starting Mix: Before filling the trays or pots, thoroughly moisten the seed starting mix with water. It should be damp but not soggy. I like to do this in a large bowl or bucket.
2. Fill the Trays or Pots: Fill each cell or pot with the moistened seed starting mix, leaving about half an inch of space at the top. Gently tap the trays or pots to settle the mix.
3. Sow the Seeds: Place 2-3 tomato seeds in the center of each cell or pot. This increases the chances of at least one seed germinating.
4. Cover the Seeds: Lightly cover the seeds with about ¼ inch of seed starting mix.
5. Water Gently: Use a spray bottle to gently water the surface of the soil. Avoid overwatering, as this can cause the seeds to rot.
6. Label Your Trays or Pots: Use plant labels to clearly identify each variety of tomato.
7. Cover with a Humidity Dome (Optional): If you’re using a humidity dome, place it over the trays or pots. This will help retain moisture and create a warm, humid environment for germination.
8. Place on a Heat Mat (Optional): If you’re using a heat mat, place the trays or pots on top of it.
9. Provide Light: Place the trays or pots under grow lights. If you don’t have grow lights, place them in a sunny window, but be aware that they may not get enough light.
Caring for Your Seedlings
Now comes the waiting game! But don’t worry, there are a few things you can do to ensure your seedlings thrive.
1. Maintain Moisture: Keep the seed starting mix consistently moist, but not soggy. Check the moisture level daily and water as needed with a spray bottle.
2. Provide Warmth: Tomato seeds germinate best at temperatures between 70-80°F (21-27°C). If you’re not using a heat mat, make sure the room is warm enough.
3. Provide Light: Tomato seedlings need at least 14-16 hours of light per day. If you’re using grow lights, keep them on for this long. If you’re using a sunny window, rotate the trays or pots regularly to ensure even growth.
4. Remove the Humidity Dome: Once the seedlings emerge (usually within 5-10 days), remove the humidity dome. This will help prevent fungal diseases.
5. Thin the Seedlings: Once the seedlings have their first true leaves (the second set of leaves that appear after the cotyledons), thin them to one seedling per cell or pot. Choose the strongest, healthiest-looking seedling and snip off the others at the soil line with scissors. Don’t pull them out, as this can disturb the roots of the remaining seedling.
6. Fertilize: Once the seedlings have their second set of true leaves, start fertilizing them with a diluted liquid fertilizer. Use a fertilizer specifically formulated for seedlings, and follow the instructions on the label. I usually start with half the recommended strength.
7. Harden Off: Before transplanting your seedlings outdoors, you need to “harden them off.” This means gradually exposing them to outdoor conditions over a period of 1-2 weeks. Start by placing them outdoors in a sheltered location for a few hours each day, gradually increasing the amount of time they spend outdoors. Protect them from direct sunlight and strong winds.
Transplanting Your Seedlings
The final step is transplanting your seedlings into their permanent homes in the garden or in containers.
1. Choose a Sunny Location: Tomatoes need at least 6-8 hours of sunlight per day. Choose a location in your garden that receives plenty of sun.
2. Prepare the Soil: Amend the soil with compost or other organic matter to improve drainage and fertility.
3. Dig a Hole: Dig a hole that is slightly larger than the root ball of the seedling.
4. Remove the Seedling: Gently remove the seedling from its tray or pot. If the roots are tightly bound, gently loosen them with your fingers.
5. Plant the Seedling: Place the seedling in the hole and backfill with soil. Plant the seedling deep, burying the stem up to the first set of leaves. This will encourage the plant to develop more roots.
6. Water Thoroughly: Water the seedling thoroughly after planting.
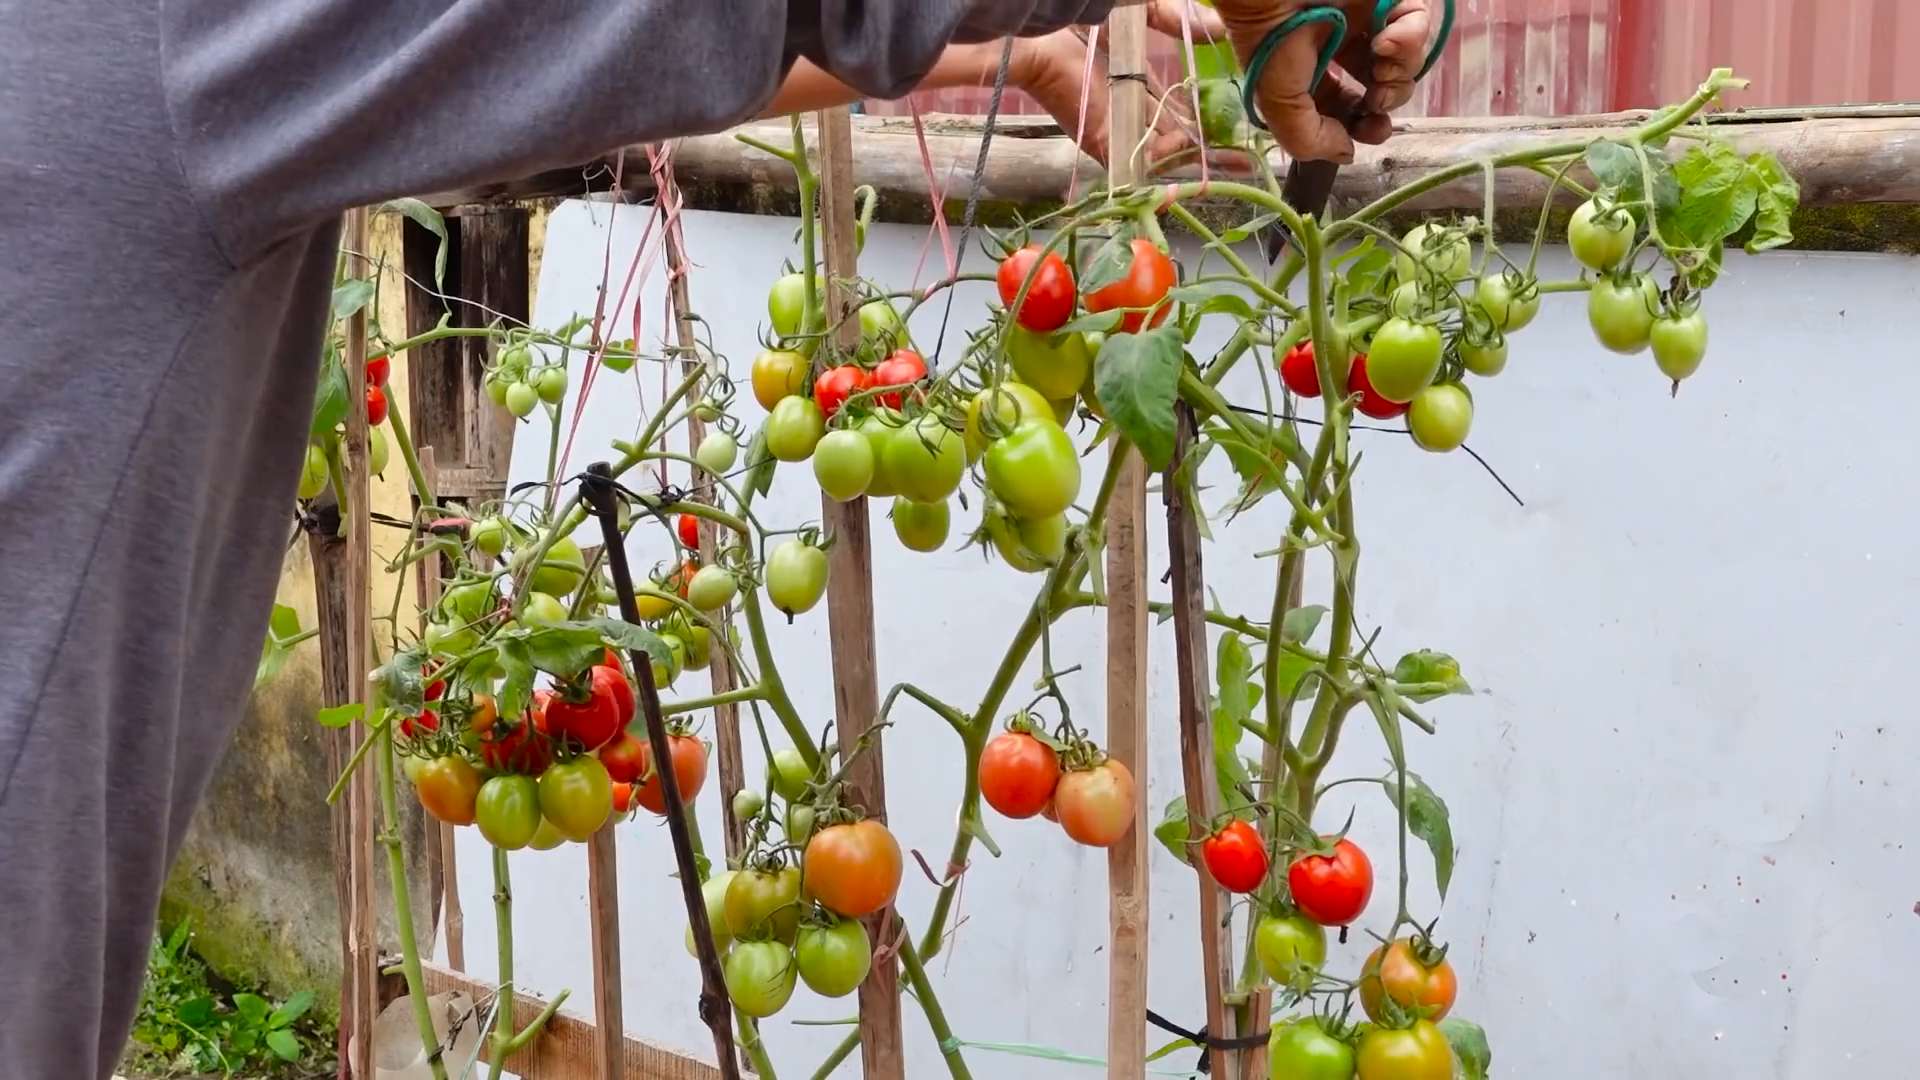
7. Stake or Cage (Indeterminate Varieties): If you’re growing indeterminate varieties, provide them with support by staking or caging them.
8. Mulch: Apply a layer of mulch around the base of the plant to help retain moisture and suppress weeds.
Ongoing Care
Once your tomato plants are in the ground, here are a few things you can do to keep them healthy and productive:
* Water Regularly: Tomatoes need consistent watering, especially during hot, dry weather. Water deeply and infrequently, rather than shallowly and frequently.
* Fertilize Regularly: Continue to fertilize your tomato plants every 2-3 weeks with a balanced fertilizer.
* Prune (Indeterminate Varieties): Prune indeterminate tomato plants to remove suckers (the small shoots that grow between the main stem and the branches). This will help improve air circulation and encourage fruit production.
* Watch for Pests and Diseases: Keep an eye out for pests and diseases, and take action promptly if you notice any problems.
* Harvest Regularly: Harvest your tomatoes when they are fully ripe and have reached their desired color.
And that’s it! Growing tomatoes from seed can seem daunting at first, but it’s actually quite simple once you get the hang of it. With a little bit of care and attention, you’ll be enjoying delicious homegrown tomatoes in no time. Happy gardening!
Conclusion
So, there you have it! Growing tomatoes from seed might seem daunting at first, but with a little patience and these simple steps, you can cultivate a thriving tomato garden right from your own home. The satisfaction of nurturing a tiny seed into a bountiful plant, laden with juicy, sun-ripened tomatoes, is truly unparalleled. Forget those bland, store-bought varieties; imagine the vibrant flavors and textures of homegrown heirlooms gracing your salads and sauces.
This DIY trick isn’t just about saving money (although that’s a definite perk!). It’s about connecting with nature, understanding the life cycle of a plant, and enjoying the freshest, most flavorful tomatoes imaginable. Plus, you have complete control over the varieties you grow. Want to try a quirky purple tomato? Or a tiny, explosively sweet cherry tomato? The possibilities are endless!
Why is this a must-try? Because it empowers you to take control of your food source, reduces your reliance on commercial agriculture, and provides a deeply rewarding gardening experience.
Consider these variations to personalize your tomato-growing journey:
* Experiment with different seed starting mediums: While we recommended a standard seed starting mix, you can also try coconut coir or even homemade compost (ensure it’s well-decomposed and sterilized).
* Explore different tomato varieties: From beefsteak to Roma, cherry to heirloom, the world of tomatoes is vast and exciting. Research different varieties to find those best suited to your climate and taste preferences.
* Try succession planting: Start new batches of seeds every few weeks to ensure a continuous harvest throughout the growing season.
* Consider using grow lights: If you live in an area with limited sunlight, grow lights can provide the necessary illumination for healthy seedling development.
* Get creative with containers: While we suggested standard pots, you can also use recycled containers like yogurt cups or plastic bottles (just be sure to provide drainage).
Don’t be afraid to experiment and adapt these techniques to your specific needs and environment. Gardening is a learning process, and every season brings new opportunities for discovery.
We wholeheartedly encourage you to give this DIY trick a try. Start small, be patient, and most importantly, have fun! We’re confident that you’ll be amazed by the results.
And now, we want to hear from you! Share your experiences, tips, and photos in the comments below. What tomato varieties are you most excited to grow? What challenges did you encounter, and how did you overcome them? Let’s create a community of tomato-growing enthusiasts and learn from each other. Let us know how your growing tomatoes from seed journey goes!
Frequently Asked Questions (FAQ)
Q: How long does it take for tomato seeds to germinate?
A: Tomato seeds typically germinate within 5-14 days, depending on temperature and moisture levels. Maintaining a consistent soil temperature of around 75-85°F (24-29°C) is ideal for optimal germination. Using a heat mat can significantly speed up the process. Ensure the soil remains consistently moist but not waterlogged.
Q: What kind of soil should I use for starting tomato seeds?
A: It’s crucial to use a seed-starting mix, not garden soil. Seed-starting mixes are specifically formulated to be lightweight, sterile, and well-draining, which is essential for healthy seedling development. Garden soil is often too heavy and can contain pathogens that can harm young seedlings. You can find seed-starting mixes at most garden centers or online retailers.
Q: How often should I water my tomato seedlings?
A: Water your tomato seedlings when the top inch of soil feels dry to the touch. Avoid overwatering, as this can lead to root rot. Water gently to avoid disturbing the seedlings. A spray bottle or watering can with a gentle nozzle is ideal.
Q: When should I transplant my tomato seedlings into larger pots?
A: Transplant your tomato seedlings into larger pots when they have developed their first set of true leaves (the leaves that appear after the initial seed leaves, or cotyledons). This usually happens about 2-3 weeks after germination. Choose pots that are at least 4 inches in diameter.
Q: How much sunlight do tomato seedlings need?
A: Tomato seedlings need at least 6-8 hours of direct sunlight per day. If you don’t have enough natural sunlight, you can supplement with grow lights. Place the grow lights a few inches above the seedlings and adjust as they grow.
Q: What are some common problems when growing tomatoes from seed, and how can I fix them?
A: Some common problems include:
* Damping off: This is a fungal disease that can cause seedlings to collapse and die. To prevent damping off, use a sterile seed-starting mix, avoid overwatering, and provide good air circulation.
* Leggy seedlings: This occurs when seedlings don’t get enough light and stretch towards the light source. To prevent leggy seedlings, provide ample sunlight or use grow lights.
* Slow growth: This can be caused by a variety of factors, including low temperatures, poor soil, or lack of nutrients. Ensure your seedlings are getting enough warmth, light, and nutrients.
Q: Can I start tomato seeds directly in the garden?
A: While it’s possible to direct sow tomato seeds in the garden, it’s generally not recommended, especially in cooler climates. Starting seeds indoors gives you a head start on the growing season and allows you to control the environment. Direct sowing is best suited for warmer climates with a long growing season.
Q: What are the best tomato varieties to grow from seed?
A: The best tomato varieties to grow from seed depend on your climate, taste preferences, and growing space. Some popular and reliable varieties include:
* Early Girl: A classic early-maturing variety that produces medium-sized red tomatoes.
* Roma: A popular paste tomato that’s ideal for making sauces and canning.
* Cherry Tomatoes (Sungold, Sweet Million): Small, sweet, and prolific, cherry tomatoes are great for snacking and salads.
* Beefsteak: Large, meaty tomatoes that are perfect for slicing and sandwiches.
* Heirloom Varieties (Brandywine, Cherokee Purple): These varieties offer unique flavors and colors and are often more disease-resistant than hybrid varieties.
Q: How do I harden off my tomato seedlings before transplanting them outdoors?
A: Hardening off is the process of gradually acclimating your seedlings to outdoor conditions. About a week before you plan to transplant them, start by placing them outdoors in a sheltered location for a few hours each day. Gradually increase the amount of time they spend outdoors each day, and expose them to more sunlight and wind. This will help them adjust to the harsher conditions and prevent transplant shock.
Q: What kind of fertilizer should I use for my tomato seedlings?
A: Once your tomato seedlings have developed their first set of true leaves, you can start fertilizing them with a diluted liquid fertilizer. Choose a fertilizer that is specifically formulated for seedlings or vegetables. Follow the instructions on the fertilizer label carefully. Avoid over-fertilizing, as this can damage the seedlings.
Q: How do I prevent pests and diseases from affecting my tomato seedlings?
A: Prevention is key when it comes to pests and diseases. Start by using a sterile seed-starting mix and providing good air circulation. Inspect your seedlings regularly for signs of pests or diseases. If you find any problems, address them promptly. You can use organic pest control methods, such as insecticidal soap or neem oil, to control pests.
Q: Can I grow tomatoes from seed in containers?
A: Yes, you can definitely grow tomatoes from seed in containers. Choose a container that is at least 12 inches in diameter and has good drainage. Use a high-quality potting mix and provide plenty of sunlight and water. Container-grown tomatoes may require more frequent fertilization than those grown in the ground.
Q: What is the best time of year to start tomato seeds indoors?
A: The best time to start tomato seeds indoors is typically 6-8 weeks before the last expected frost in your area. This will give your seedlings enough time to develop before they are transplanted outdoors. Check your local frost dates to determine the best time to start your seeds.

Leave a Comment