

Indoor Carrot Container Gardening: Imagine plucking fresh, sweet carrots right from your windowsill, even in the dead of winter! Sounds like a dream, right? Well, it doesn’t have to be! For centuries, humans have cultivated food in small spaces, from ancient rooftop gardens in bustling cities to medieval monastery herb gardens. This inherent connection to growing our own food is deeply ingrained within us, and now, more than ever, it’s making a huge comeback.
In today’s fast-paced world, we’re often disconnected from the source of our food. Store-bought produce, while convenient, can lack the vibrant flavor and nutritional value of homegrown vegetables. Plus, let’s be honest, who knows how long those carrots have been sitting on the shelf? That’s where indoor carrot container gardening comes in! It’s a fantastic way to reconnect with nature, enjoy fresh produce, and add a touch of green to your living space.
I’m going to show you some simple, effective DIY tricks and hacks that will transform your home into a mini-farm, one carrot at a time. Whether you’re a seasoned gardener or a complete newbie, I’ll guide you through every step, from choosing the right container to harvesting your delicious, homegrown carrots. Get ready to ditch the bland supermarket carrots and embrace the joy of growing your own!
Grow Your Own Carrots Indoors: A Beginner’s Guide
Hey there, fellow gardening enthusiasts! Ever dreamt of enjoying fresh, homegrown carrots even when the weather outside is frightful? Well, dream no more! I’m going to walk you through the surprisingly simple process of growing carrots indoors. It’s a rewarding experience, and trust me, nothing beats the taste of a carrot you’ve nurtured from seed to harvest.
Choosing the Right Carrot Variety
Before we dive into the nitty-gritty, let’s talk carrots. Not all carrot varieties are created equal when it comes to indoor gardening. You’ll want to opt for shorter, rounder varieties that don’t require a ton of space to grow. Here are a few of my favorites:
* ‘Thumbelina’: These are super cute, round carrots that are perfect for containers. They mature quickly and are incredibly sweet.
* ‘Paris Market’: Similar to ‘Thumbelina,’ these are small, round, and ideal for limited space.
* ‘Little Finger’: As the name suggests, these are small, slender carrots that are well-suited for container gardening.
* ‘Short n Sweet’: A classic choice for shorter carrots with a good flavor.
Gathering Your Supplies
Okay, now that we’ve picked our carrot contenders, let’s gather our supplies. Here’s what you’ll need:
* A Large Container: This is crucial! Carrots need depth to grow properly. I recommend a container that’s at least 12 inches deep and wide. A rectangular planter box works great, or even a large, sturdy bucket. Make sure it has drainage holes!
* Potting Mix: Don’t skimp on the soil! Use a high-quality, well-draining potting mix. Avoid using garden soil, as it can be too heavy and compact, hindering root growth. I like to use a mix specifically formulated for vegetables.
* Carrot Seeds: Obviously! Make sure you get fresh seeds from a reputable source.
* Watering Can or Spray Bottle: For gentle watering.
* Grow Lights (Optional but Recommended): If you don’t have a spot with at least 6 hours of direct sunlight, grow lights are a must.
* Fertilizer (Optional): A balanced liquid fertilizer can help boost growth, but it’s not always necessary.
* Small Trowel or Hand Rake: For planting and thinning.
Planting Your Carrot Seeds
Alright, let’s get our hands dirty! Here’s the step-by-step planting process:
1. Prepare the Container: Fill your container with the potting mix, leaving about an inch or two of space at the top. Gently pat down the soil to remove any large air pockets.
2. Sow the Seeds: Carrot seeds are tiny, so be careful not to plant them too densely. Sprinkle the seeds evenly over the surface of the soil, spacing them about 1/2 inch to 1 inch apart.
3. Cover the Seeds: Lightly cover the seeds with a thin layer of potting mix (about 1/4 inch).
4. Water Gently: Use a watering can or spray bottle to gently moisten the soil. Be careful not to wash away the seeds. The soil should be damp but not soggy.
5. Provide Light: Place your container in a location that receives at least 6 hours of direct sunlight per day. If you don’t have enough natural light, use grow lights. Position the lights a few inches above the soil surface and keep them on for 12-16 hours per day.
6. Maintain Moisture: Keep the soil consistently moist but not waterlogged. Check the soil moisture daily by sticking your finger into the soil. If the top inch feels dry, it’s time to water.
Caring for Your Indoor Carrots
Now that your carrots are planted, it’s time to nurture them. Here’s what you need to do to keep them happy and healthy:
1. Thinning: This is a crucial step! Once your seedlings emerge (usually within 1-3 weeks), you’ll need to thin them out. Carrots need space to develop properly. When the seedlings are about 1-2 inches tall, thin them so that they are about 1-2 inches apart. Gently pull out the weaker seedlings, being careful not to disturb the roots of the remaining plants.
2. Watering: As mentioned before, keep the soil consistently moist. Water deeply when the top inch of soil feels dry. Avoid overwatering, as this can lead to root rot.
3. Fertilizing (Optional): If you want to give your carrots a boost, you can fertilize them every 2-3 weeks with a balanced liquid fertilizer. Follow the instructions on the fertilizer label. I usually dilute the fertilizer to half strength to avoid burning the roots.
4. Weeding: Keep an eye out for any weeds that may pop up in your container. Remove them promptly to prevent them from competing with your carrots for nutrients and water.
5. Rotating: If you’re using grow lights, rotate your container regularly to ensure that all sides of the plants receive equal light exposure. This will help them grow evenly.
Dealing with Common Problems
Even with the best care, you might encounter a few problems along the way. Here are some common issues and how to address them:
* Poor Germination: If your seeds aren’t germinating, it could be due to several factors: old seeds, soil that’s too dry or too wet, or temperatures that are too cold. Make sure you’re using fresh seeds, maintaining consistent moisture, and providing adequate warmth.
* Leggy Seedlings: Leggy seedlings are tall and spindly, with weak stems. This is usually caused by insufficient light. Move your container to a brighter location or use grow lights.
* Root Rot: Root rot is a fungal disease that can occur in overly wet soil. To prevent root rot, make sure your container has good drainage and avoid overwatering. If you suspect root rot, allow the soil to dry out slightly before watering again.
* Pests: Indoor carrots are less susceptible to pests than outdoor carrots, but you might still encounter aphids or spider mites. If you spot any pests, try spraying them with a strong stream of water or using an insecticidal soap.
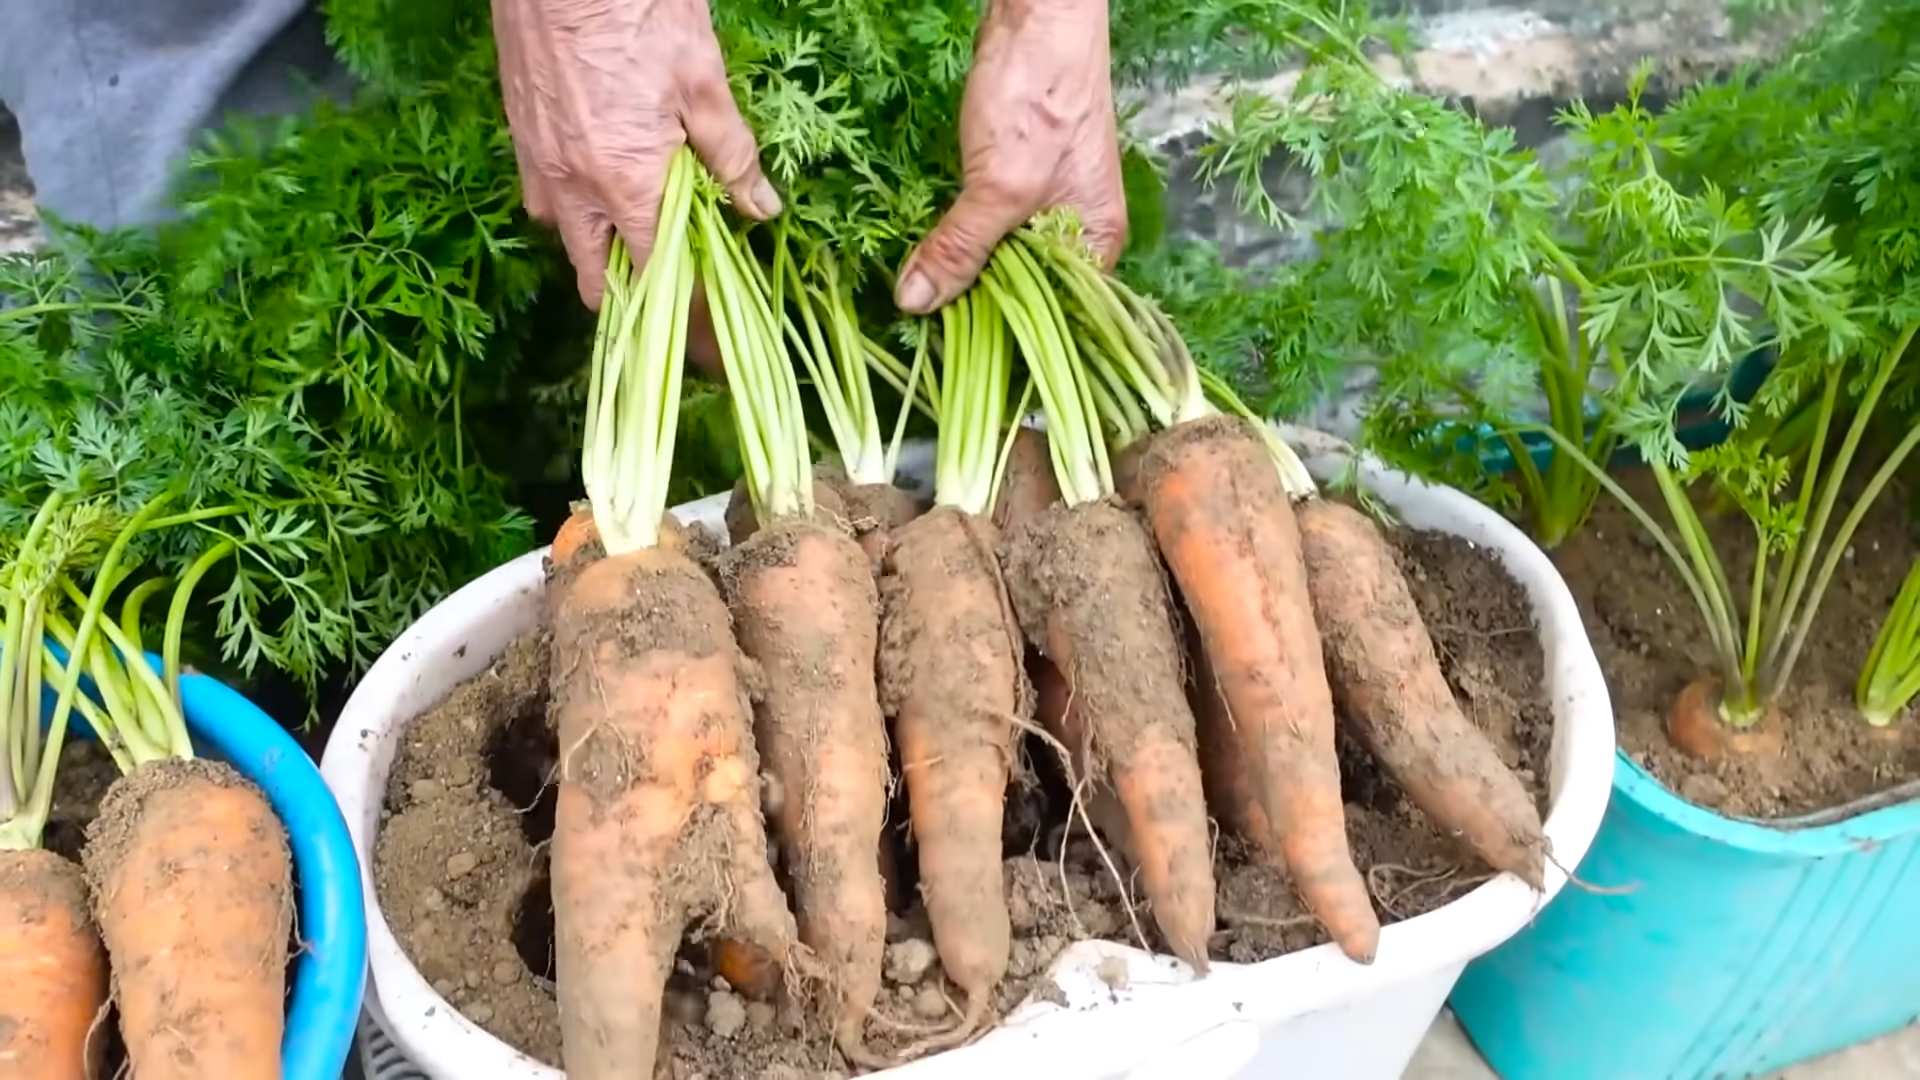
Harvesting Your Carrots
The moment we’ve all been waiting for! Harvesting your carrots is the most rewarding part of the process.
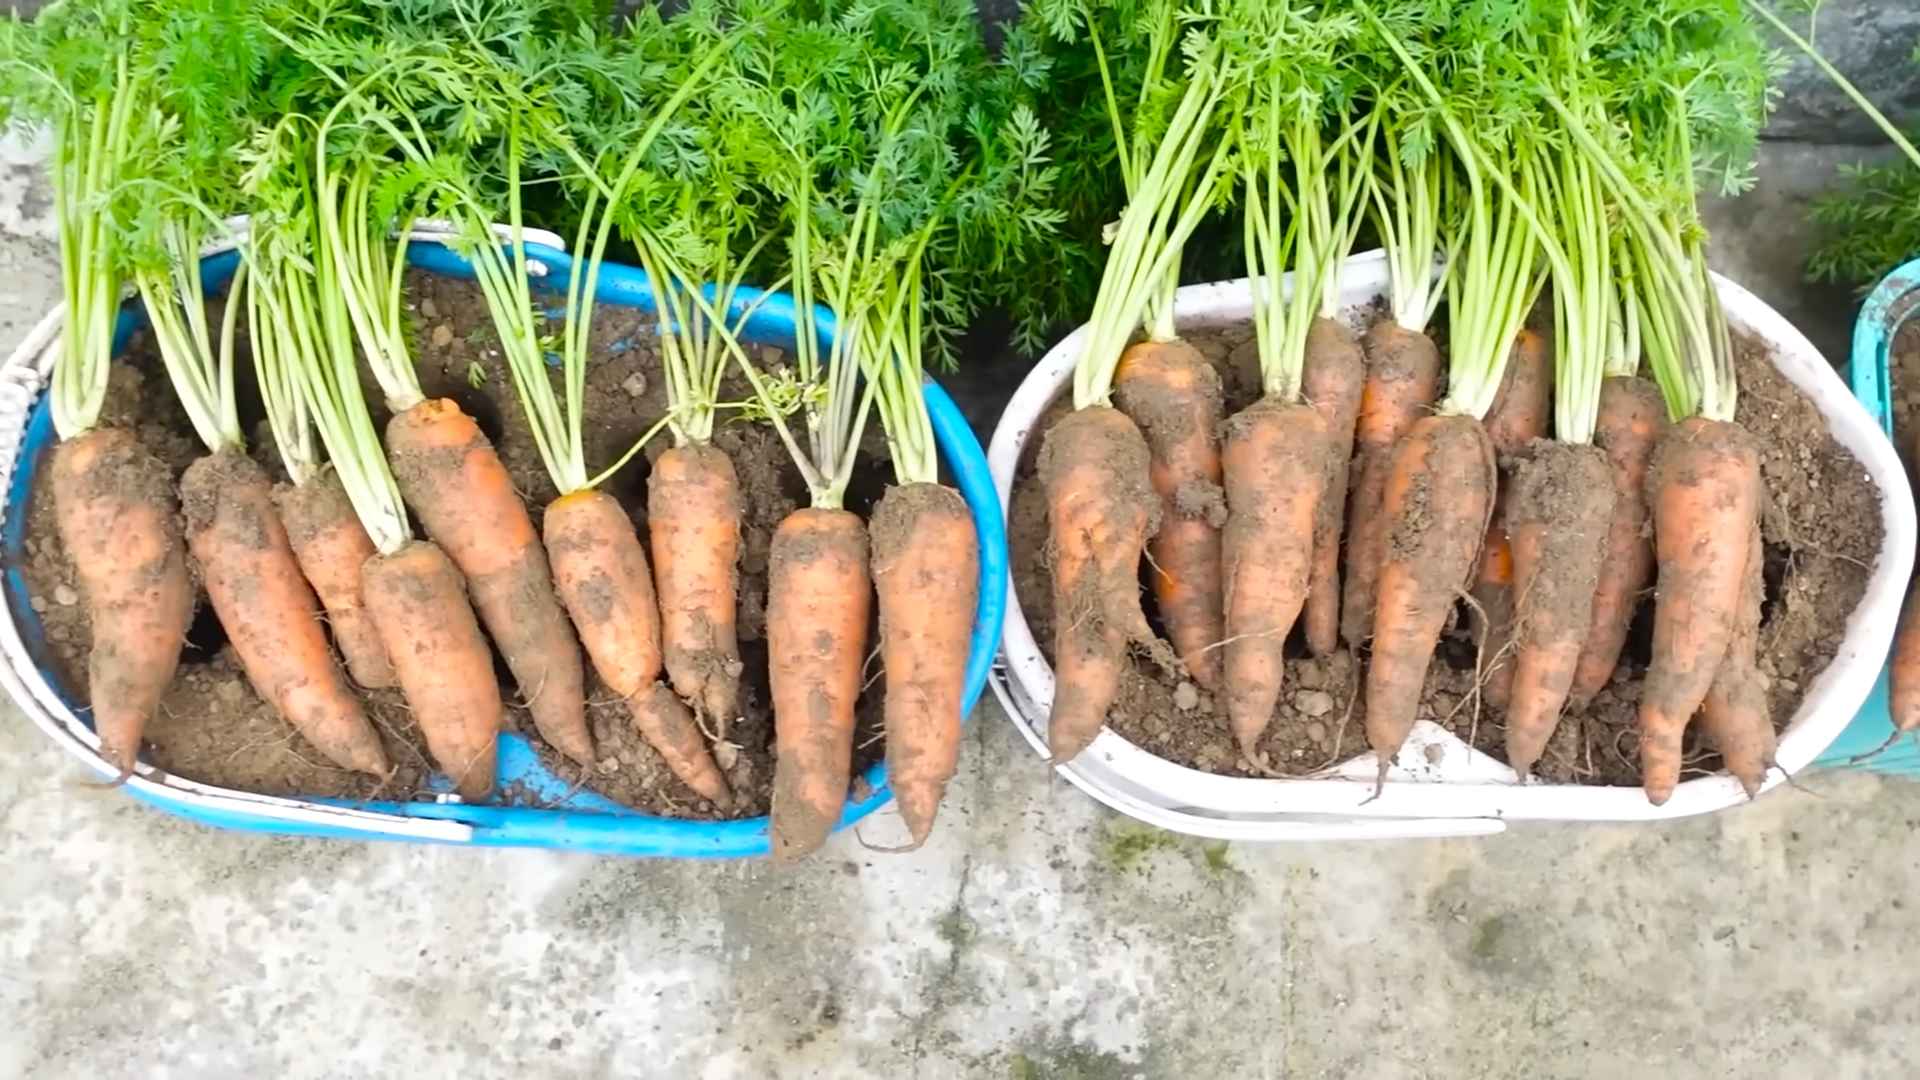
1. Maturity Time: Carrot maturity time varies depending on the variety, but most indoor carrots will be ready to harvest in 50-75 days.
2. Signs of Readiness: You’ll know your carrots are ready to harvest when the tops of the carrots are visible above the soil surface and have reached the desired size.
3. Harvesting Technique: Gently loosen the soil around the carrot with a trowel or hand rake. Then, grasp the carrot by the base of the leaves and gently pull it out of the soil. If the carrot is difficult to pull, try wiggling it back and forth to loosen it further.
4. Enjoy! Once you’ve harvested your carrots, wash them thoroughly and enjoy them fresh! They’re delicious raw, roasted, or added to soups and stews.
Tips for Success
Here are a few extra tips to help you succeed with your indoor carrot garden:
* Choose the Right Container: I can’t stress this enough! Depth is key.
* Use High-Quality Potting Mix: Don’t skimp on the soil.
* Provide Adequate Light: Carrots need plenty of light to thrive.
* Thin Your Seedlings: This is essential for proper growth.
* Water Consistently: Keep the soil moist but not waterlogged.
* Be Patient: Growing carrots takes time, so don’t get discouraged if you don’t see results immediately.
Growing carrots indoors is a fun and rewarding experience. With a little bit of care and attention, you can enjoy fresh, homegrown carrots all year round. So, grab your supplies, get planting, and get ready to enjoy the fruits (or rather, vegetables) of your labor! Happy gardening!
Conclusion
So, there you have it! Transforming your living space into a miniature carrot farm with indoor carrot container gardening is not only achievable but surprisingly rewarding. We’ve walked you through the simple steps, from selecting the right container and soil to nurturing your tiny carrot seedlings into vibrant, edible roots. But why should you even bother with this DIY project?
The answer is multifaceted. First and foremost, it’s about fresh, homegrown flavor. Imagine plucking a perfectly formed, sweet carrot directly from your windowsill, knowing exactly where it came from and what went into its growth. No more bland, store-bought carrots lacking that earthy, vibrant taste. This is about experiencing the true essence of a carrot, bursting with natural sweetness and nutrients.
Beyond the flavor, indoor carrot container gardening offers a unique connection to nature, especially for those living in urban environments or areas with limited outdoor space. It’s a therapeutic activity, a chance to slow down, get your hands dirty, and witness the miracle of life unfolding before your eyes. Watching those tiny green shoots emerge from the soil is a deeply satisfying experience, a reminder of the simple joys that nature provides.
Furthermore, this project is incredibly versatile. Feel free to experiment with different carrot varieties. Nantes carrots are a classic choice, but consider trying round carrots like Parisian or Thumbelina for a unique twist. These shorter varieties are particularly well-suited for container gardening and can add a playful element to your indoor garden. You can also explore different container types. While we recommended a deep pot, you could also use a grow bag or even repurpose a large bucket. Just ensure it has adequate drainage.
Don’t be afraid to get creative with your soil mix. While a standard potting mix works well, you can enhance it with compost or worm castings for added nutrients. Consider adding a layer of mulch to the top of the soil to help retain moisture and suppress weeds.
And speaking of creativity, why not turn your indoor carrot garden into a decorative feature? Arrange your containers on a tiered shelf, add some colorful labels, or even incorporate other herbs and vegetables into the mix. The possibilities are endless!
But the real magic happens when you share your experience. We encourage you to embark on this indoor carrot container gardening adventure and document your progress. Take photos, share your tips and tricks, and let us know what worked best for you. Did you discover a particular fertilizer that boosted growth? Did you find a unique way to deter pests? Your insights can help other aspiring indoor gardeners succeed.
So, grab your seeds, your soil, and your container, and get ready to experience the joy of growing your own carrots indoors. It’s a simple, rewarding, and delicious way to connect with nature and enjoy the freshest carrots imaginable. We can’t wait to hear about your success!
Frequently Asked Questions (FAQ)
What is the best time of year to start indoor carrot container gardening?
While you can technically start indoor carrot container gardening at any time of year, the best time is generally during the cooler months, such as fall or winter. This is because carrots prefer cooler temperatures for optimal growth. Starting in the fall or winter allows you to provide the ideal environment indoors, away from the intense heat of summer. However, with proper temperature control and adequate lighting, you can successfully grow carrots indoors year-round.
How much sunlight do indoor carrots need?
Carrots require at least 6-8 hours of direct sunlight per day to thrive. If you don’t have a sunny windowsill that provides this much light, you’ll need to supplement with artificial grow lights. LED grow lights are an excellent option as they are energy-efficient and provide the full spectrum of light that plants need. Position the grow lights a few inches above the carrot seedlings and adjust the height as they grow.
What kind of soil is best for growing carrots in containers?
The ideal soil for indoor carrot container gardening is a loose, well-draining potting mix. Avoid heavy clay soils, as they can hinder root development. A good mix would include peat moss, perlite, and vermiculite. You can also add compost or worm castings to enrich the soil with nutrients. Ensure the soil is slightly acidic, with a pH between 6.0 and 6.8.
How often should I water my indoor carrot plants?
Water your indoor carrot plants regularly, keeping the soil consistently moist but not waterlogged. Overwatering can lead to root rot, while underwatering can stunt growth. Check the soil moisture by sticking your finger about an inch deep. If the soil feels dry, it’s time to water. Water deeply until you see water draining from the bottom of the container.
How long does it take for carrots to grow indoors?
The time it takes for carrots to mature indoors depends on the variety and growing conditions. Generally, it takes about 60-80 days from planting to harvest. Shorter varieties like Parisian carrots may mature faster, while longer varieties may take a bit longer. Be patient and monitor your plants closely. You’ll know they’re ready to harvest when the tops of the carrots are visible above the soil and have reached the desired size.
What are some common pests and diseases that affect indoor carrots?
While indoor carrot container gardening is generally less susceptible to pests and diseases than outdoor gardening, there are still some potential issues to watch out for. Aphids, spider mites, and fungus gnats are common pests that can infest indoor plants. You can control these pests with insecticidal soap or neem oil. Root rot is a common disease that can occur if the soil is too wet. To prevent root rot, ensure your container has good drainage and avoid overwatering.
Can I grow carrots from carrot tops?
While you can’t grow a full carrot from a carrot top, you can regrow the leafy greens. Cut off the top of a carrot about an inch from the green shoots and place it in a shallow dish of water. The greens will continue to grow, and you can use them in salads or as a garnish. However, the carrot itself will not regrow.
How do I know when my carrots are ready to harvest?
You’ll know your carrots are ready to harvest when the tops of the carrots are visible above the soil and have reached the desired size. Gently loosen the soil around the carrot and pull it out of the container. If the carrot is difficult to pull, it may not be fully mature. You can also harvest carrots at different stages of maturity, depending on your preference. Smaller carrots will be more tender, while larger carrots will have a more intense flavor.
Can I use fertilizer for my indoor carrot plants?
Yes, fertilizing your indoor carrot plants can help promote healthy growth and increase yields. Use a balanced fertilizer with equal parts nitrogen, phosphorus, and potassium. You can also use a fertilizer specifically formulated for root vegetables. Follow the instructions on the fertilizer label and avoid over-fertilizing, as this can burn the roots.
What are some tips for maximizing my indoor carrot harvest?
To maximize your indoor carrot harvest, ensure your plants receive adequate sunlight or grow lights, use a well-draining potting mix, water regularly, and fertilize as needed. Thin out the seedlings to allow them enough space to grow. Rotate the container regularly to ensure even growth. And most importantly, be patient and enjoy the process!

Leave a Comment