

Kitchen Cleaning Hacks: Are you tired of spending hours scrubbing away at stubborn grease and grime in your kitchen? I know I am! Let’s face it, the kitchen is the heart of the home, but it can quickly become a battlefield of spills, splatters, and sticky messes. But what if I told you there’s a better way? A way to reclaim your weekends and actually enjoy your kitchen again?
For generations, resourceful homemakers have passed down clever cleaning tips and tricks, often born out of necessity and a desire to keep their homes sparkling without harsh chemicals. Think about it – our grandmothers didn’t have a cabinet full of specialized cleaning products! They relied on simple, natural ingredients and a little bit of ingenuity. These time-tested methods are just as relevant today, and I’m excited to share some of my favorite kitchen cleaning hacks with you.
In today’s busy world, who has time to spend an entire day cleaning? These DIY tricks are designed to save you time, money, and effort. From banishing burnt-on food to deodorizing your refrigerator, these hacks will help you tackle even the toughest kitchen cleaning challenges with ease. So, grab your apron, and let’s get ready to transform your kitchen into a sparkling, inviting space using simple, effective, and often surprising methods!

DIY Kitchen Cleaning Hacks: Sparkling Clean with Minimal Effort!
Okay, let’s face it, cleaning the kitchen is nobody’s favorite chore. But a clean kitchen is a happy kitchen, and I’m here to share some of my absolute favorite DIY cleaning hacks that will make the process faster, easier, and even (dare I say?) a little bit fun! These are tried and tested methods I use in my own kitchen, and they’ve saved me tons of time and elbow grease.
Cleaning the Microwave Like a Pro
The microwave – a breeding ground for splatters and smells! But fear not, this hack is a game-changer.
* The Goal: To loosen stuck-on food and eliminate odors in your microwave.
* What You’ll Need:
* 1 cup of water
* 1 tablespoon of white vinegar (or lemon juice)
* Microwave-safe bowl
* Clean sponge or cloth
Step-by-Step Instructions:
1. Mix the Solution: In your microwave-safe bowl, combine the water and vinegar (or lemon juice). The vinegar helps to break down grease and grime, while the lemon juice adds a fresh scent.
2. Microwave Magic: Place the bowl in the microwave and heat it on high for 5-10 minutes. You want the solution to boil and create steam inside the microwave. The steam is what will loosen all that stubborn gunk.
3. Let it Sit: Once the timer goes off, don’t open the microwave immediately! Let it sit for another 5 minutes. This allows the steam to continue working its magic.
4. Wipe it Down: Carefully remove the bowl (it will be hot!). Use your clean sponge or cloth to wipe down the inside of the microwave. You’ll be amazed at how easily the food particles come off.
5. Final Touches: For any particularly stubborn spots, you can dip your sponge in the remaining solution and scrub a little harder. Rinse the sponge and wipe down the interior one last time to remove any residue.
Degreasing Your Stovetop with Baking Soda
A greasy stovetop is a common kitchen woe. But baking soda is your secret weapon!
* The Goal: To remove stubborn grease and grime from your stovetop without harsh chemicals.
* What You’ll Need:
* Baking soda
* Water
* Spray bottle
* Clean sponge or cloth
* Old toothbrush (optional, for tight corners)
Step-by-Step Instructions:
1. Create a Paste: In a small bowl, mix baking soda with enough water to form a thick paste. The consistency should be similar to toothpaste.
2. Apply the Paste: Generously apply the baking soda paste to the greasy areas of your stovetop. Let it sit for at least 15-20 minutes. For really tough grease, you can let it sit for even longer – up to an hour.
3. Spray with Water: After the paste has sat, lightly spray the stovetop with water. This will help to reactivate the baking soda and make it easier to scrub.
4. Scrub Away: Use your clean sponge or cloth to scrub the stovetop. You’ll notice the grease starting to loosen and lift. For tight corners and around burner grates, an old toothbrush can be really helpful.
5. Rinse and Wipe: Rinse the stovetop thoroughly with water to remove all traces of baking soda. Then, wipe it down with a clean, dry cloth. Your stovetop should be sparkling clean!
Cleaning Your Oven with Ammonia (Safely!)
Oven cleaning is notoriously dreaded, but this ammonia trick makes it surprisingly manageable. Safety is paramount here, so follow these instructions carefully!
* The Goal: To loosen baked-on grease and grime in your oven using ammonia fumes.
* What You’ll Need:
* 1/2 cup ammonia
* 1 gallon of hot water
* Oven-safe bowl
* Dish soap
* Clean sponge or cloth
* Rubber gloves
* Eye protection (goggles or glasses)
* Crucially: Excellent ventilation! Open windows and doors.
Step-by-Step Instructions:
1. Safety First: This is the most important step! Open all windows and doors in your kitchen to ensure excellent ventilation. Wear rubber gloves and eye protection. Remove all oven racks and clean them separately (see below).
2. Prepare the Ammonia: Heat the gallon of water. Pour 1/2 cup of ammonia into the oven-safe bowl.
3. The Ammonia Soak: Place the bowl of ammonia on the top rack of your oven. Close the oven door and let it sit overnight (at least 12 hours). The ammonia fumes will loosen the baked-on grime. Do not turn the oven on!
4. Ventilate and Clean: The next day, carefully remove the bowl of ammonia (it will still be potent!). Discard the ammonia safely. Continue to ventilate the kitchen thoroughly.
5. Wipe it Down: Mix a small amount of dish soap with warm water. Use your clean sponge or cloth to wipe down the inside of the oven. The grime should come off much easier than usual.
6. Rinse and Dry: Rinse the oven thoroughly with clean water to remove any soap residue. Wipe it dry with a clean cloth.
7. Reassemble: Replace the oven racks. Your oven should now be significantly cleaner!
Cleaning Oven Racks with Dish Soap and a Bathtub
Those oven racks can be a real pain! This method uses the power of soaking to loosen the grime.
* The Goal: To effectively clean oven racks without excessive scrubbing.
* What You’ll Need:
* Dish soap
* Hot water
* Old towel or blanket
* Scrub brush or sponge
* Bathtub (or large utility sink)
Step-by-Step Instructions:
1. Protect Your Tub: Line the bottom of your bathtub with an old towel or blanket to prevent scratching.
2. Soak the Racks: Place the oven racks in the bathtub. Fill the tub with hot water until the racks are completely submerged.
3. Add Dish Soap: Add a generous amount of dish soap to the water. The dish soap will help to break down the grease and grime.
4. Let it Soak: Let the racks soak for at least 2-3 hours, or even overnight for heavily soiled racks. The longer they soak, the easier they will be to clean.
5. Scrub Away: After soaking, use a scrub brush or sponge to scrub the racks. The grime should come off much more easily than if you tried to clean them without soaking.
6. Rinse and Dry: Rinse the racks thoroughly with clean water to remove all soap residue. Dry them with a clean towel before placing them back in the oven.
Cleaning Your Dishwasher with Vinegar and Baking Soda
Yes, even the machine that cleans your dishes needs a good cleaning itself!
* The Goal: To remove buildup, odors, and food particles from your dishwasher.
* What You’ll Need:
* 1 cup of white vinegar
* 1 cup of baking soda
* Dish soap (optional)
Step-by-Step Instructions:
1. Vinegar Wash: Make sure your dishwasher is empty. Place a dishwasher-safe cup filled with 1 cup of white vinegar on the top rack of the dishwasher.
2. Run a Hot Cycle: Run the dishwasher on the hottest cycle. The vinegar will help to dissolve grease, grime, and mineral deposits.
3. Baking Soda Refresh: Once the cycle is complete, sprinkle 1 cup of baking soda on the bottom of the dishwasher.
4. Another Short Cycle: Run another short, hot cycle. The baking soda will help to absorb odors and further clean the dishwasher.
5. Clean the Filter: Remove and clean the dishwasher filter. This is where a lot of food particles can accumulate. Rinse it thoroughly under running water. You can use a soft brush to scrub away any stubborn debris.
6. Wipe Down the Interior: Use a damp cloth to wipe down the interior of the dishwasher, paying attention to the door seals and any areas where food particles may be trapped. You can use a little dish soap if needed.
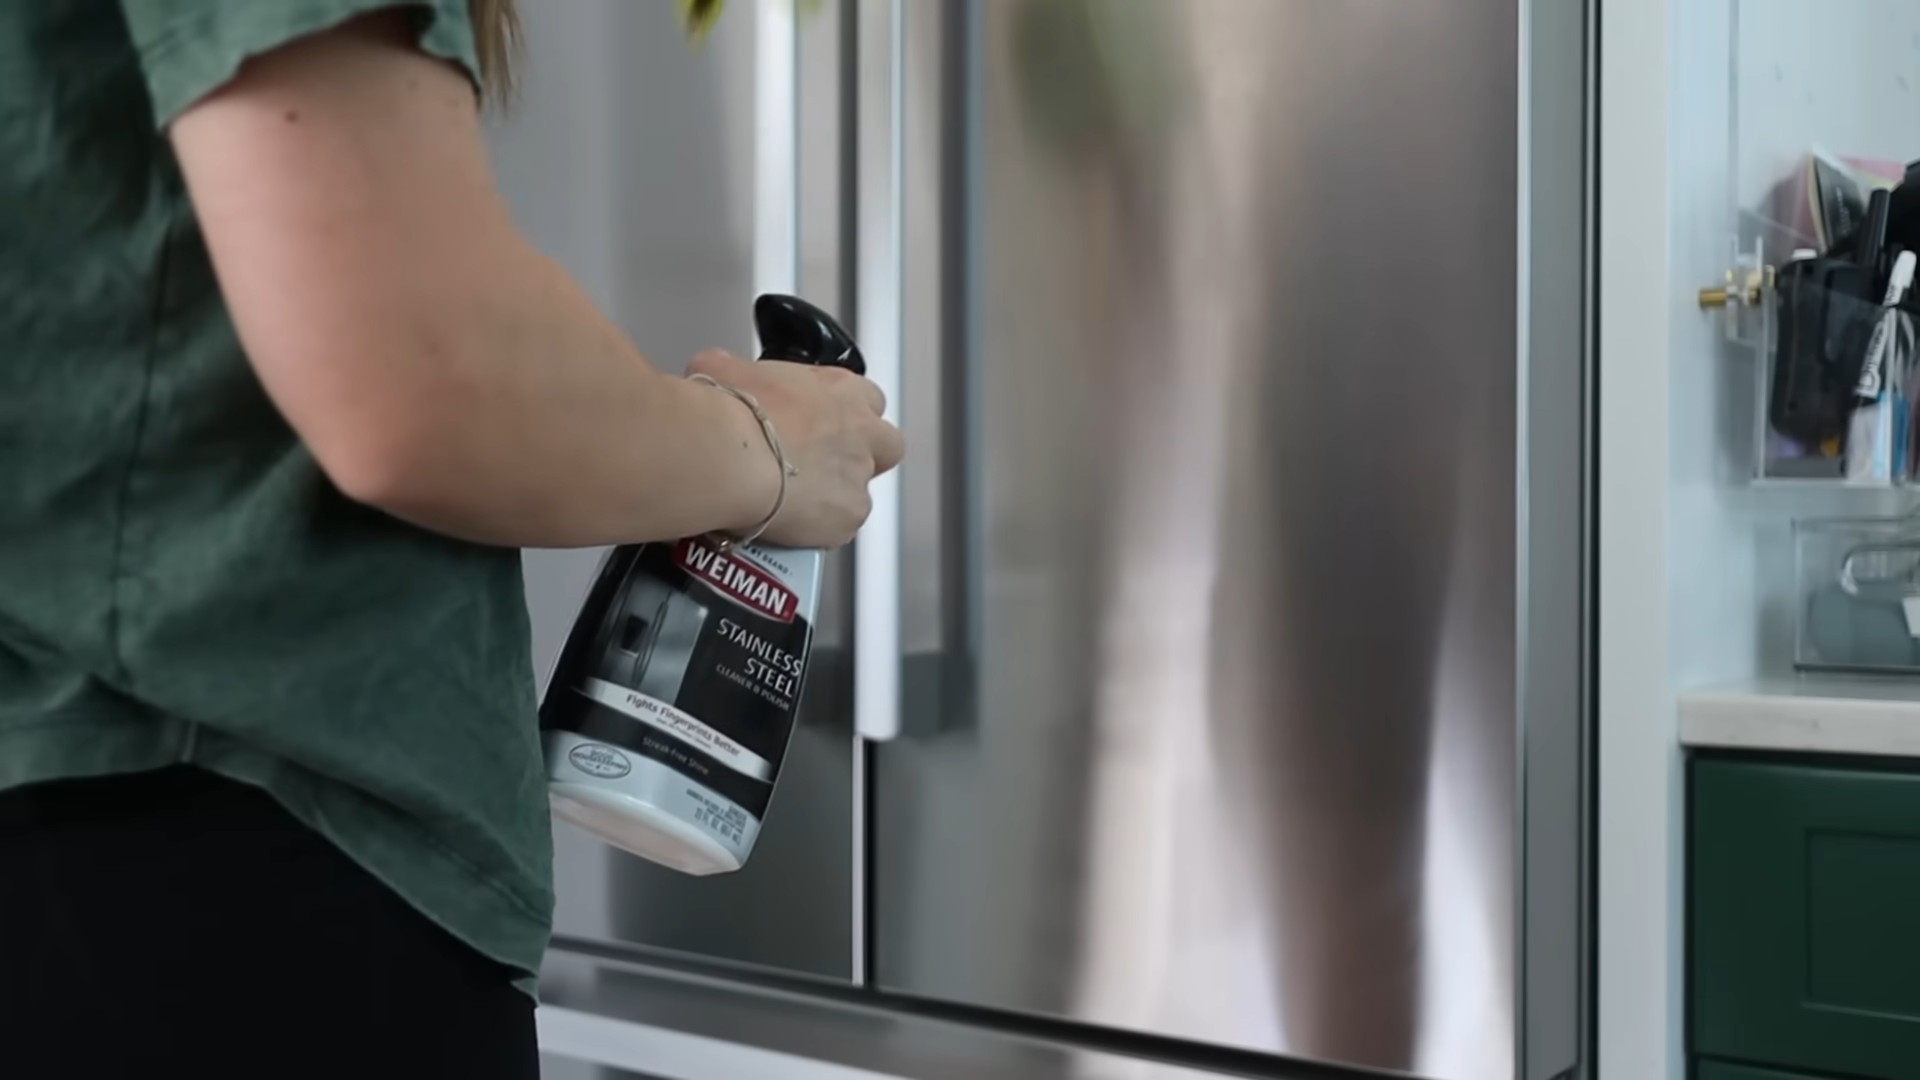
Shining Stainless Steel Appliances with Olive Oil
This is my favorite trick for making stainless steel appliances look brand new!
* The Goal: To clean and polish stainless steel appliances, removing fingerprints and streaks.
* What You’ll Need:
* White vinegar
* Olive oil
* Two clean microfiber cloths
Step-by-Step
Conclusion
So, there you have it! These kitchen cleaning hacks aren’t just about tidying up; they’re about reclaiming your time, saving money, and creating a healthier, happier cooking space. We’ve explored simple yet incredibly effective ways to tackle common kitchen woes, from banishing stubborn grease to reviving dull stainless steel. The beauty of these DIY solutions lies in their accessibility. You likely already have most, if not all, of the ingredients needed sitting in your pantry or under your sink.
But why is this a must-try? Because a clean kitchen isn’t just aesthetically pleasing; it’s essential for food safety and overall well-being. A sparkling clean oven prevents smoke and unpleasant odors, a spotless sink discourages bacteria growth, and organized cabinets make cooking a breeze. These hacks are designed to make achieving that level of cleanliness easier and more sustainable.
Consider these variations to personalize your cleaning routine:
* **Citrus Power:** Infuse your cleaning solutions with citrus peels (lemon, orange, grapefruit) for an extra boost of freshness and degreasing power. Simply steep the peels in vinegar for a few weeks before using the infused vinegar in your cleaning sprays.
* **Essential Oil Enhancement:** Add a few drops of your favorite essential oils (tea tree, lavender, eucalyptus) to your cleaning solutions for their antibacterial and aromatic properties.
* **Baking Soda Paste for Tough Stains:** For particularly stubborn stains on your stovetop or oven, create a thick paste of baking soda and water. Apply the paste, let it sit for a few hours or overnight, and then scrub away the grime.
* **Vinegar and Baking Soda Volcano for Drains:** For a clogged drain, pour baking soda down the drain, followed by vinegar. Let it fizz for 30 minutes, then flush with hot water. Repeat if necessary.
We understand that every kitchen is different, and what works for one person might not work for another. That’s why we encourage you to experiment with these techniques and find what best suits your needs and preferences. The key is to be consistent and to incorporate these hacks into your regular cleaning routine.
Don’t just take our word for it – try these **kitchen cleaning hacks** yourself! We’re confident that you’ll be amazed by the results. And most importantly, we want to hear about your experience! Share your before-and-after photos, your favorite variations, and any other tips you’ve discovered in the comments below. Let’s create a community of clean kitchen enthusiasts and inspire each other to maintain sparkling and healthy cooking spaces. Your feedback will not only help other readers but also help us refine and improve these cleaning hacks. So, grab your supplies, roll up your sleeves, and get ready to transform your kitchen into a haven of cleanliness and culinary delight!
Frequently Asked Questions (FAQ)
1. Are these kitchen cleaning hacks safe for all surfaces?
While most of these hacks are generally safe for common kitchen surfaces like stainless steel, ceramic, and glass, it’s always a good idea to test them on a small, inconspicuous area first. This is especially important for delicate surfaces like marble, granite, or painted wood. Avoid using abrasive cleaners or scrub brushes on these surfaces, as they can cause scratches or damage. For natural stone surfaces, consider using pH-neutral cleaners specifically designed for stone. When in doubt, consult the manufacturer’s instructions for your specific appliances and surfaces.
2. Can I use these cleaning solutions on food preparation surfaces?
Yes, you can use these cleaning solutions on food preparation surfaces, but it’s crucial to rinse them thoroughly with clean water afterward. Vinegar and baking soda are both food-safe ingredients, but you don’t want to leave any residue behind. For extra precaution, you can also wipe down the surfaces with a food-safe sanitizing solution after cleaning. Always ensure that the surfaces are completely dry before preparing food on them.
3. How often should I use these kitchen cleaning hacks?
The frequency of cleaning depends on how often you use your kitchen and how messy it gets. As a general guideline, wipe down countertops and sinks daily, clean the stovetop after each use, and deep clean the oven and refrigerator monthly. You can use these **kitchen cleaning hacks** as part of your regular cleaning routine to maintain a clean and healthy kitchen. Adjust the frequency based on your individual needs and preferences.
4. What if I don’t have vinegar or baking soda? Are there any alternatives?
While vinegar and baking soda are staples in many DIY cleaning solutions, there are alternatives you can use. For degreasing, you can try using dish soap diluted in water. For scrubbing, you can use salt or cream of tartar. Lemon juice can also be used as a natural cleaner and deodorizer. However, vinegar and baking soda are generally the most effective and versatile options.
5. Can I use these cleaning solutions on my dishwasher?
Yes, you can use vinegar and baking soda to clean your dishwasher. To clean the interior, place a cup of vinegar in the top rack of the dishwasher and run a normal cycle. To clean the drain, sprinkle baking soda on the bottom of the dishwasher and run a short cycle. This will help remove food particles and odors. However, avoid using vinegar and baking soda together in the dishwasher, as the chemical reaction can damage the appliance.
6. Are these cleaning hacks environmentally friendly?
Yes, these cleaning hacks are generally more environmentally friendly than using harsh chemical cleaners. Vinegar and baking soda are natural, biodegradable ingredients that are safe for the environment. By using these DIY solutions, you can reduce your reliance on chemical cleaners and minimize your impact on the planet. You can also further reduce your environmental footprint by using reusable cleaning cloths and spray bottles.
7. How do I get rid of stubborn odors in my kitchen?
Stubborn odors can be a challenge, but there are several ways to tackle them. Place a bowl of vinegar or baking soda in the affected area to absorb odors. You can also simmer citrus peels or spices in water to freshen the air. For lingering odors in the refrigerator, place an open box of baking soda or a container of coffee grounds inside. Regularly cleaning your garbage disposal and emptying your trash cans can also help prevent odors from building up.
8. What’s the best way to clean a greasy oven?
A greasy oven can be a daunting task, but with the right approach, it can be manageable. Start by removing any loose food particles and debris. Then, create a paste of baking soda and water and apply it to the interior of the oven, avoiding the heating elements. Let the paste sit overnight, then scrub away the grime with a sponge or scrub brush. Rinse thoroughly with clean water. For particularly stubborn grease, you can use a commercial oven cleaner, but be sure to follow the manufacturer’s instructions carefully.
9. How can I prevent my kitchen from getting so dirty in the first place?
Prevention is key to maintaining a clean kitchen. Wipe up spills immediately, clean the stovetop after each use, and regularly empty your trash cans. Store food properly to prevent spoilage and odors. Keep your countertops clear and organized to make cleaning easier. By incorporating these simple habits into your daily routine, you can prevent your kitchen from getting too dirty and make cleaning a breeze.
10. What if I have allergies or sensitivities to certain cleaning ingredients?
If you have allergies or sensitivities to certain cleaning ingredients, it’s important to choose alternatives that are safe for you. For example, if you’re allergic to vinegar, you can try using lemon juice or diluted dish soap instead. Always read the labels of cleaning products carefully and test them on a small area before using them on a larger surface. If you’re unsure about which cleaning ingredients are safe for you, consult with your doctor or an allergist.

Leave a Comment