

Teddy bear keychain DIY projects are not just adorable; they’re a fantastic way to express your creativity and add a personal touch to your everyday essentials! Have you ever looked at your keys and thought, “This needs a little *me*?” Well, you’re in the right place. I’m going to show you how to transform simple materials into charming teddy bear keychains that are guaranteed to bring a smile to your face.
The history of teddy bears themselves is rooted in comfort and companionship, dating back to the early 20th century and inspired by President Theodore “Teddy” Roosevelt. Now, we’re taking that same heartwarming essence and shrinking it down into a portable, personalized accessory. Think of it as carrying a tiny hug wherever you go!
In today’s world, where mass-produced items dominate, creating something with your own hands is incredibly rewarding. A teddy bear keychain DIY allows you to break free from the ordinary and craft something truly unique. Plus, it’s a budget-friendly way to add a touch of personality to your keys, backpack, or even use them as cute zipper pulls. Who wouldn’t want a little fuzzy friend dangling from their belongings? I know I would!
This DIY project is perfect for crafters of all skill levels, from beginners to seasoned pros. I’ll guide you through each step, offering tips and tricks to ensure your teddy bear keychain turns out exactly as you envision. So, grab your supplies, unleash your inner artist, and let’s get crafting!

DIY Adorable Teddy Bear Keychain: A Step-by-Step Guide
Hey there, fellow crafters! Ever wanted a super cute, personalized keychain that screams “you”? Well, look no further! I’m going to walk you through creating your very own adorable teddy bear keychain. This project is perfect for beginners and seasoned crafters alike, and the best part? You can customize it to your heart’s content!
Materials You’ll Need
Before we dive in, let’s gather our supplies. Here’s what you’ll need:
* Felt: Choose your favorite colors! I recommend a soft brown or beige for the main body and some brighter colors for accessories.
* Embroidery Floss: Matching or contrasting colors to your felt.
* Stuffing: Polyester fiberfill is perfect for a fluffy teddy bear.
* Keychain Ring: A standard keychain ring will do the trick.
* Jump Ring: To connect the teddy bear to the keychain ring.
* Small Beads or Safety Eyes: For the eyes (safety eyes are easier for beginners).
* Needle and Thread: For sewing everything together.
* Scissors: Sharp scissors for cutting the felt.
* Pencil or Fabric Marker: For tracing the pattern.
* Teddy Bear Pattern: You can find free patterns online, draw your own, or use the one I’ll provide instructions for below.
* Pliers (Optional): For opening and closing the jump ring.
* Hot Glue Gun (Optional): For attaching small details quickly.
Creating Your Teddy Bear Pattern
If you don’t have a pattern handy, don’t worry! I’ll show you how to create a simple one. This is where you can really let your creativity shine!
1. Draw a Basic Teddy Bear Shape: On a piece of paper, sketch a simple teddy bear outline. Think rounded head, slightly wider body, and stubby arms and legs. Keep it simple – we’re going for cute, not complex! The size is up to you, but I recommend around 3-4 inches tall for a keychain.
2. Separate the Pieces: Now, break down the teddy bear into individual pattern pieces. You’ll need:
* Two body pieces (front and back).
* Four arm pieces (two for each arm).
* Four leg pieces (two for each leg).
* Two ear pieces.
* A small oval for the snout (optional).
3. Add Seam Allowance: Around each pattern piece, add a small seam allowance of about 1/4 inch. This will give you room to sew the pieces together without making them too small.
4. Cut Out the Pattern Pieces: Carefully cut out each pattern piece. Now you’re ready to start cutting the felt!
Cutting the Felt Pieces
This step is all about precision. Take your time and make sure you’re cutting along the lines of your pattern pieces.
1. Trace the Pattern: Place each pattern piece onto the felt and trace around it with a pencil or fabric marker. Remember to trace two of each piece (front and back) except for the snout, which only needs one.
2. Cut Out the Felt: Carefully cut out each felt piece along the traced lines. Try to be as accurate as possible for a neat finish.
Sewing the Teddy Bear
Now for the fun part – bringing your teddy bear to life! We’ll start by sewing the smaller pieces and then move on to assembling the body.
Sewing the Arms and Legs
1. Sew the Arm Pieces: Take two arm pieces and align them. Using a blanket stitch or a simple running stitch, sew around the edges, leaving a small opening at the top for stuffing.
2. Stuff the Arms: Lightly stuff the arm with polyester fiberfill. Don’t overstuff them – you want them to be soft and pliable.
3. Close the Opening: Sew the opening closed with a few small stitches.
4. Repeat for the Other Arm and Both Legs: Follow the same steps to create the other arm and both legs.
Sewing the Ears and Snout (Optional)
1. Sew the Ear Pieces: Take two ear pieces and align them. Sew around the edges, leaving the bottom open. You don’t need to stuff the ears.
2. Attach the Ears to the Head: Position the ears on the front body piece and sew them securely in place.
3. Attach the Snout (Optional): If you’re using a snout, position it on the front body piece and sew it in place. You can use a blanket stitch or a simple running stitch.
Assembling the Body
1. Attach the Arms and Legs to the Front Body Piece: Position the arms and legs on the front body piece. You can either sew them directly onto the body or use a few stitches to tack them in place temporarily.
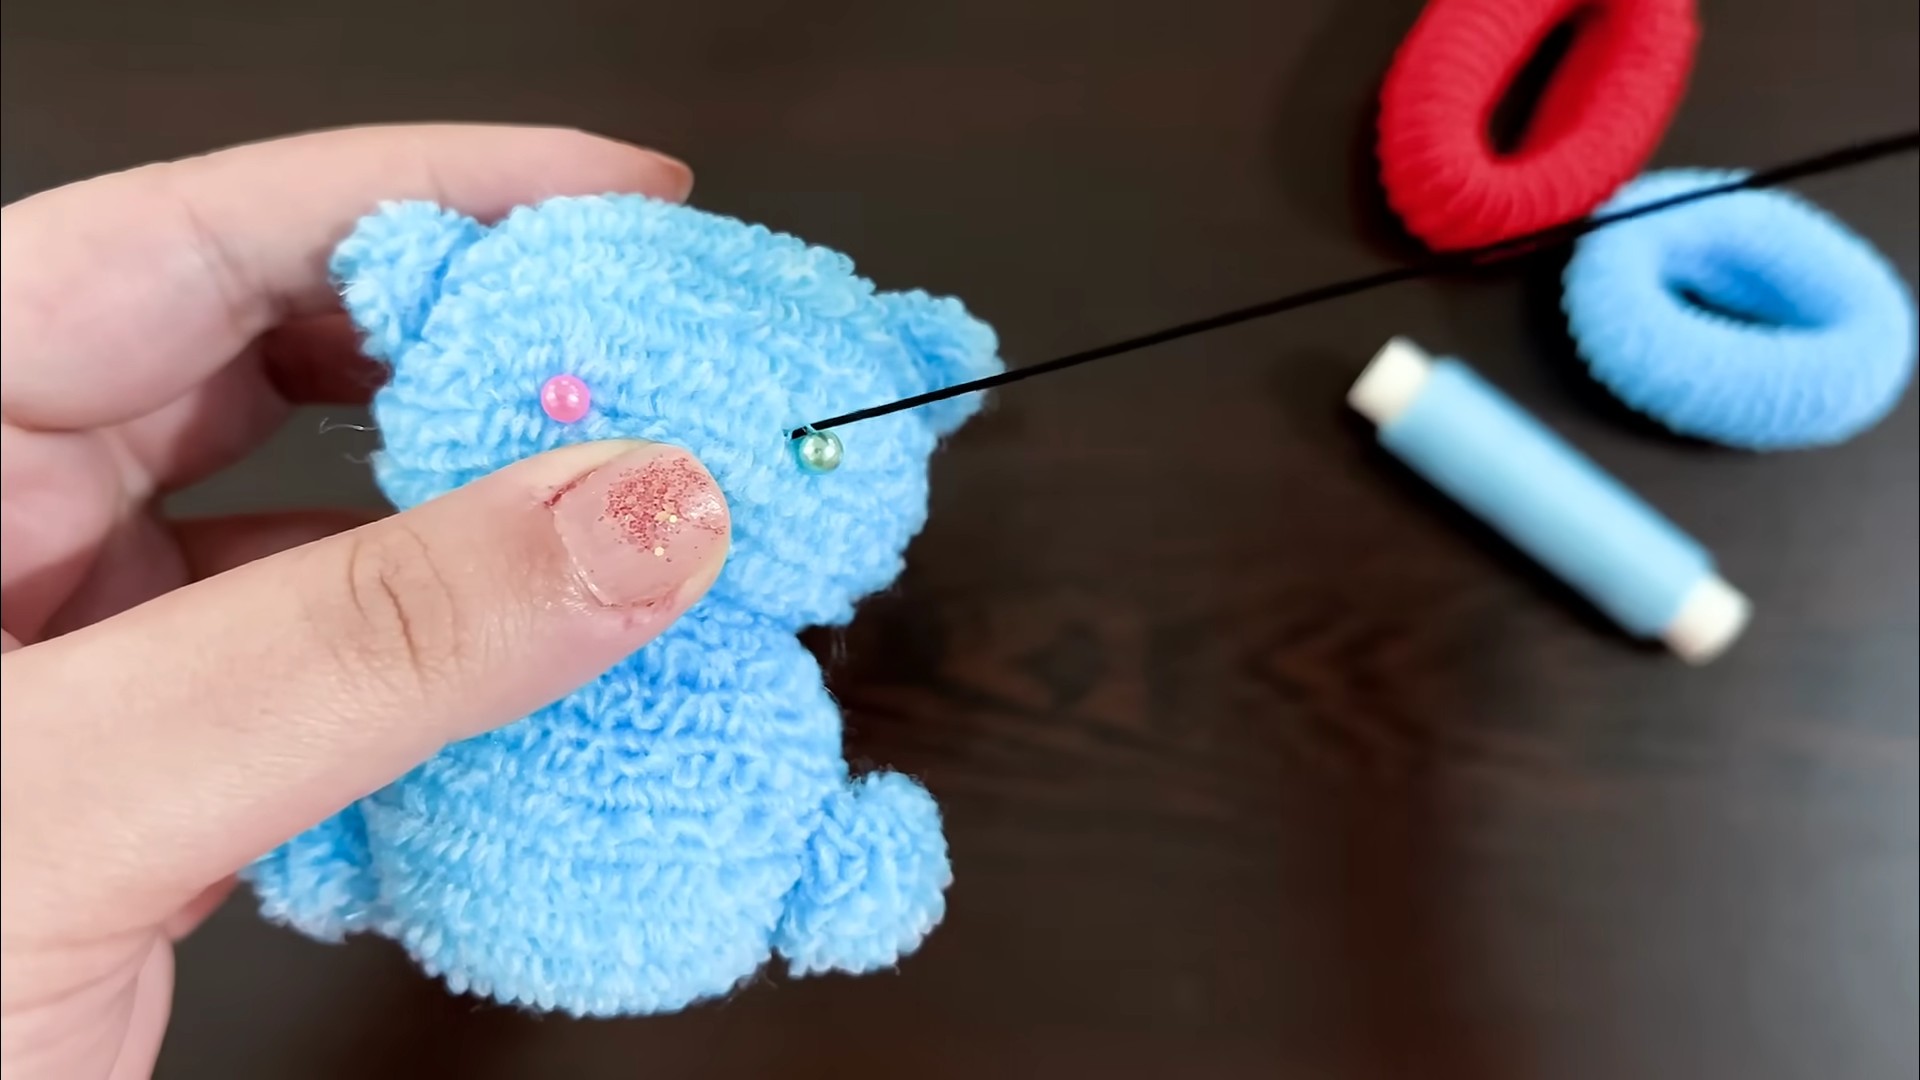
2. Attach the Eyes: If you’re using safety eyes, insert them into the front body piece according to the manufacturer’s instructions. If you’re using beads, sew them securely in place.
3. Embroider the Nose and Mouth: Using embroidery floss, embroider a small nose and mouth onto the snout (or directly onto the face if you’re not using a snout). You can use a simple backstitch or satin stitch.
4. Sew the Front and Back Body Pieces Together: Place the front and back body pieces together, aligning the edges. Starting at the bottom, sew around the edges using a blanket stitch or a simple running stitch, leaving a small opening at the top for stuffing.
5. Stuff the Body: Stuff the body with polyester fiberfill until it’s nice and plump.
6. Close the Opening: Sew the opening closed with a few small stitches.
Adding the Keychain Attachment
Almost there! Now we just need to add the keychain ring.
1. Attach the Jump Ring: Use pliers (if needed) to open the jump ring.
2. Insert the Jump Ring: Insert the jump ring through the top of the teddy bear’s head. Make sure it’s securely attached.
3. Attach the Keychain Ring: Attach the keychain ring to the jump ring.
4. Close the Jump Ring: Use pliers (if needed) to close the jump ring securely.
Adding Personal Touches (Optional)
This is where you can really make your teddy bear keychain unique! Here are some ideas:
* Add a Bow or Ribbon: Tie a small bow or ribbon around the teddy bear’s neck.
* Embroider Initials: Embroider your initials or the initials of a loved one onto the teddy bear’s body.
* Add Small Accessories: Attach small beads, buttons, or charms to the teddy bear.
* Create a Tiny Outfit: Sew a tiny felt shirt or dress for your teddy bear.
* Use Different Fabrics: Experiment with different types of felt or other fabrics to create a unique texture.
Tips and Tricks
* Use a Glue Gun for Small Details: If you’re having trouble sewing small details, a hot glue gun can be a lifesaver. Just be careful not to burn yourself!
* Practice Your Stitches: Before you start sewing the teddy bear, practice your stitches on a scrap piece of felt. This will help you get a feel for the fabric and ensure that your stitches are neat and even.
* Don’t Overstuff: Overstuffing the teddy bear can make it look lumpy and misshapen. Use just enough stuffing to give it a nice, plump shape.
* Be Patient: This project takes time and patience. Don’t get discouraged if you don’t get it perfect the first time. Just keep practicing, and you’ll eventually create a beautiful teddy bear keychain.
* Get Creative with Colors: Don’t be afraid to experiment with different colors and patterns. The more creative you are, the more unique your teddy bear keychain will be.
And there you have it! Your very own adorable teddy bear keychain. I hope you had fun making it. Now go show it off to the world! Happy crafting!
Conclusion
So, there you have it! This simple yet incredibly rewarding teddy bear keychain DIY project is more than just a craft; it’s a chance to personalize your belongings, create heartfelt gifts, and unleash your inner artist. We’ve walked you through the steps, from gathering your materials to adding those final, adorable touches. But why is this DIY trick a must-try?
Firstly, it’s a fantastic way to repurpose fabric scraps, old sweaters, or even that lone sock that lost its partner in the laundry. Instead of contributing to textile waste, you’re giving these materials a new life as a charming and functional accessory. Secondly, the level of customization is unparalleled. You’re not limited to store-bought designs; you get to choose the fabric, the embellishments, and even the size of your teddy bear keychain. Want a miniature bear to dangle from your zipper? Go for it! Prefer a larger, more huggable version for your backpack? The possibilities are endless.
Think about the joy of gifting a handmade teddy bear keychain to a loved one. It’s a tangible expression of your care and creativity, far more meaningful than any mass-produced item. Imagine the smiles on their faces when they receive a unique, personalized gift crafted with love.
But the fun doesn’t stop there! Let’s talk about variations. For a festive touch, use holiday-themed fabrics like plaid for Christmas or pastel colors for Easter. Add tiny bells or sequins for extra sparkle. Consider using felt for a more rustic look, or even upcycling denim for a trendy, urban vibe. You can also experiment with different stuffing materials. Instead of traditional fiberfill, try using dried lavender for a fragrant keychain or rice for a slightly weighted feel.
For a truly unique touch, personalize your teddy bear keychain with embroidered initials, names, or dates. This is a fantastic way to commemorate special occasions or create personalized gifts for friends and family. You could even add small pockets to the back of the bear to hold tiny notes or trinkets.
Don’t be afraid to get creative with the embellishments. Use buttons for eyes, embroidery floss for the nose and mouth, and ribbons or lace for added flair. You can even add tiny accessories like miniature hats, scarves, or backpacks to give your teddy bear keychain its own unique personality.
We truly believe that this teddy bear keychain DIY project is accessible to crafters of all skill levels. Whether you’re a seasoned pro or a complete beginner, you’ll find the steps easy to follow and the results incredibly satisfying. So, gather your materials, unleash your creativity, and get ready to create some adorable teddy bear keychains!
We’re confident that you’ll love this DIY project as much as we do. But don’t just take our word for it – try it out for yourself! We encourage you to share your creations with us on social media using #TeddyBearKeychainDIY. We can’t wait to see what you come up with! Share your tips, tricks, and variations with the crafting community. Let’s inspire each other to create even more amazing and unique teddy bear keychains. Happy crafting!
Frequently Asked Questions (FAQ)
What kind of fabric is best for making a teddy bear keychain?
The best fabric for a teddy bear keychain depends on the look and feel you’re going for. Fleece is a popular choice because it’s soft, cuddly, and easy to work with. Felt is another great option, especially for beginners, as it doesn’t fray easily. Cotton fabrics are also suitable, particularly if you want to use patterned or printed materials. Consider the durability of the fabric, especially if the keychain will be used frequently. Thicker fabrics like denim or canvas can also be used for a more rugged look. Ultimately, the best fabric is one that you enjoy working with and that suits the overall aesthetic you’re aiming for.
What kind of stuffing should I use for my teddy bear keychain?
Polyester fiberfill is the most common and readily available stuffing material for teddy bear keychains. It’s lightweight, washable, and provides a soft, plush feel. However, there are other options to consider. Cotton stuffing is a natural alternative that’s also washable and hypoallergenic. For a more weighted feel, you can use plastic pellets or dried beans. Just be sure to secure them tightly within the keychain to prevent them from spilling out. As mentioned earlier, dried lavender can be used for a fragrant keychain, while rice can provide a slightly weighted feel. Experiment with different stuffing materials to find the one that best suits your preferences.
How do I attach the keychain ring to the teddy bear?
The most secure way to attach the keychain ring is to sew it directly onto the teddy bear’s head or back. Before stuffing the bear completely, insert the keychain ring through a loop of ribbon or fabric. Position the loop securely on the bear’s head or back, and then sew it firmly in place using a strong thread. Reinforce the stitching several times to ensure that the ring is securely attached. Alternatively, you can use a metal jump ring to connect the keychain ring to a small loop of fabric sewn onto the bear. Make sure the jump ring is closed tightly to prevent it from coming loose.
Can I wash my teddy bear keychain?
Whether or not you can wash your teddy bear keychain depends on the materials used. If you used washable fabrics and stuffing, you can typically hand wash it gently with mild soap and water. Avoid using harsh detergents or bleach, as these can damage the fabric and stuffing. Rinse thoroughly and allow the keychain to air dry completely. If you used delicate fabrics or embellishments, spot cleaning may be a better option. Use a damp cloth to gently clean any soiled areas, and avoid saturating the keychain with water. If you’re unsure, it’s always best to err on the side of caution and spot clean only.
How can I make my teddy bear keychain more durable?
To make your teddy bear keychain more durable, use high-quality fabrics and strong thread. Reinforce all seams with multiple rows of stitching, especially around the keychain ring attachment point. Consider using a thicker fabric for the outer layer of the bear, such as denim or canvas. Avoid using delicate embellishments that are easily damaged or detached. If you’re using buttons for eyes, make sure they are securely sewn on. Regularly inspect your teddy bear keychain for any signs of wear and tear, and repair any damage promptly to prevent further deterioration.
What if I don’t have a sewing machine? Can I still make this?
Absolutely! This teddy bear keychain DIY is perfectly doable by hand. In fact, many crafters prefer hand-sewing for smaller projects like this because it allows for more control and precision. Just use a sturdy needle and strong thread, and take your time with each stitch. A simple running stitch or back stitch will work perfectly for sewing the pieces together. Hand-sewing can be a relaxing and meditative activity, so don’t be intimidated if you don’t have a sewing machine.
How can I personalize my teddy bear keychain even further?
There are countless ways to personalize your teddy bear keychain! Consider adding embroidered details like initials, names, or dates. Use fabric markers to draw designs or patterns on the fabric. Add small accessories like miniature hats, scarves, or backpacks. Use different colored threads for the stitching to create a unique look. Experiment with different fabric textures and patterns to create a one-of-a-kind teddy bear. You can even add small pockets to the back of the bear to hold tiny notes or trinkets. The possibilities are endless!
Leave a Comment