

Toothpaste, that minty fresh staple in your bathroom, might just be the secret weapon you need to combat those pesky salt water stains! Have you ever returned from a blissful beach vacation only to find your favorite sandals or boat shoes looking like they’ve been through a blizzard? Those unsightly white marks are the bane of every ocean lover’s existence, and trust me, I’ve been there!
For centuries, people living near the sea have battled the corrosive effects of salt water. While modern stain removers exist, sometimes the simplest solutions are the most effective. Think of it as a modern twist on age-old cleaning wisdom, using everyday items to tackle common problems.
But why should you bother with this DIY trick? Well, those commercial cleaners can be harsh on your materials and your wallet! This method is gentle, affordable, and uses something you likely already have on hand. Plus, who doesn’t love a good life hack that saves time and money? I’m going to show you how to use toothpaste to remove those stubborn salt water stains and restore your belongings to their former glory. Get ready to say goodbye to those salty reminders of your vacation and hello to fresh, clean gear!

DIY: Reviving Your Leather Shoes After a Salty Beach Day
Okay, so you had an amazing day at the beach, soaking up the sun and enjoying the waves. But now your favorite leather shoes are sporting some unsightly white salt stains. Don’t panic! I’ve been there, and I’m here to tell you that you can rescue them with a simple household item: toothpaste! Yes, you read that right. Toothpaste isn’t just for your teeth; it’s a surprisingly effective leather cleaner, especially for those pesky salt stains.
What You’ll Need
Before we dive in, let’s gather our supplies. This is a pretty straightforward project, so you probably already have most of these things lying around:
- Soft-bristled toothbrush: An old toothbrush works perfectly. Just make sure it’s clean!
- White, non-gel toothpaste: This is crucial! Gel toothpaste or colored toothpaste can stain your leather. Stick to the plain white stuff. I usually grab the cheapest one I can find.
- Clean, damp cloth: Microfiber cloths are ideal, but any soft cloth will do.
- Leather conditioner: This is essential for rehydrating the leather after cleaning. Don’t skip this step!
- Saddle soap (optional): For particularly stubborn stains, saddle soap can give you an extra boost.
- Clean, dry cloth: For buffing the leather after conditioning.
- Shoe trees (optional): These help maintain the shape of your shoes while you’re working on them.
Step-by-Step Guide to Removing Salt Stains with Toothpaste
Alright, let’s get those shoes looking their best again!
1. Prepare Your Shoes
First things first, remove any loose dirt or debris. Use a soft brush or cloth to gently wipe down your shoes. If your shoes are particularly dirty, you might want to give them a quick wipe with a damp cloth before you start. This will prevent you from grinding dirt into the leather while you’re cleaning. I usually do this outside to avoid making a mess indoors.
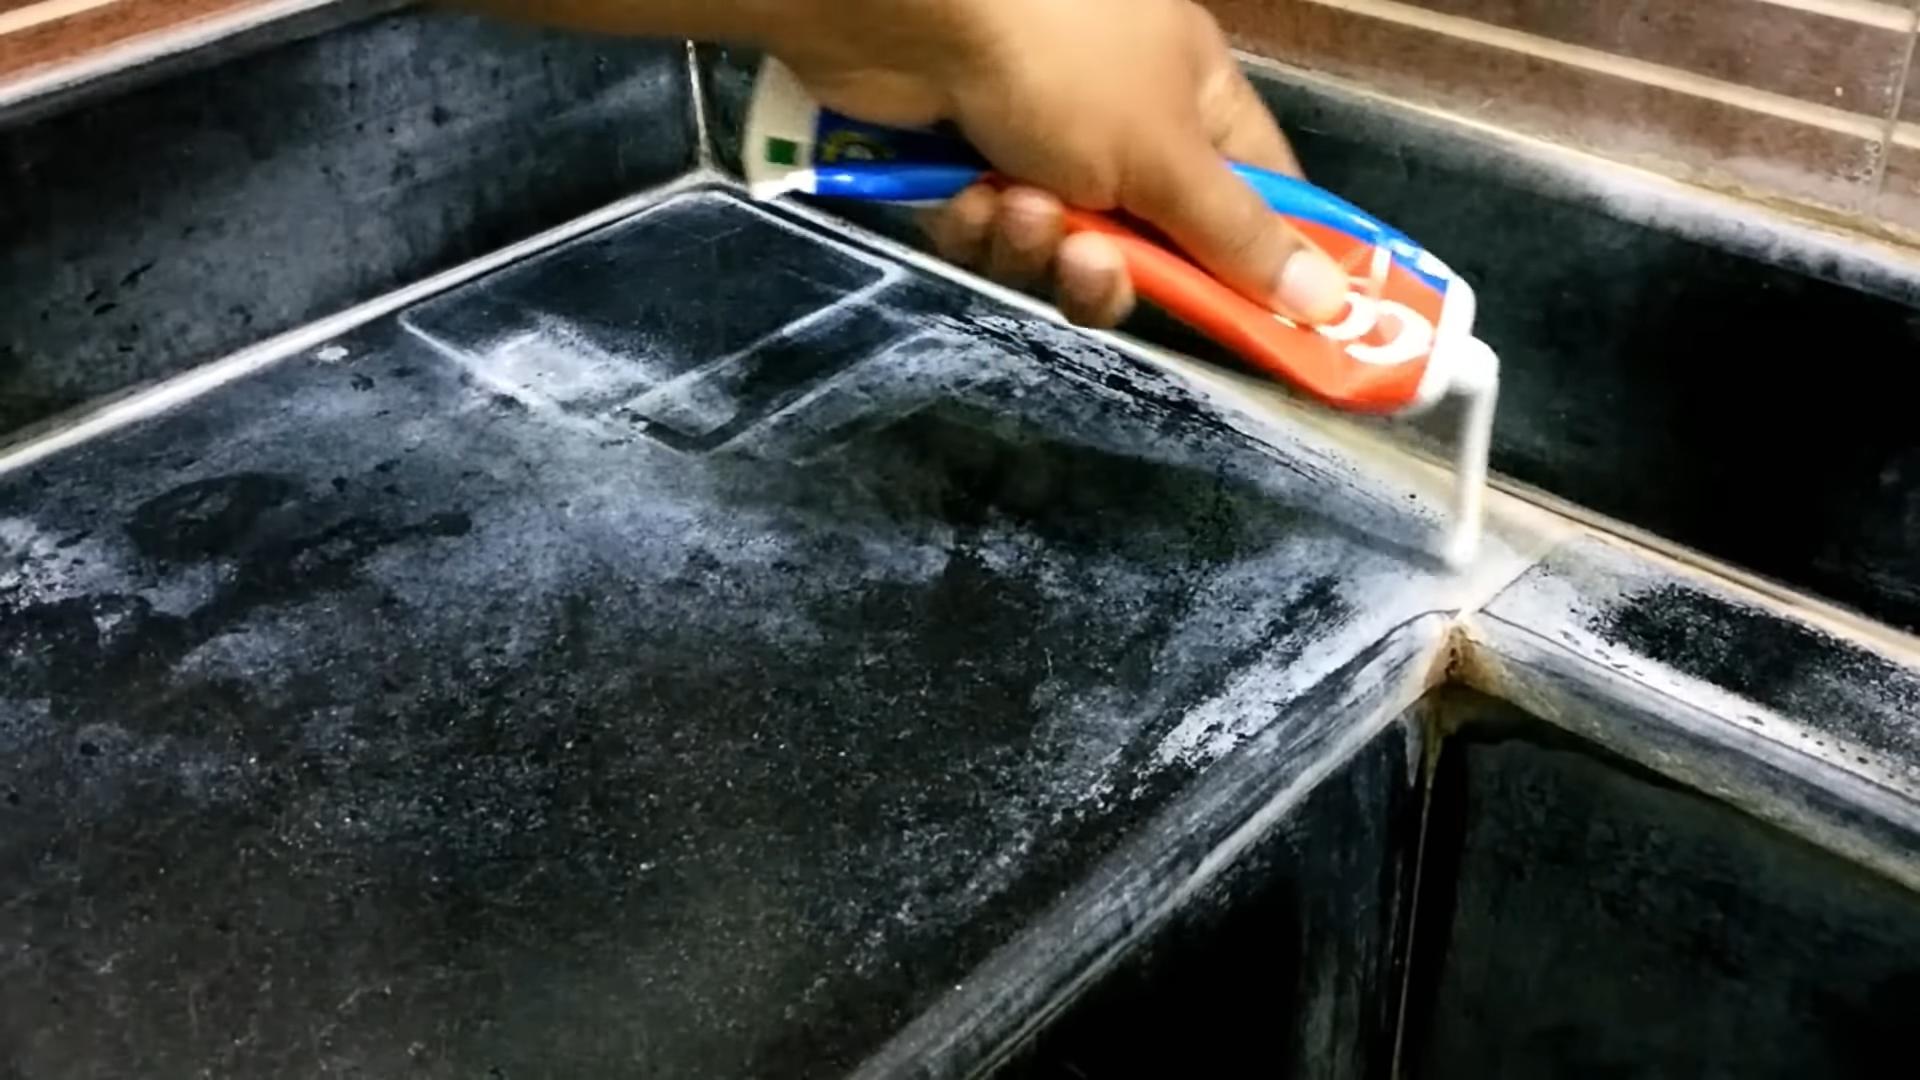
2. Apply the Toothpaste
Now for the magic ingredient! Squeeze a small amount of white, non-gel toothpaste onto the soft-bristled toothbrush. You don’t need a ton – a pea-sized amount should be enough for a small area.
3. Gently Scrub the Stained Areas
Using gentle, circular motions, scrub the toothpaste into the salt-stained areas. Be careful not to apply too much pressure, as you don’t want to damage the leather. Focus on the areas where the salt stains are most visible. I like to work in small sections to make sure I’m not missing any spots.
4. Wipe Away the Toothpaste
After scrubbing for a minute or two, use a clean, damp cloth to wipe away the toothpaste. Make sure you remove all traces of the toothpaste. You might need to rinse the cloth and wipe the area several times to get it completely clean. I usually check the cloth after each wipe to see if there’s any toothpaste residue left.
5. Inspect and Repeat (If Necessary)
Take a good look at your shoes. Are the salt stains gone? If not, repeat steps 2-4. For stubborn stains, you might need to apply the toothpaste and let it sit for a few minutes before scrubbing. However, don’t leave it on for too long, as it could dry out the leather. I’ve found that sometimes it takes two or three applications to completely remove the stains.
6. Condition the Leather
This is the most important step! Toothpaste can be drying, so it’s crucial to rehydrate the leather with a good leather conditioner. Apply a small amount of leather conditioner to a clean, dry cloth and gently rub it into the entire shoe. Follow the instructions on the conditioner bottle. I usually let the conditioner sit for about 15-20 minutes to allow it to fully absorb into the leather.
7. Buff the Leather
After the conditioner has had time to absorb, use a clean, dry cloth to buff the leather. This will remove any excess conditioner and give your shoes a nice shine. Buffing also helps to distribute the conditioner evenly and protect the leather. I like to use a circular motion when buffing to get the best results.
Dealing with Stubborn Stains: Saddle Soap to the Rescue!
Sometimes, toothpaste alone isn’t enough to tackle those really stubborn salt stains. That’s where saddle soap comes in. Saddle soap is a mild soap specifically designed for cleaning and conditioning leather.
1. Prepare the Saddle Soap
Dampen a clean cloth with water. Then, rub the cloth over the saddle soap to create a lather. You don’t need a lot of lather – just enough to coat the cloth.
2. Apply the Saddle Soap
Gently rub the lathered cloth onto the salt-stained areas. Use circular motions to work the saddle soap into the leather. Be careful not to apply too much pressure.
3. Wipe Away the Saddle Soap
Use a clean, damp cloth to wipe away the saddle soap. Make sure you remove all traces of the soap. You might need to rinse the cloth and wipe the area several times to get it completely clean.
4. Let the Leather Dry
Allow the leather to air dry completely. Don’t place your shoes in direct sunlight or near a heat source, as this can damage the leather. I usually let mine dry overnight.
5. Condition and Buff
Once the leather is dry, condition it with leather conditioner and buff it with a clean, dry cloth, just like in steps 6 and 7 above. This will rehydrate the leather and restore its shine.
Important Tips and Considerations
* Always test in an inconspicuous area first. Before applying toothpaste or saddle soap to the entire shoe, test it on a small, hidden area to make sure it doesn’t discolor or damage the leather. The inside of the tongue or the heel are good places to test.
* Use a soft touch. Leather is delicate, so avoid using harsh scrubbing motions or abrasive cleaners.
* Don’t over-saturate the leather. Too much water can damage the leather, so use a damp cloth, not a soaking wet one.
* Condition, condition, condition! Leather conditioner is your best friend. It will keep your shoes looking their best and prevent them from drying out and cracking.
* Store your shoes properly. When you’re not wearing your shoes, store them in a cool, dry place away from direct sunlight. Use shoe trees to help maintain their shape.
* Prevention is key. Consider using a leather protectant spray to help prevent salt stains in the first place. Apply the spray before you head to the beach or any other place where your shoes might get exposed to salt water.
* If you’re unsure, consult a professional. If you’re dealing with expensive or delicate leather shoes, or if you’re not comfortable cleaning them yourself, it’s always best to take them to a professional leather cleaner.
Choosing the Right Toothpaste
As I mentioned earlier, it’s crucial to use the right kind of toothpaste for this project. Here’s a quick rundown of what to look for:
* White, non-gel: This is the most important thing. Gel toothpaste and colored toothpaste can stain your leather.
* Plain flavor: Avoid toothpastes with added whitening agents or strong flavors, as these could potentially damage the leather.
* Fluoride is okay: Fluoride is fine, as it won’t affect the leather.
* Avoid abrasive toothpastes: Some toothpastes contain abrasive ingredients that can scratch the leather. Look for a toothpaste that is labeled as “gentle” or “non-abrasive.”
Why This Works: The Science Behind the Hack
You might be wondering why toothpaste works so well for removing salt stains. The answer lies in its mild abrasive properties and its ability to break down the salt crystals. The gentle scrubbing action of the toothbrush and the toothpaste helps to lift the salt stains from the leather, while the damp cloth helps to dissolve and remove the salt.
Maintaining Your Leather Shoes
Once you’ve successfully removed the salt stains, it’s important to take steps to maintain your leather shoes and prevent future stains. Here are a few tips:
* Clean your shoes regularly. Wipe them down with a damp cloth after each wear to remove any dirt or debris.
* Condition your shoes regularly. Condition them every few weeks to keep the leather hydrated and prevent it from drying out and cracking.
* Use a leather protectant spray. Apply a leather protectant spray to help repel water and prevent stains.
* Store your shoes properly. Store them in a cool, dry place away from direct sunlight. Use shoe trees to help maintain their shape.
By following these tips, you can keep your leather shoes looking their best for years to come! And remember, don
Conclusion
So, there you have it! This simple yet incredibly effective DIY trick using toothpaste to remove stubborn salt water stains is a game-changer for anyone living near the coast, enjoying watersports, or simply prone to accidental splashes. We’ve all been there – that favorite pair of shoes, that cherished handbag, or even the interior of your car, all marred by the unsightly white residue left behind by evaporated salt water. But fear not, because with a tube of toothpaste and a little elbow grease, you can restore your belongings to their former glory.
Why is this a must-try? Because it’s cost-effective, readily accessible, and surprisingly powerful. Forget expensive specialty cleaners that promise the world but often fall short. Toothpaste, a household staple, contains mild abrasives that gently lift the salt crystals without damaging the underlying material. It’s a gentle yet effective solution that saves you money and prevents further damage from harsh chemicals.
But the benefits don’t stop there. This method is also incredibly versatile. While we’ve focused on removing salt water stains from shoes, handbags, and car interiors, the same principle applies to a wide range of surfaces. Try it on your boat upholstery, your outdoor furniture, or even your swimwear. Just be sure to test a small, inconspicuous area first to ensure compatibility, especially with delicate fabrics or painted surfaces.
Speaking of variations, consider the type of toothpaste you use. While a standard white toothpaste works best, you can experiment with gel-based toothpastes for more delicate materials. For particularly stubborn stains, you can also try mixing the toothpaste with a small amount of baking soda to create a more potent cleaning paste. Remember to always use a soft cloth or brush to avoid scratching the surface.
And for those of you dealing with salt water stains on leather, a leather conditioner applied after cleaning with toothpaste will help restore moisture and prevent cracking. This is especially important for items that are frequently exposed to the elements.
Ultimately, this DIY trick is about empowering you to take control of your belongings and protect them from the damaging effects of salt water. It’s about saving you money, reducing waste, and achieving professional-quality results with minimal effort.
We are confident that you’ll be amazed by the effectiveness of this simple solution. So, grab a tube of toothpaste, gather your stained items, and get ready to witness the magic. Don’t let salt water stains ruin your favorite things any longer.
Now, we want to hear from you! Have you tried this DIY trick for removing salt water stains? What were your results? Do you have any tips or variations to share? Head over to the comments section and let us know. Your experiences can help others discover the power of this simple yet effective solution. Share your before-and-after photos, your favorite toothpaste brands, and any challenges you encountered along the way. Let’s create a community of salt water stain warriors, armed with toothpaste and a determination to keep our belongings looking their best! We encourage you to share this article with your friends and family who might also benefit from this helpful tip. Together, we can conquer those pesky salt water stains and enjoy our coastal lifestyles to the fullest! Remember, a little toothpaste can go a long way in preserving your cherished possessions.
Frequently Asked Questions (FAQs)
What kind of toothpaste works best for removing salt water stains?
Generally, a plain white toothpaste (not gel) is recommended. The mild abrasives in the toothpaste help to lift the salt crystals without being too harsh on the material. Avoid using whitening toothpastes, as they may contain bleaching agents that could discolor some surfaces. For delicate materials, you might experiment with a gel-based toothpaste, but always test in an inconspicuous area first.
Can I use this method on all types of materials?
While this method is generally safe for many materials, it’s crucial to test it on a small, hidden area first. This is especially important for delicate fabrics, painted surfaces, and certain types of leather. If you notice any discoloration or damage, discontinue use immediately. For porous materials, the toothpaste might be harder to remove completely, so use it sparingly.
How do I remove the toothpaste residue after cleaning the salt water stain?
After applying the toothpaste and gently scrubbing the stain, use a clean, damp cloth to wipe away the residue. You may need to repeat this process several times to ensure all the toothpaste is removed. For fabrics, you can also use a vacuum cleaner with a brush attachment to remove any remaining residue. Make sure the area is completely dry after cleaning to prevent mold or mildew growth.
What if the salt water stain is really stubborn?
For particularly stubborn stains, you can try a few things. First, let the toothpaste sit on the stain for a longer period (up to 30 minutes) before scrubbing. You can also try mixing the toothpaste with a small amount of baking soda to create a more abrasive cleaning paste. Another option is to use a soft-bristled brush (like a toothbrush) to gently scrub the stain. Remember to always test in an inconspicuous area first and avoid excessive pressure, which could damage the material.
Will this method work on salt water stains on car interiors?
Yes, this method can be effective for removing salt water stains from car interiors, especially on fabric seats and carpets. However, be extra careful when working on leather or vinyl surfaces. Test the toothpaste in a hidden area first, and use a very small amount. After cleaning, be sure to thoroughly wipe away all the toothpaste residue and allow the area to dry completely. You may also want to apply a leather conditioner to leather surfaces to prevent cracking.
How can I prevent salt water stains in the future?
Prevention is always better than cure! If you know you’ll be exposed to salt water, try to protect your belongings as much as possible. For example, wear waterproof shoes or sandals when walking on the beach. Use a waterproof bag to protect your belongings from splashes. Regularly rinse off any items that have been exposed to salt water with fresh water. You can also apply a protective coating to certain surfaces, such as leather or fabric protectors, to help repel water and prevent stains.
Is there a specific brand of toothpaste that works best?
There isn’t a specific brand that is universally recommended, but generally, a basic, non-gel, white toothpaste works best. The key is the mild abrasive quality, not necessarily the brand. Experiment with what you have on hand, but always test in a hidden area first.
Can I use this method on delicate fabrics like silk or wool?
Using toothpaste on delicate fabrics like silk or wool is generally not recommended. The abrasives in toothpaste, even mild ones, can damage the fibers of these materials. It’s best to consult a professional cleaner for these types of fabrics. If you absolutely must try it yourself, test in a very inconspicuous area and use a very small amount of gel-based toothpaste, gently blotting instead of scrubbing.
What other household items can I use to remove salt water stains?
Besides toothpaste, you can try using a mixture of white vinegar and water (1:1 ratio) to remove salt water stains. Apply the mixture to the stain, let it sit for a few minutes, and then blot it dry with a clean cloth. Baking soda paste can also be effective for some stains. Always test any cleaning solution in a hidden area first to ensure it doesn’t damage the material.
How often should I clean items exposed to salt water?
The frequency of cleaning depends on how often the items are exposed to salt water. If you use something frequently near the ocean, like a beach bag or watersports equipment, cleaning it after each use is a good idea. For items that are only occasionally exposed, cleaning them as soon as you notice a salt water stain is sufficient. Regular cleaning will prevent the stains from becoming deeply embedded and more difficult to remove.

Leave a Comment