

Wooden Cutting Board Care: It’s more than just a chore; it’s an act of love for a kitchen staple that’s been around for centuries! From ancient Roman butchers using thick wooden blocks to modern chefs relying on sleek bamboo boards, wood has always been a trusted surface for food preparation. But let’s be honest, are you giving your trusty wooden cutting board the TLC it deserves? I know I haven’t always!
We’ve all been there – hastily wiping it down after chopping onions, maybe giving it a quick scrub, and then tossing it back in the drawer. But neglecting your wooden cutting board can lead to unsightly stains, lingering odors, and even, *gasp*, bacteria growth. Yikes! That’s where these simple, yet effective, DIY tricks come in.
This article is your ultimate guide to wooden cutting board care. I’m going to share easy-to-follow steps and natural solutions to keep your board looking beautiful, smelling fresh, and, most importantly, safe for food preparation. Because a well-maintained cutting board isn’t just about aesthetics; it’s about protecting your health and extending the life of a valuable kitchen tool. So, grab your board, and let’s get started!
Revive Your Beloved Wooden Cutting Board: A DIY Guide
Hey there, fellow DIY enthusiasts! I’m so excited to share my tried-and-true method for restoring wooden cutting boards. We all know how much we rely on these workhorses in the kitchen, but over time, they can become dry, scratched, and just plain sad-looking. But don’t despair! With a little elbow grease and a few simple ingredients, you can bring your wooden cutting board back to life and keep it looking its best for years to come.
What You’ll Need
Before we dive in, let’s gather our supplies. This is a pretty straightforward project, so you probably already have most of these items on hand.
* Coarse Salt: I prefer kosher salt, but any coarse salt will do. It acts as a gentle abrasive to help scrub away grime.
* Lemon: The acidity of the lemon helps to disinfect and deodorize the board. Plus, it smells amazing!
* White Vinegar (Optional): For extra disinfecting power, especially if you’ve been cutting raw meat.
* Food-Grade Mineral Oil: This is crucial for rehydrating the wood and preventing it from cracking. Don’t use vegetable oil, olive oil, or any other cooking oil, as they can go rancid.
* Beeswax (Optional): To create a cutting board butter for extra protection and water resistance.
* Clean Rags or Paper Towels: For wiping and buffing.
* Scraper or Spatula: To remove any stubborn debris.
* Sandpaper (Various Grits): 80 grit, 120 grit, 220 grit, and 320 grit. This is only necessary if your board has deep scratches or gouges.
* Sanding Block (Optional): Makes sanding easier and more even.
* Double Boiler or Microwave-Safe Bowl: For melting beeswax (if using).
* Heat-Resistant Container: For storing your homemade cutting board butter (if using).
Step-by-Step Restoration Process
Okay, let’s get started! I’m going to walk you through each step, so you can follow along easily.
Phase 1: Cleaning and Disinfecting
This is the foundation of the whole process. A clean board is a happy board!
1. Scrape Away Debris: Use a scraper or spatula to remove any loose food particles or dried-on gunk from the surface of the cutting board. I find this step really helps to get a head start on the cleaning process.
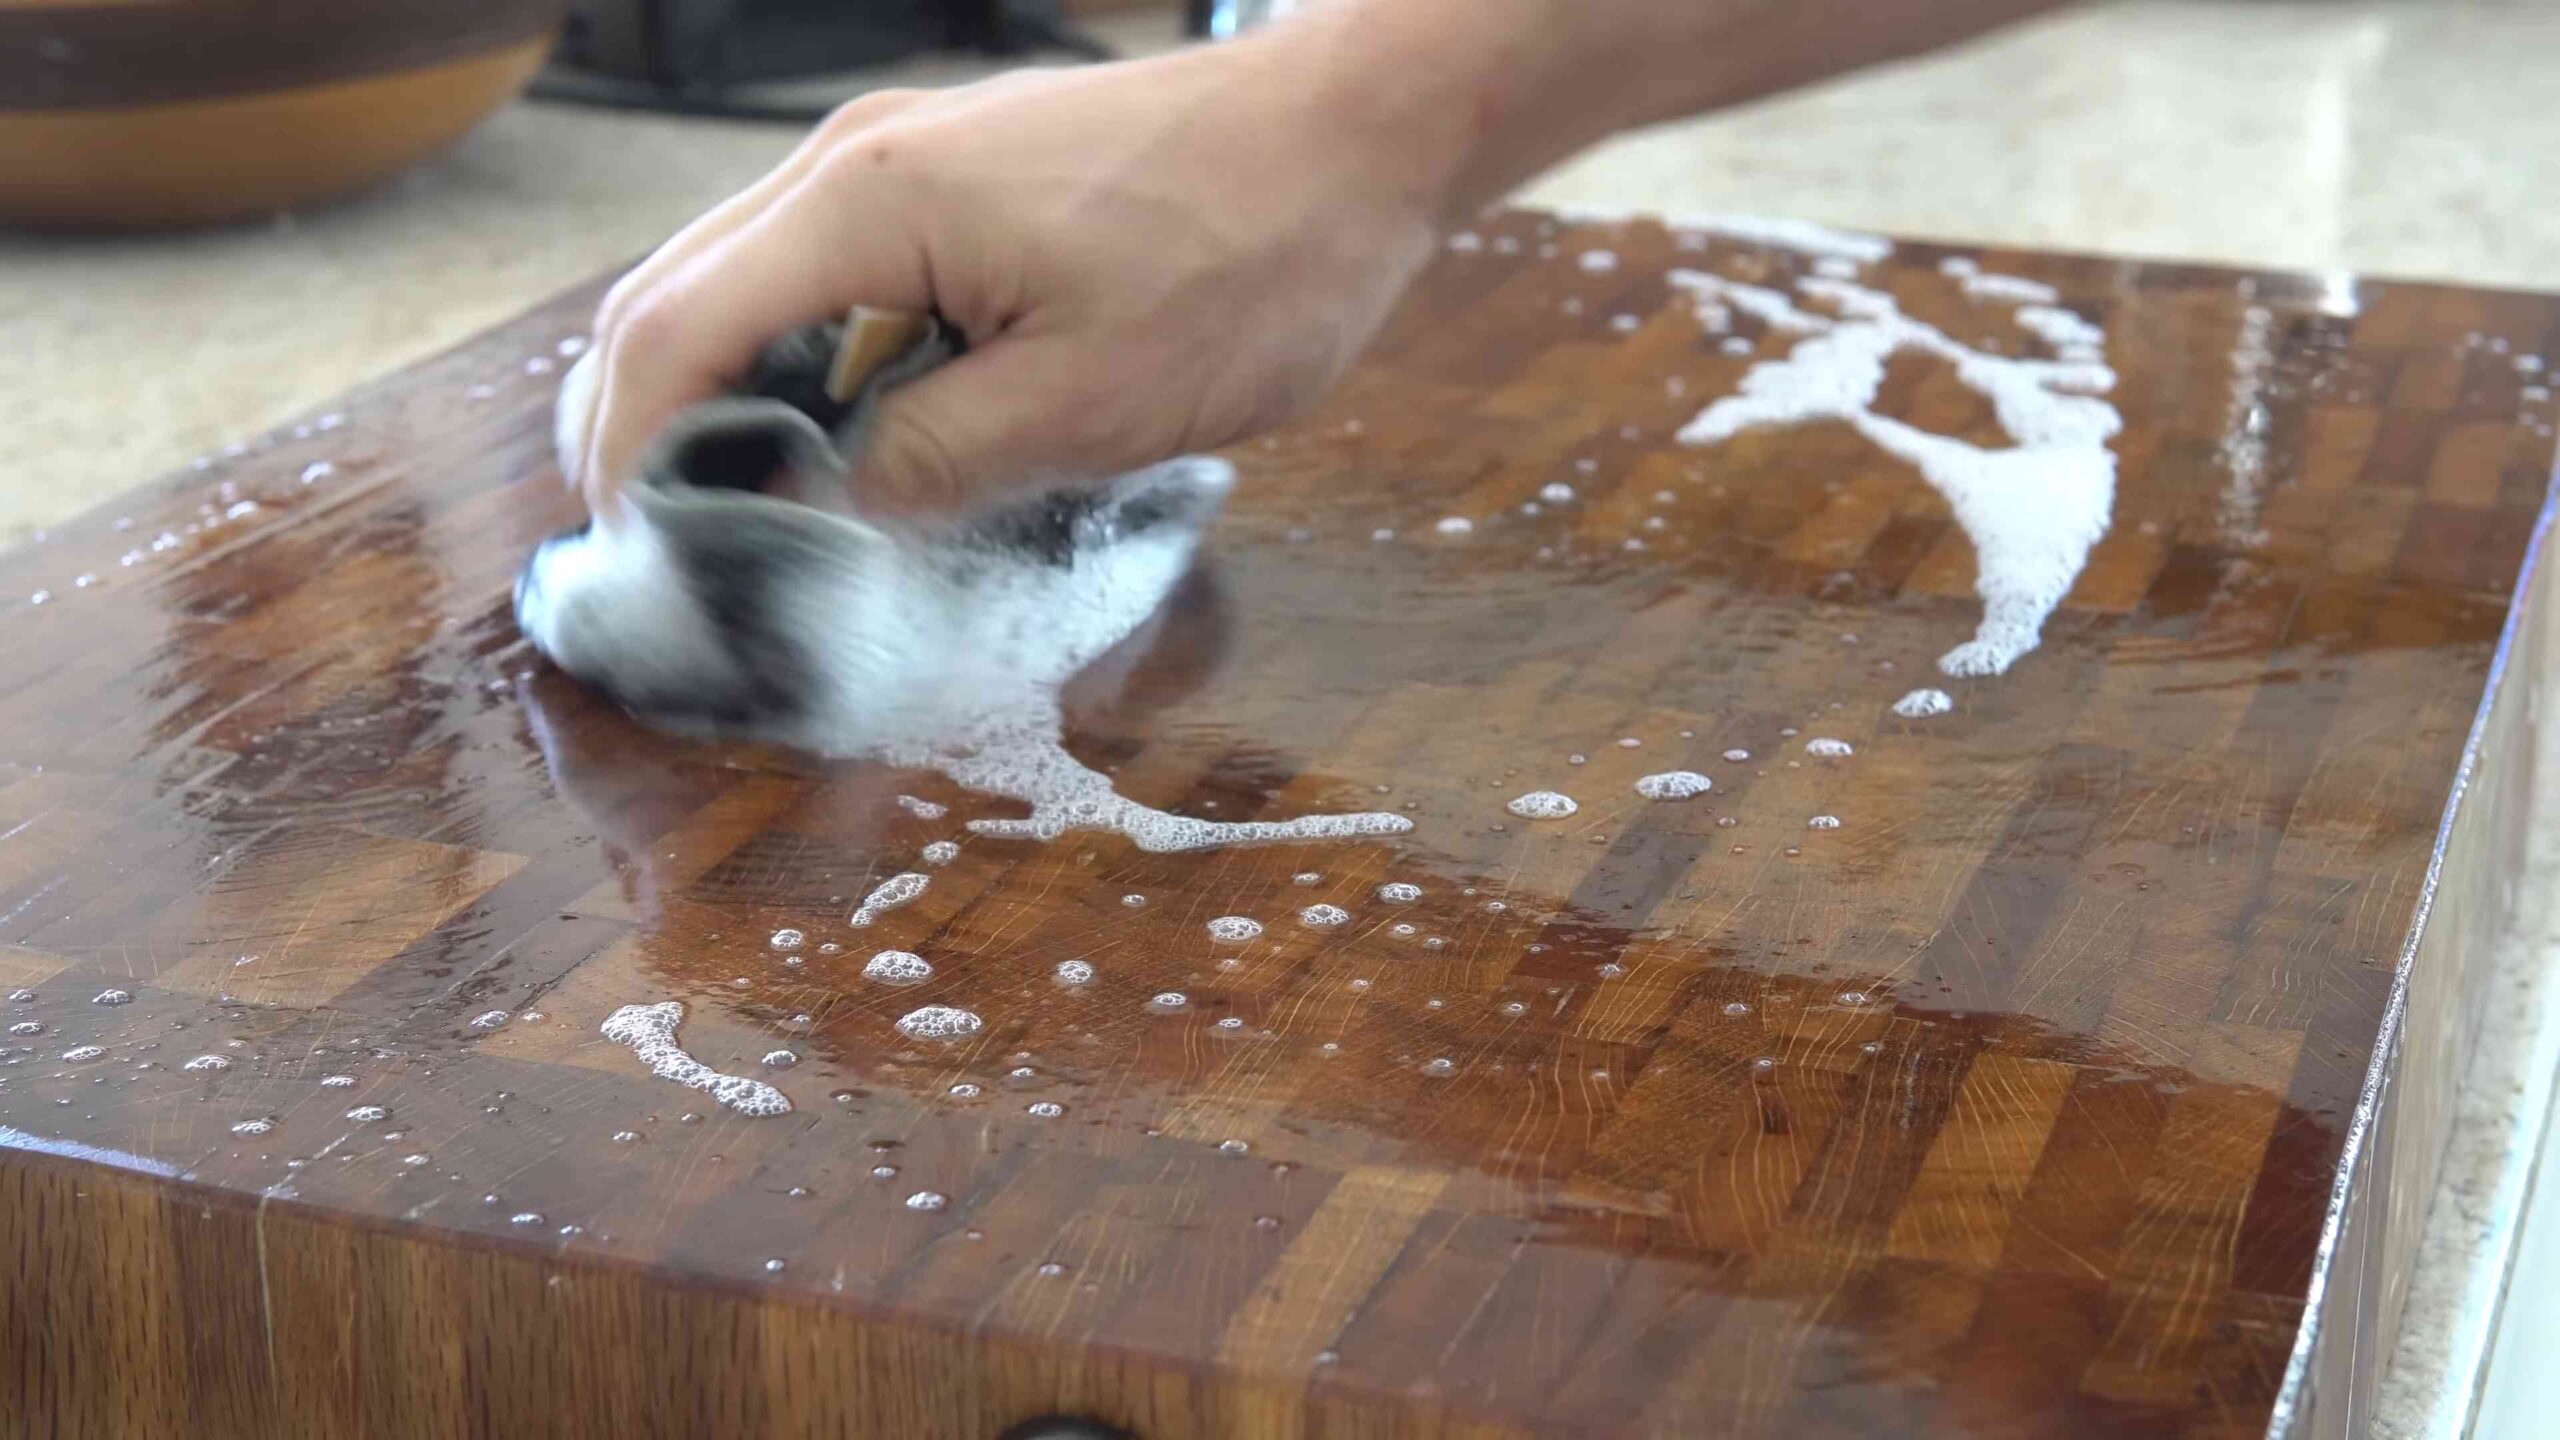
2. Salt and Lemon Scrub: Sprinkle a generous amount of coarse salt over the entire surface of the cutting board. Cut a lemon in half and use one half to scrub the salt into the wood. Apply firm pressure and work in circular motions. The salt acts as an abrasive, while the lemon disinfects and deodorizes. I love the fresh scent!
3. Vinegar Boost (Optional): If you want an extra layer of disinfection, especially if you’ve been cutting raw meat, you can lightly spray the board with white vinegar after the salt and lemon scrub. Let it sit for a few minutes, then proceed to the next step.
4. Rinse Thoroughly: Rinse the cutting board thoroughly with warm water, making sure to remove all traces of salt and lemon.
5. Dry Completely: Pat the cutting board dry with a clean rag or paper towel. Then, let it air dry completely. This is crucial! You don’t want to trap any moisture in the wood, as that can lead to mold or mildew. I usually leave mine to dry overnight.
Phase 2: Sanding (If Necessary)
This step is only needed if your cutting board has deep scratches, gouges, or uneven surfaces. If your board is in relatively good condition, you can skip this phase and move on to oiling.
1. Assess the Damage: Take a good look at your cutting board and identify any areas that need sanding.
2. Start with Coarse Grit: If you have deep scratches, begin with 80-grit sandpaper. If the scratches are less severe, you can start with 120-grit. Attach the sandpaper to a sanding block (optional) for easier handling.
3. Sand with the Grain: Sand the cutting board in the direction of the wood grain. Apply even pressure and avoid sanding in circles, as this can create uneven surfaces.
4. Progress to Finer Grits: After sanding with the coarse grit, move on to the next finer grit (120, then 220, then 320). Each time you switch to a finer grit, you’re smoothing out the scratches left by the previous grit. Remember to always sand with the grain.
5. Dust Off: After sanding, use a clean rag or brush to remove all the sanding dust from the cutting board. You can also use a vacuum cleaner with a brush attachment.
Phase 3: Oiling and Conditioning
This is the most important step for restoring and protecting your wooden cutting board. Oiling rehydrates the wood, prevents it from cracking, and helps to repel water and food stains.
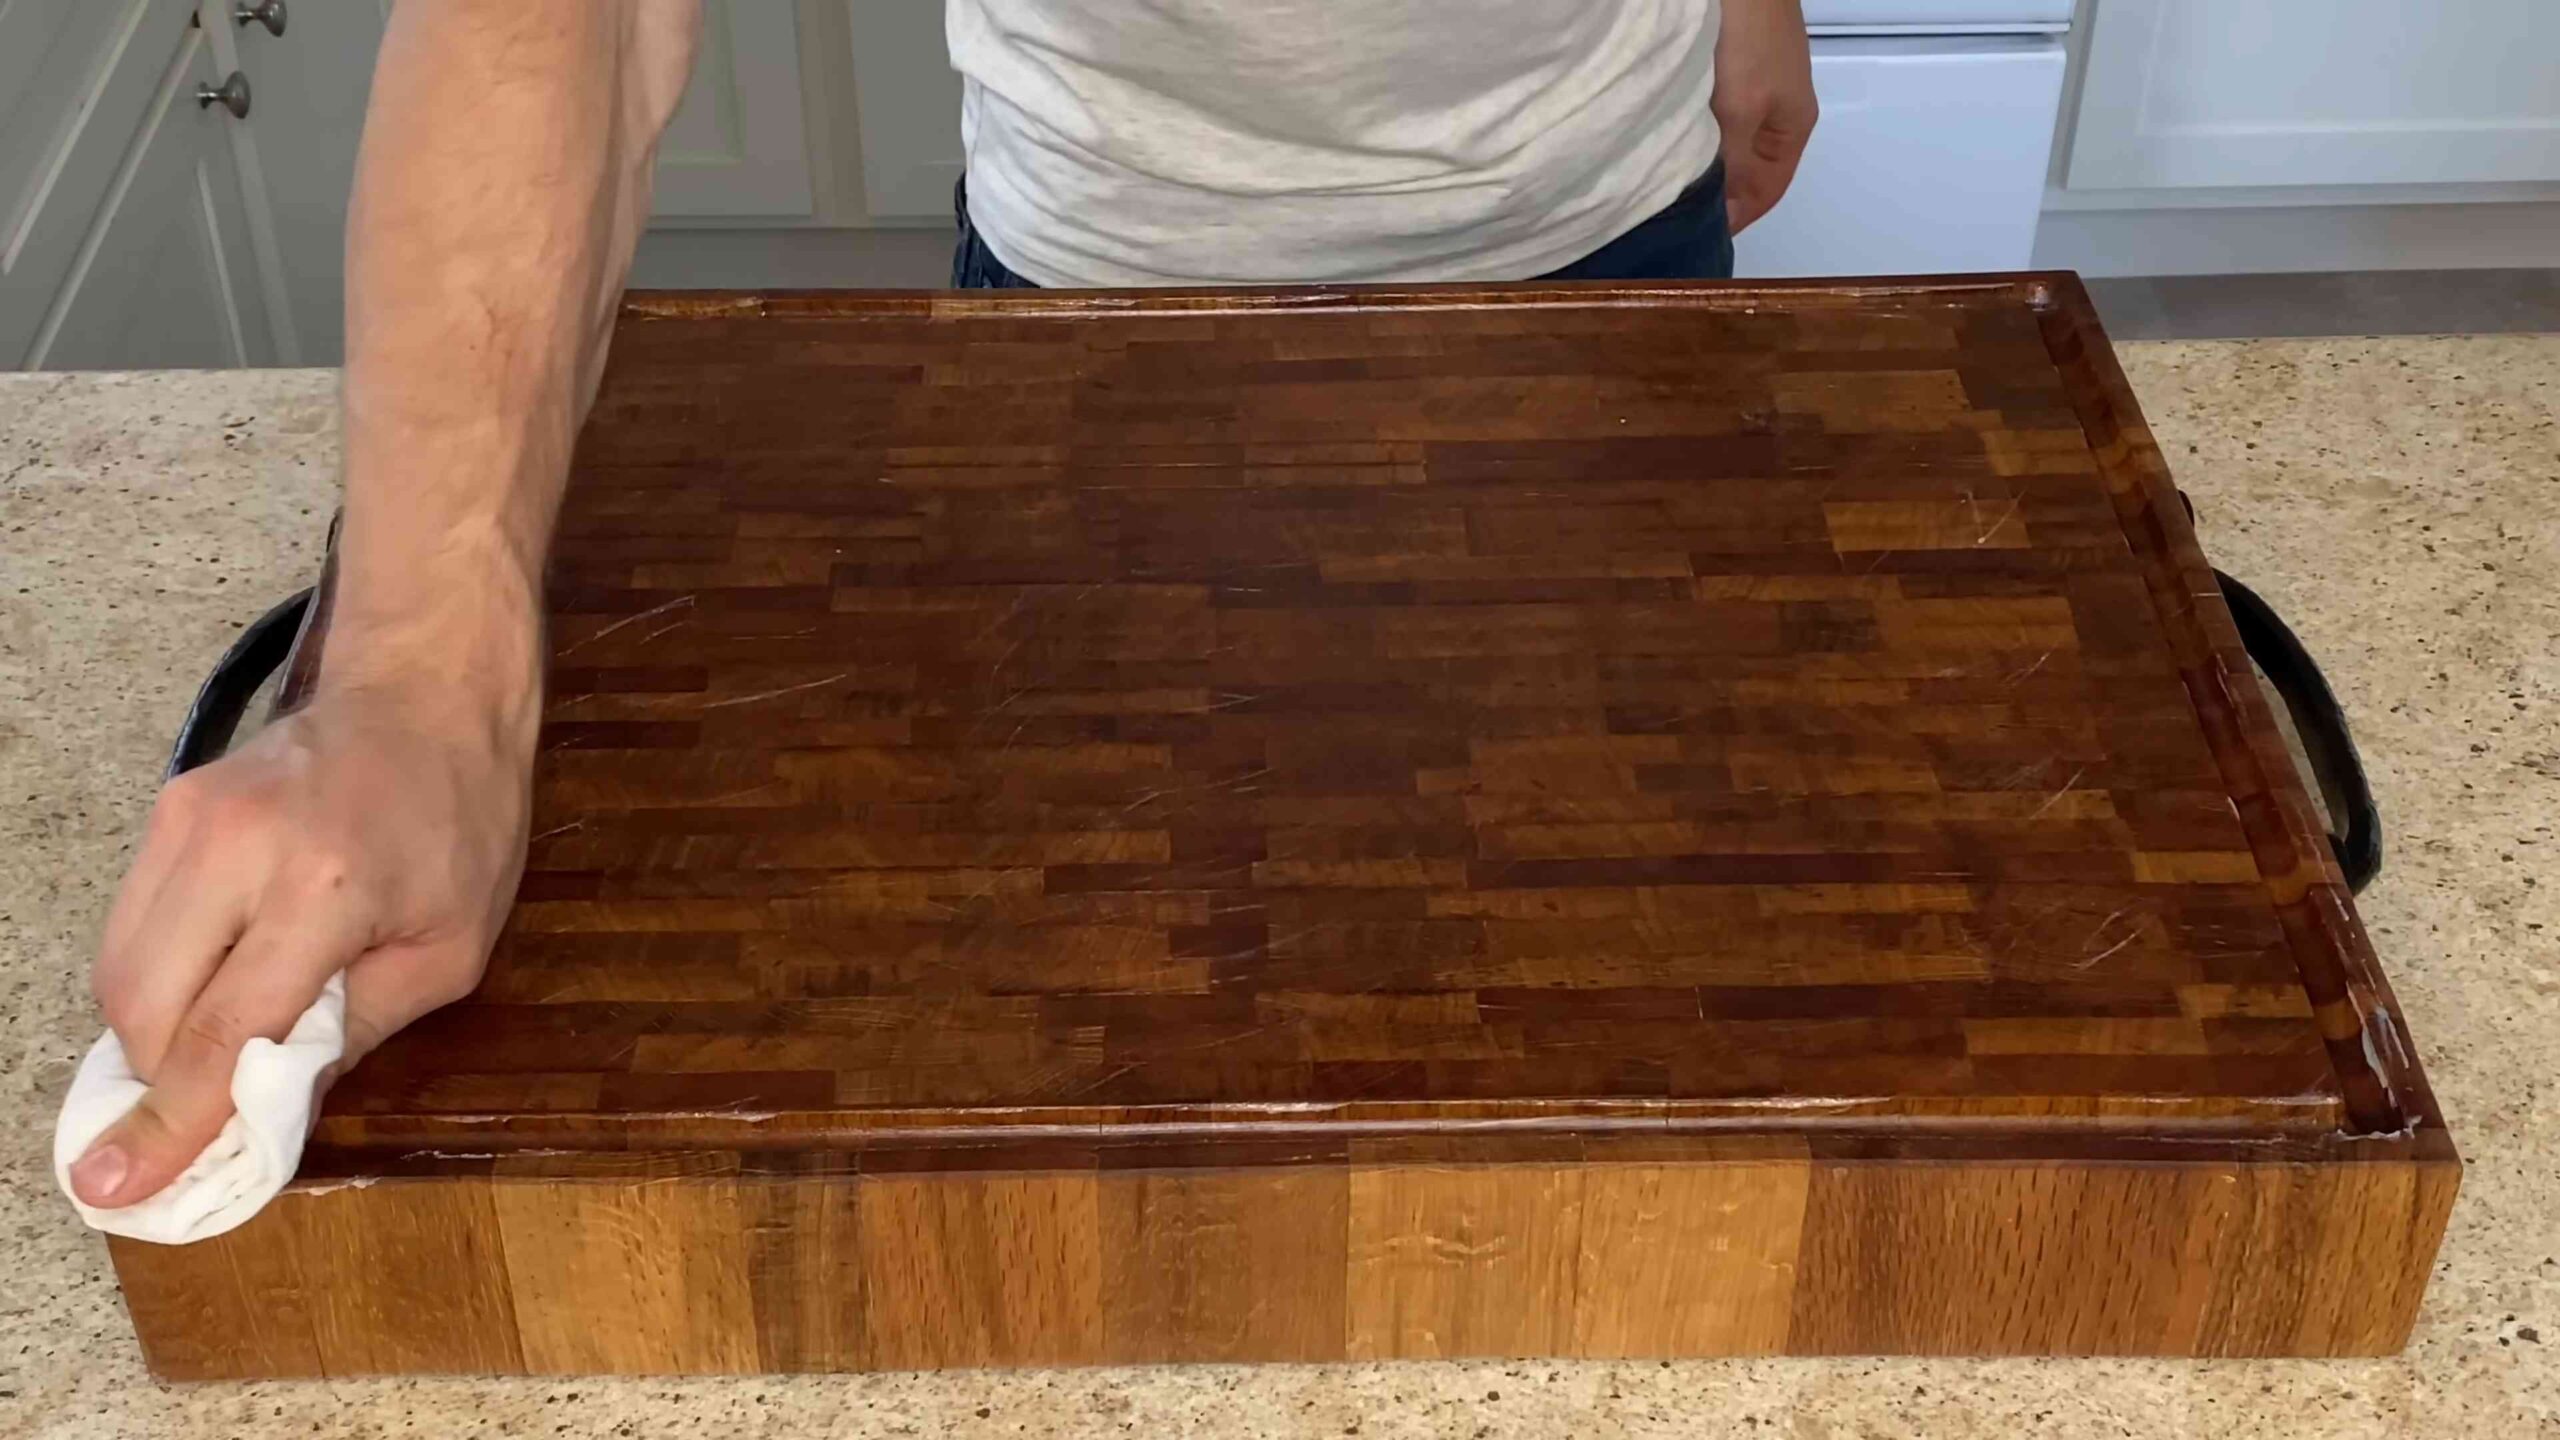
1. Apply Mineral Oil: Pour a generous amount of food-grade mineral oil onto the cutting board.
2. Rub it In: Use a clean rag or paper towel to rub the oil into the wood, working it in thoroughly. Pay special attention to the end grain, as this is where the wood is most absorbent.
3. Let it Soak: Allow the oil to soak into the wood for at least a few hours, or preferably overnight. The longer it soaks, the better. You’ll notice that the wood will absorb the oil and become darker.
4. Apply More Oil (If Needed): After the initial soaking, check the cutting board to see if it has absorbed all the oil. If there are still dry spots, apply another coat of oil and let it soak for a few more hours.
5. Wipe Off Excess Oil: After the oil has soaked in, use a clean rag or paper towel to wipe off any excess oil from the surface of the cutting board. You don’t want the board to feel sticky or greasy.
Phase 4: Creating and Applying Cutting Board Butter (Optional)
This step adds an extra layer of protection and water resistance to your cutting board. Cutting board butter is a mixture of mineral oil and beeswax.
1. Melt the Beeswax: In a double boiler or microwave-safe bowl, melt the beeswax. If using a microwave, heat in 30-second intervals, stirring in between, until completely melted.
2. Combine with Mineral Oil: Once the beeswax is melted, slowly pour in the mineral oil, stirring constantly until the mixture is smooth and well combined. A good ratio is about 1 part beeswax to 4 parts mineral oil, but you can adjust the ratio to your liking. More beeswax will result in a harder butter, while less beeswax will result in a softer butter.
3. Let it Cool and Harden: Pour the mixture into a heat-resistant container and let it cool and harden completely. This may take several hours.
4. Apply the Cutting Board Butter: Once the cutting board butter is solid, use a clean rag or paper towel to apply a thin layer to the cutting board.
5. Buff it In: Use a clean, dry rag to buff the cutting board butter into the wood. This will help to create a smooth, water-resistant finish.
6. Let it Sit: Allow the cutting board butter to sit on the board for a few hours, or preferably overnight, before using the cutting board.
Maintaining Your Restored Cutting Board
Now that you’ve put in all this effort to restore your cutting board, you’ll want to keep it looking its best. Here are a few tips for maintaining your restored cutting board:
* Wash After Each Use: Wash your cutting board with warm, soapy water after each use. Avoid using harsh detergents or putting it in the dishwasher, as this can damage the wood.
* Dry Thoroughly: Always dry your cutting board thoroughly after washing it.
* Oil Regularly: Re-oil your cutting board every few weeks, or whenever it starts to look dry.
* Sanitize Periodically: Sanitize your cutting board periodically with a mixture of white vinegar and water.
* Store Properly: Store your cutting board in a dry place, away from direct sunlight or heat.
Troubleshooting
Sometimes, things don’t go exactly as planned. Here are a few common issues you might encounter and how to fix them:
* Cutting Board is Still Dry After Oiling: If your cutting board is still dry after oiling, it may need more oil. Apply another coat of oil and let it soak for a longer period of time.
* Cutting Board is Sticky After Oiling: If your cutting board is sticky after oiling, you may have applied too much oil. Wipe off
Conclusion
So, there you have it! Reviving and maintaining your wooden cutting board isn’t some arcane art reserved for master woodworkers. It’s a simple, satisfying process that anyone can do at home with just a few readily available ingredients. We’ve shown you how to clean, sanitize, and most importantly, how to create your own DIY cutting board oil, a crucial step in extending the life and beauty of your beloved kitchen workhorse.
Why is this DIY trick a must-try? Because it’s cost-effective, environmentally friendly, and gives you complete control over the ingredients. Commercial cutting board oils can be expensive and sometimes contain additives you might not want coming into contact with your food. By making your own, you know exactly what’s going on your board – typically just mineral oil and beeswax, both food-safe and readily available. Plus, the satisfaction of knowing you’re taking excellent care of your tools is a reward in itself.
But don’t stop there! Feel free to experiment with variations. For a subtle, pleasant aroma, consider infusing your oil with a few drops of food-grade essential oils like lemon or rosemary. Just be sure they are truly food-grade and used sparingly. Another variation involves adding a small amount of carnauba wax to the beeswax and mineral oil mixture for an even harder, more durable finish. This is particularly useful for boards that see heavy use. You can also adjust the ratio of beeswax to mineral oil to achieve your desired consistency. A higher beeswax content will result in a thicker, more paste-like finish, while less beeswax will create a thinner, more easily absorbed oil.
Ultimately, the best way to discover what works best for you and your cutting board is to simply try it! We’re confident that once you experience the difference a properly oiled and maintained cutting board makes, you’ll never go back. It will not only look better but will also be more hygienic and last significantly longer.
So, grab your ingredients, follow our simple steps, and give your wooden cutting board the TLC it deserves. We’re eager to hear about your experiences! Share your before-and-after photos, your favorite variations, and any tips or tricks you discover along the way in the comments below. Let’s build a community of happy, well-oiled cutting board enthusiasts! Your feedback will help others learn and improve their own cutting board care routines. Happy oiling!
Frequently Asked Questions (FAQ)
What kind of mineral oil should I use for my DIY cutting board oil?
You absolutely must use food-grade mineral oil. This type of mineral oil is highly refined and safe for contact with food. Do not use industrial or medicinal mineral oil, as these may contain impurities that are harmful if ingested. You can typically find food-grade mineral oil at pharmacies, kitchen supply stores, or online retailers. Look for labels that specifically state “food-grade” or “safe for cutting boards.” Using the wrong type of mineral oil can contaminate your cutting board and potentially pose a health risk.
How often should I oil my wooden cutting board?
The frequency of oiling depends on how often you use your cutting board and the humidity of your environment. As a general rule, oil your board whenever it starts to look dry or feels rough to the touch. This could be as often as once a week for heavily used boards in dry climates, or as infrequently as once a month for boards that are used less often in more humid environments. A good way to test if your board needs oiling is to sprinkle a few drops of water on the surface. If the water beads up, the board is still adequately oiled. If the water soaks in quickly, it’s time to re-oil. Regular oiling is key to preventing your board from cracking, warping, or harboring bacteria.
Can I use other types of oil besides mineral oil?
While mineral oil is the most commonly recommended oil for cutting boards due to its food safety, stability, and lack of odor or taste, some people prefer to use other oils. If you choose to use an alternative, make sure it’s a drying oil that is food-safe and won’t go rancid easily. Some options include walnut oil, coconut oil (fractionated), and linseed oil (food-grade). However, be aware that walnut oil can be an allergen for some people, and coconut oil can sometimes impart a slight flavor. Olive oil is generally not recommended as it can become sticky and rancid over time. Always research the properties of any oil before using it on your cutting board to ensure it’s a safe and suitable choice.
How much beeswax should I use in my DIY cutting board oil?
The ideal ratio of beeswax to mineral oil is typically around 1 part beeswax to 4 or 5 parts mineral oil. This will create a balm that is easy to apply and provides a good level of protection. You can adjust the ratio to suit your preferences. More beeswax will result in a thicker, more paste-like balm, while less beeswax will create a thinner, more liquid oil. Start with the recommended ratio and experiment to find what works best for you. Remember that a little beeswax goes a long way, so it’s better to start with less and add more as needed.
How do I clean my wooden cutting board before oiling it?
Proper cleaning is essential before oiling your cutting board. Start by scraping off any food debris with a bench scraper or spatula. Then, wash the board with hot, soapy water and a scrub brush. Be sure to scrub thoroughly to remove any lingering food particles. Rinse the board well with hot water and pat it dry with a clean towel. For extra sanitization, you can sprinkle the board with coarse salt and rub it with half a lemon. The salt acts as an abrasive, while the lemon juice has antibacterial properties. Rinse the board again and dry it thoroughly. Allow the board to air dry completely before applying the oil. This will prevent moisture from being trapped under the oil, which can lead to mold or mildew growth.
How do I apply the DIY cutting board oil?
Once your cutting board is clean and dry, you’re ready to apply the oil. Pour a generous amount of the DIY cutting board oil onto the surface of the board. Use a clean cloth or paper towel to spread the oil evenly over the entire surface, working it into the grain of the wood. Pay particular attention to the edges and end grain, as these areas tend to dry out more quickly. Allow the oil to soak in for at least a few hours, or preferably overnight. After the oil has had time to absorb, wipe off any excess with a clean cloth. You may need to apply multiple coats of oil, especially if the board is very dry. Repeat the process until the wood is saturated and no longer absorbs the oil readily.
How do I store my DIY cutting board oil?
Store your DIY cutting board oil in an airtight container in a cool, dark place. A glass jar with a tight-fitting lid is ideal. This will help to prevent the oil from oxidizing and going rancid. Properly stored, your DIY cutting board oil should last for several months. Check the oil periodically for any signs of spoilage, such as a foul odor or discoloration. If the oil appears to be rancid, discard it and make a fresh batch.
Can I use this DIY cutting board oil on other wooden kitchen items?
Yes, you can use this DIY cutting board oil on other wooden kitchen items, such as wooden spoons, salad bowls, and rolling pins. The same principles of cleaning and oiling apply. Just make sure the wood is clean and dry before applying the oil, and allow it to soak in thoroughly before wiping off any excess. Regular oiling will help to protect these items from drying out, cracking, and warping, and will also enhance their natural beauty.

Leave a Comment